Category Archives: Tommy Paints

Primitive Nativity

lori craig tommyart thibra better family2_600

In the spirit of the season, today I’m sharing a nativity project that I have noticed on several crafting sites in the last few years, and wanted to create for myself.

lori craig tommyart thibra better photo 1 600

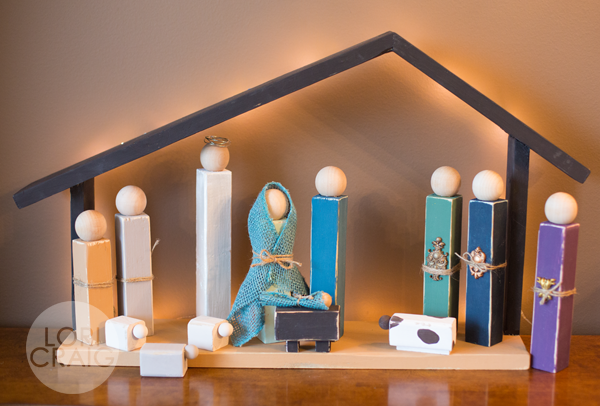
The fun thing about this full nativity project is that it can be scaled back to a few key pieces if you are short on time, and I’m sure I can think of a few new pieces to add next year. It’s the perfect gift for a friendship where small items are exchanged each season – start with Mary, Joseph and the manger. Add the angel, wisemen, shepherds, animals, etc. in future years.

I’m thankful for my friend Darcie who helped in anticipation of Christmas, and we created three full nativity sets in just 2 hours (plus a 24-hour rest for glue to cure!).  Supplies from Tommy ART, Thibra and Better Ultimate Adhesive take this project from simple to striking, and the first-rate quality of the supplies means the sets will be enjoyed for years to come.

SUPPLY LIST 

A few affiliate links to reputable sources have been used in this post at no additional cost to the buyer.

Directions for Creating the People

lori craig tommyart thibra better family 600

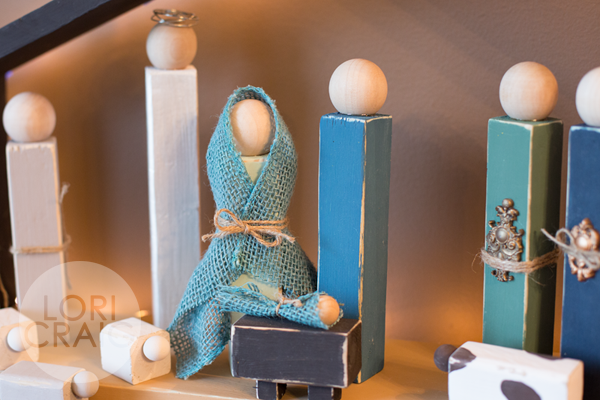
Step 1: Cut your character pieces from the 2×2 lumber and quickly sand to smooth any rough edges, especially at cuts on each end. We used a circular saw. Please be sure to wear your safety glasses – a great idea when snipping dies, too! (Ask me how I know!) 

You have some flexibility, but these measurements seemed to work well with proportion of the 1 ½” knob heads. The measurements and colors of this set as shown this set are:

  • Joseph – Tommy ART Petroleum – 6 ¾”
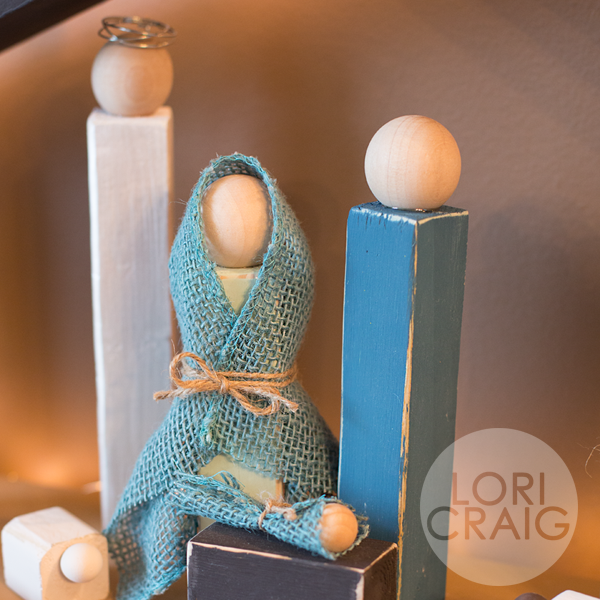
  • Mary – Tommy ART Pale Blue – 6”
  • Angel – Tommy ART Metallic Pearl – 8”
  • Manger – Tommy ART Brown Black – 3”
  • Shepherd 1 – Tommy ART Dove Grey – 5”
  • Shepherd 2 – Tommy ART Wheat  – 6”
  • 3 Wiseman – Tommy ART Avocado, Plum and Navy Blue – 7” each
  • Donkey – Tommy ART Dove Grey – 2”
  • Sheep (cut 2) – Tommy ART Cashmere – 1 ½” each  
  • Cow – Milk and Dark Brown – 3”

The stable shown here is made entirely of scrap wood. My friend Darcie whipped this together for me – in 10 minutes, and I do not have a pattern or angles for the mitered cuts. The base is 6” x 20”. The sides are 7.5” tall on the left and 9.75” tall on the right. The roof pieces are 19.75” and 11.25” long. The pieces were glued with Better Ultimate Adhesive and secured with finishing tacks. The stable was painted with Dark Walnut and Honey Tommy ART Mineral Color.

Step 2: Use a natural bristle brush (these are super affordable at your local craft or discount store!) and apply thin swipes of Tommy ART neutral wax to all of the edges of each 2×2 pieces. Allow the wax to rest about 5 minutes.

Step 3: Paint each of the pieces and allow to dry.  Again, the colors shown here are:

Tip: If painting animal heads, glue heads to the animal bodies before painting. (Better Ultimate Adhesive gluing instructions in step 5)

Continue reading

Seasons Givings Blog Hop

seasons givings blog photo

Welcome, my friends to the 6th annual Seasons Givings Blog Hop! I can’t believe 2017 has come and gone, but I’m thrilled to be hopping today with my favorites and welcoming 2018 with a little bit of papercrafting love for lucky readers. This hop is always a fun way of saying thank you to each of our faithful readers and paper crafting community! So, thank you so very much for stopping by!

If we have never met, my name is Lori Craig, and I love working in our industry. I am the advertising manager for Splitcoaststampers.com – the largest online resource for stamping and papercrafting with forums and the largest cardmaking gallery in the world. I have also worked for 10 years with Imagination International – known to most as the North American home of Copic Marker. I have traveled North America many times over teaching Copic coloring classes, as well as class for other Imagination International brands, like Tommy Art, Terial Magic, and X-Press It.

FullSizeRender 6Today I’m sharing a Christmas card that I created with Tommy Artmineral paints, Timbrillo Paste (for sparkle and shine!) and Stencil Light Paste. This one was fun!

The white background is simply Stencil Light Paste through a swirl stencil design, set aside to dry. The ornaments were painted with a mixture of mineral-based paint and Timbrillo paste, then lightly sanded to release the sparkle.  The border was created with smooth and sparkly Silver Deco Glitter Tape from X-Press It! I simply apply the tape to cardstock and die-cut my frame.  The tape works beautifully for these types of die-cuts. Seams don’t show when pieces of the tape are laid side-by-side, and it cuts beautifully.

FullSizeRender 4

Here is another project I created with the same products, and you can see the shine! The pieces of painted and lightly sanded cardstock were diecut with flowers and feathers from Taylored Expressions, and stamped with a Taylored Expressions stamp – Light as a Feather. I’ve had a lot of fun with this!

Check out my giveaway! 

FullSizeRender 5

Would you like to try some creative fun from Imagination International?

To enter my giveaway, just leave me a comment and let know what type of crafting or hobby you plan to enjoy through the new year…especially if you are exploring something new-to-you!  🙂  I’ll select a winner on January 8th. 

After you leave me a comment to enter my drawing, visit my friend, Lisa Henke!

Rested, Refilled, Ready and a FREE class with me!

FullSizeRender

If you follow me on Facebook, you know my very first crafty act of 2017 was to clean and refill my entire classroom set of Copic Markers – 872 Sketch Markers… ready for awesome students…because all of my students are amazing! #truth

FullSizeRender_2

I did a short marker cleaning and refill video last month that you can find HERE. If you are wondering how long it took for me to get these babies whipped back into shape and ready for student hands, I was able to watch 2.75 seasons of Longmire on Netflix while I worked. I love that show… It’s the perfect blend of John Wayne meets modern day cultural issues. I’ve binged the entire series, and now await the 6th and final season. (sad face here)

FullSizeRender_1

So, now things are all ready to go, and right after CHA, I’m taking the show on the road. I’d love for you to come and take a Copic class with me soon! My upcoming locations are:

  • Portland, OR – February 17 and 18
  • St. Louis, MO – March 3 and 4
  • Richmond, VA – March 17 and 18
  • Vancouver, British Columbia – April 21 and 22
  • Orange, CA – May 5 and 6

tommy paint

Speaking of classes… if you live in the Portland, OR area, and would be intersted in taking a FREE class while I’m in Portland to learn about Tommy Paints – that I blogged about last week – please leave me a comment, and I’ll email the information to you.

tommy techniques

The class is in Vancouver, WA on Friday, February 17th from 5:00 – 8:00pm with instruction, product information and two fun projects! And, IT IS FREE! Hurry! Space is limited!

See you soon!

Amazing *A* Decor with Tommy Art Paints

FullSizeRender (84)

Home from CHA today! It’s always wonderful to see new products and connect with so many crafty people. Crafty people are good people.

I also loved learning more about a new product from Imagination International – the Copic Marker people – called Tommy Art Paints. It’s a line of fluid Italian chalk paints that applies and dries so smoothly. And, it comes in over 30 rich colors!

I had made this ‘amazing a‘ to take with me as a classroom sample for our Copic Marker workshops, but I thought you might like to see it!

FullSizeRender (81)

I started with a bare wood accent letter from Hobby Lobby and seriously in less than 30 minutes had this cute accent for my daughter’s room! Here’s how I did it:

  1. With a clean 1″ brush, coat wooden letter with Cream Tommy Paint – allow about 5 minutes to dry.
  2. Rub a small amount of Neutral Wax over the edges of the letter with a brush or soft cloth. This allows for a buffer between the layers of paint without damaging your initial layer of cream paint.
  3. With the 1″ brush, coat letter with Vintage Green Tommy Paint – allow about 5 minutes to dry and repeat a second coat of Vintage Green – allow 5 minutes to dry.
  4. With green paint dry, sanding block (I used the same one I use on paper) and lightly brush edges of the wood letter to remove the green paint and expose cream paint below.
  5. Rub small amount of  Neutral Wax onto dry wood piece a soft cloth – allow to dry and buff to sheen with a clean, soft cloth.

FullSizeRender (82)

The felt flowers were cut from an assortment of florals dies – I had borrowed the dies from a friend, and I believe most of them are from MFT or Papertrey, though some may be retired. The felt is from Taylored Expressions – it’s beautiful quality and you can see how crisp and clean the cuts are on the felt. The dainty word ‘amazing’ is from  Amazing Adjective dies – Verve Stamps!

FullSizeRender (89)

This was a project that we completed at a marketing event last Thursday night at CHA. I started with two plain pieces of smooth MDF and created ALL of the texture and wood grain that you see with 4 colors of Tommy Paints, Neutral Wax, a piece of sand paper and the orange impression tool on the top right. I really like these products, and ordered more colors today so that I could show you a tutorial or two!

FullSizeRender_1

Here is my finished plaque – the “thankful” is a textured Volcano Paste that I put through a stencil with a palette knife – love the raised look and feel.  This project took about 25 minutes start to finish – even with the dry time.

FullSizeRender (84)

I am looking forward to painting all-of-the-things now that I know how beautifully these paints perform! I have aspirations for some furniture that’s in my basement, as well as some crafty gift items…. Given a free day, what would you like to paint?