Category Archives: MISTI

Hello There, Beautiful!

Lori Craig Winnie and Walter Tag April2018

If there is one thing I appreciate in a good stamp set, it is versatility!  Can you believe this tag was created with a Winnie and Walter beauty that masquerades as a Christmas stamp set? You can see Victoria’s Very Merry  stamp set HERE.

This was created with Fresh Ink from Impress – and beautiful blooms are layered on scalloped tag from Papertrey Ink.  I’ve been adding the Fresh Inks to my collection after using them several times at retreats and events… they make a beautiful, crisp impression, and they are not soupy or runny… at all.

The sentiment is from another Winnie and Walter beauty, Ashlee’s Rosie Posies set, and embossed with Ranger Princess Gold – I’ve been using that powder a lot because it’s a beautiful, soft gold – not as brassy as it shows in this photo.

Lori Craig Winne and Walter Sympathy April2018

Another Winnie and Walter beauty – with the stamp set, Julie’s Roses. This set was a gift from Winnie and Walter – thank you, Shay!

One of the keys to beautiful clean and simple stamping is precision – I wouldn’t dream of attempting the alignment on this card without my MISTI the most important stamp tool invented. The fill image for the flower and leaves were stamped with Fresh Ink and then embossed over with Princess Gold Embossing Powder.

Speaking of MISTI – save 25% on Studio Bags through the 7th with code: SCSSTUDIOBAG

I loved this design for mass-production – with a sentiment no one wants to send.

And, that is a wrap on this week, friends. I hope your Friday is short and your weekend long! Thanks for looking!

Color My World? Yes, please!

Color My World Full Lori Craig_5877

Color My World! Yes! Extra colorful excitement around here today as I have an opportunity to share beautiful new Premium Matched Inks from Taylored Expressions. TWELVE rich colors in full size ink pads or 1″ cubes that coordinate perfectly with Taylor’s Premium Cardstock. Swoon!

I have been using a lot of bright and bold colors lately, and these certainly spark the creativity!  The Chocolate Truffle and Oreo Hybrid inks offer a nice smooth, dark coverage that dry quickly, and worked well with Copic Markers. The other ten dye inks are fast-drying, fade resistant, archival safe, and offers superior coverage. Let me repeat two words again: superior coverage.

GetInked-600x218

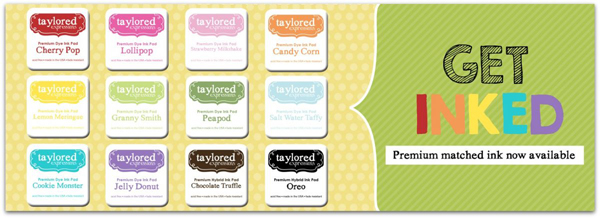
The colors are almost as fun to say as they are to play with. Super sweet, and totally Taylor! … cherry pop, lollipop, strawberry slush, candy corn, lemon meringue, granny smith, peapod, cotton candy, cookie monster and jelly bean! 

Color My World Lori Craig_5880

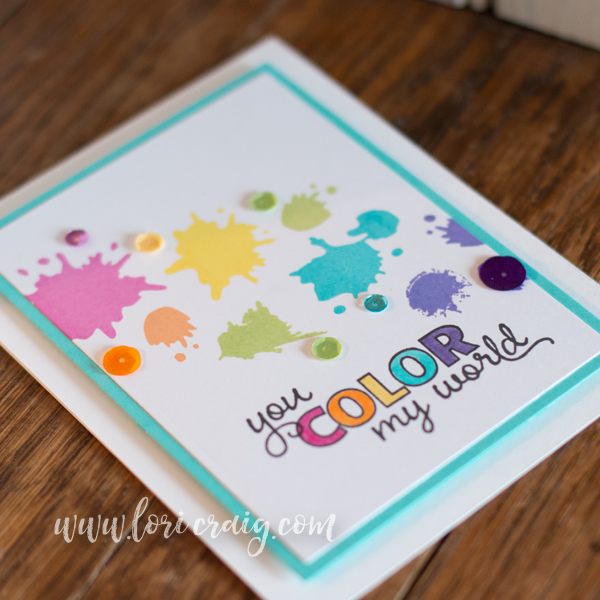
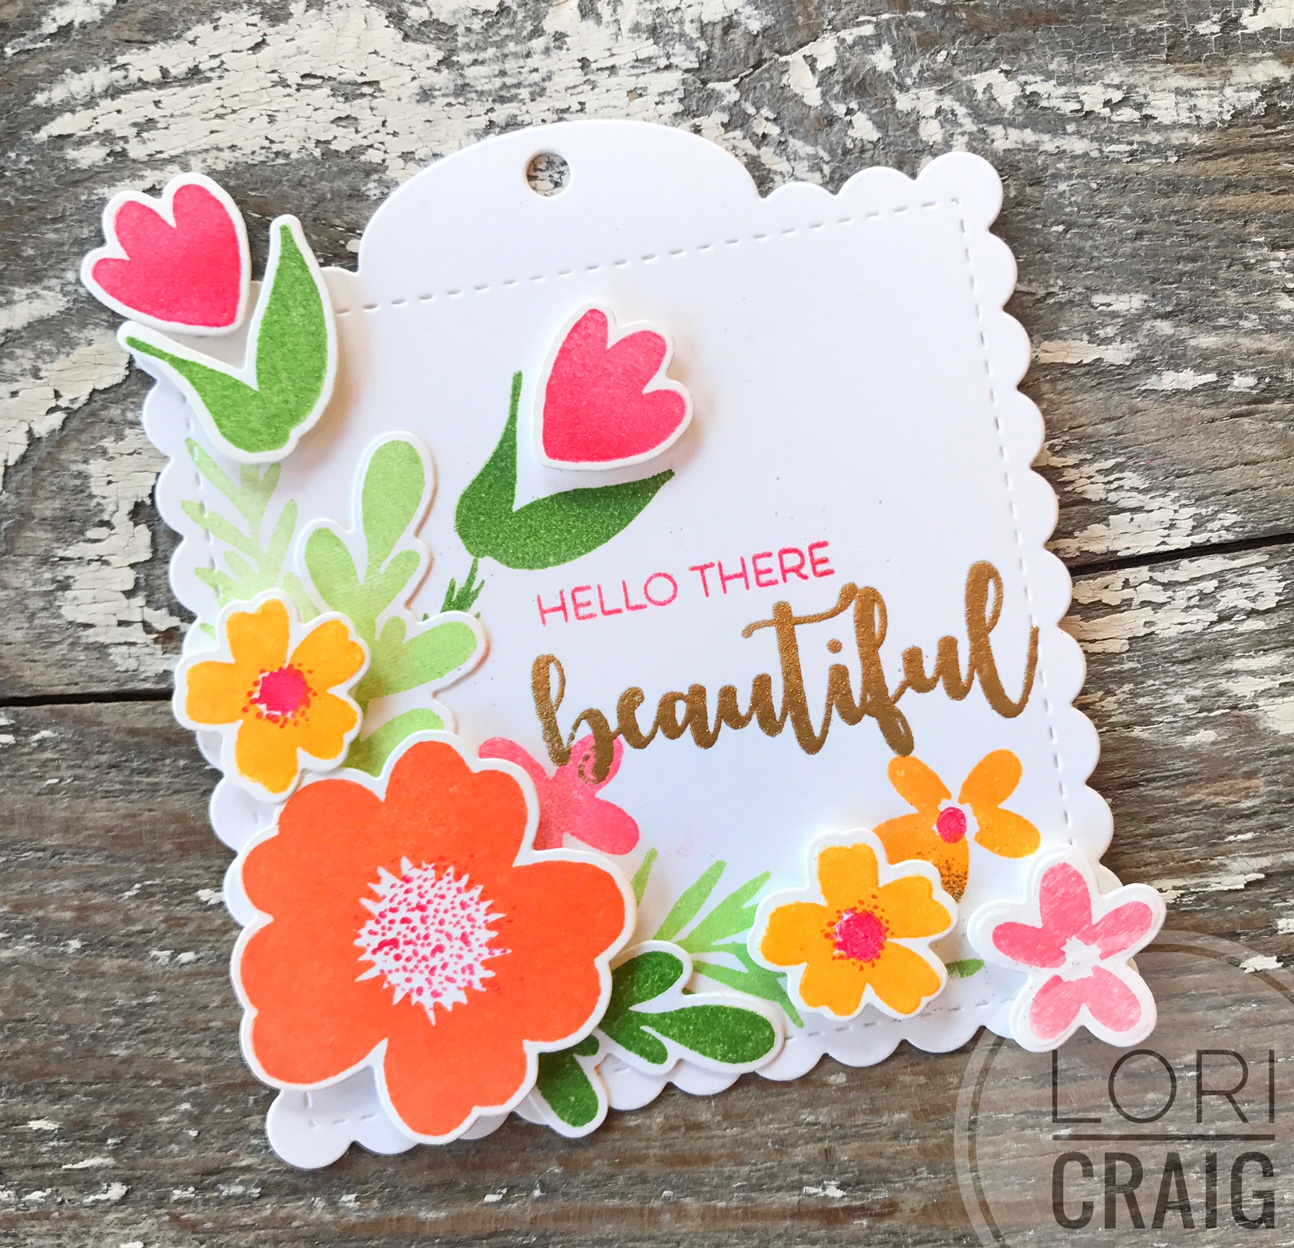
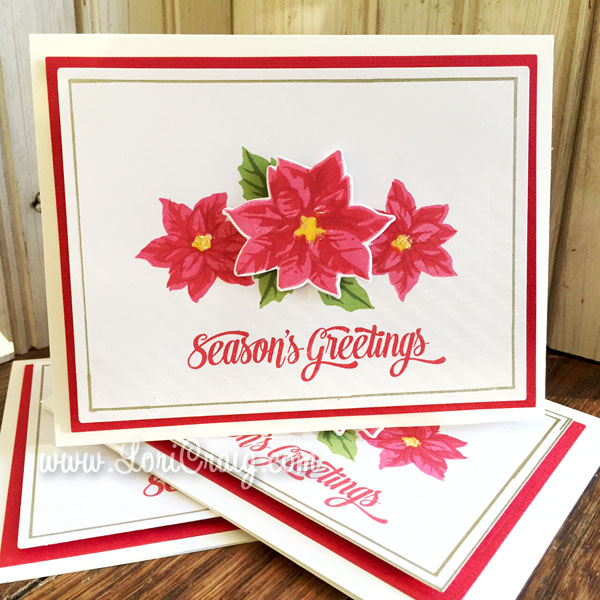
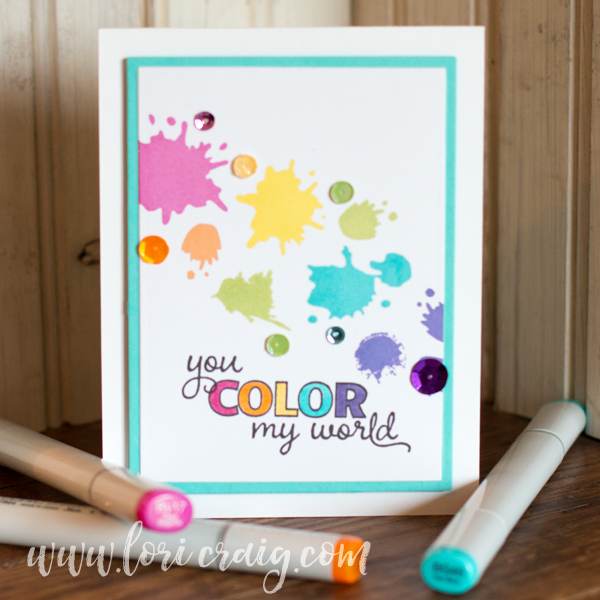
I made two cards to share with you today! The first one “you color my world” showcases splotches from Stroke of Genius 1 and 2 with the colors Strawberry Milkshake, Candy Corn, Lemon Meringue, Granny Smith, Cookie Monster and Jelly Bean! I paired the color splash with a sentiment from the set A Life She Loved and Copic Markers (RV17, YR04, Y15, BG45 and V17). I finished it off with a smattering of sequins from random packages in my stash!

Have Hope Lori Craig 5864

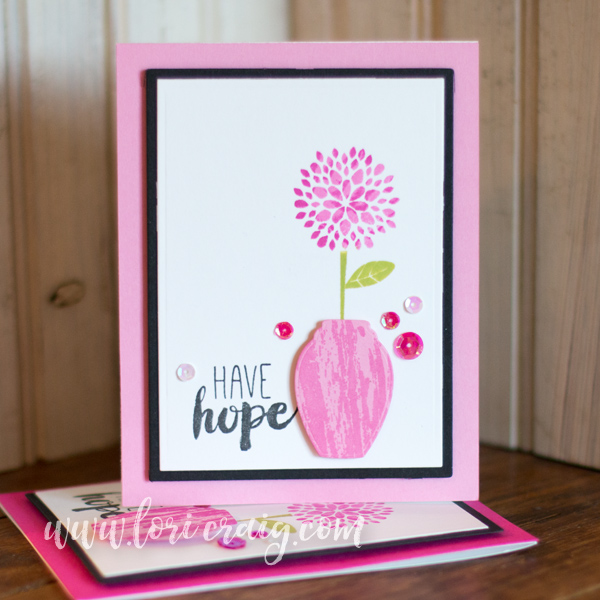
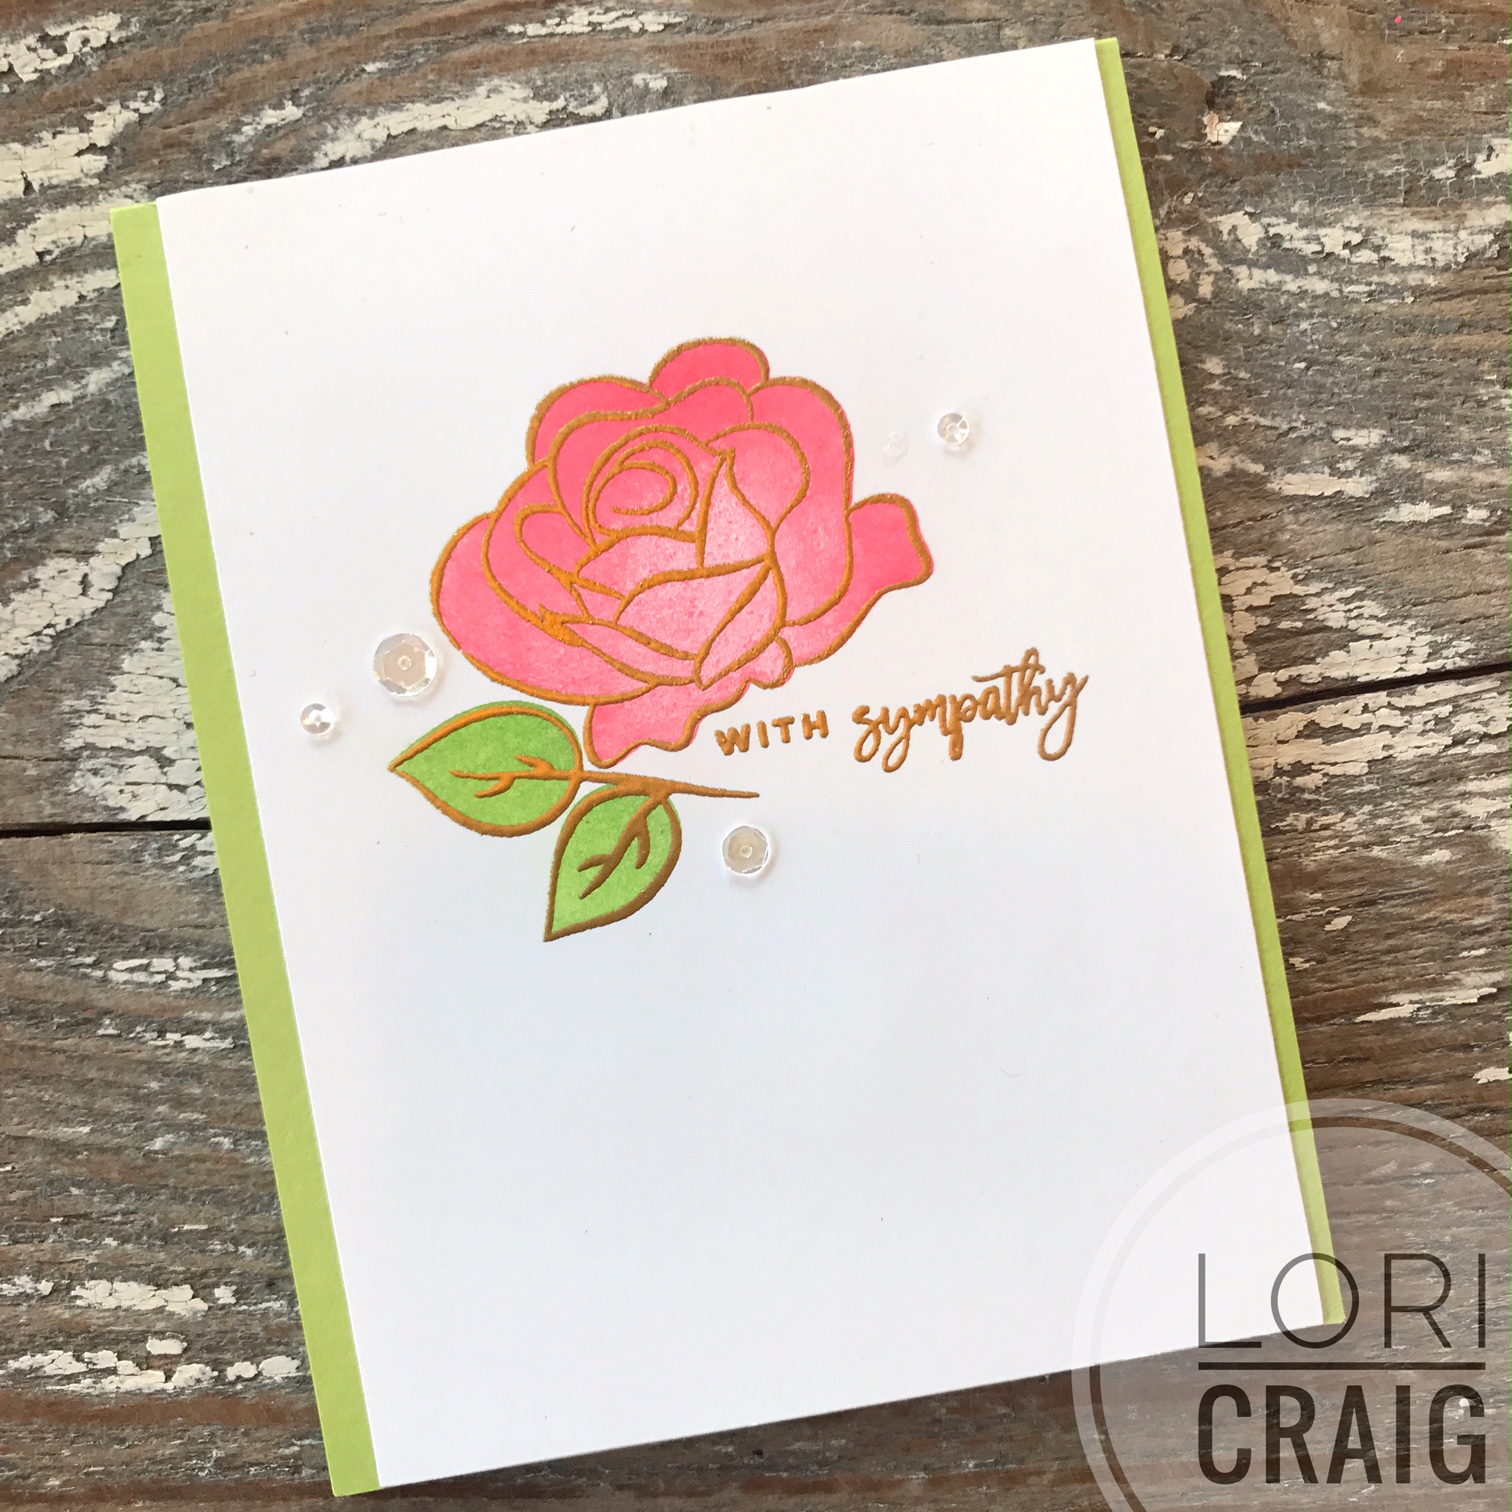
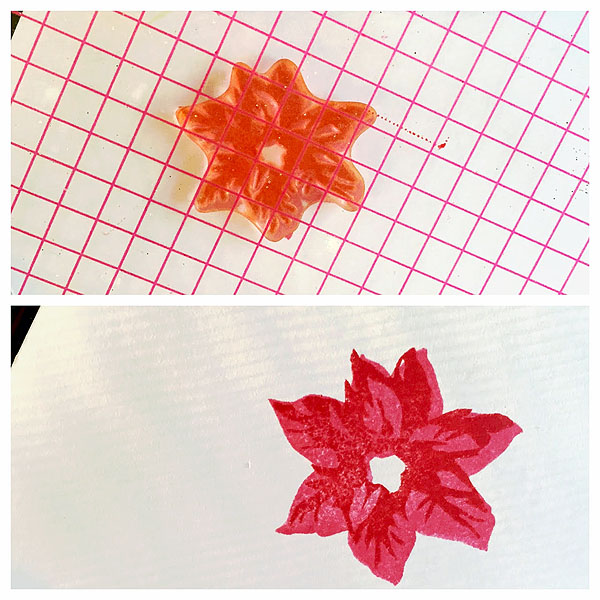
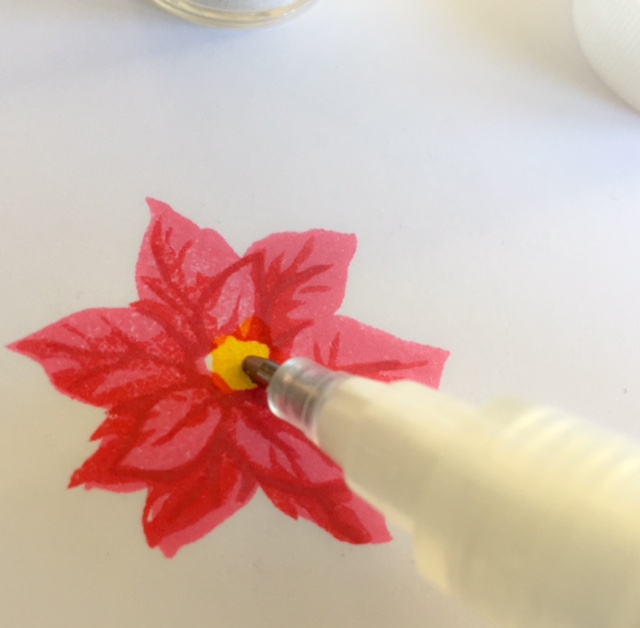
My next card was fast and fun! I used a super old stamping technique called Rock ‘n Roll (tutorial found HERE at Splitcoaststampers) that allows for multiple colors of ink in a single impression on solid image stamps. I used a single stem floral from Posh Posies inked first in Strawberry Milkshake Premium Ink and then rolled in Lollipop Premium Ink while the stamp was affixed to the lid of my MISTI Stamp Positioner. By keeping the stamp on the MISTI, I was able to stamp the floral bloom and clean my stamp before inking the stem in Granny Smith Premium Ink and pressing to the white cardstock for a crisp clean impression.

Have Hope Close Lori Craig_5865

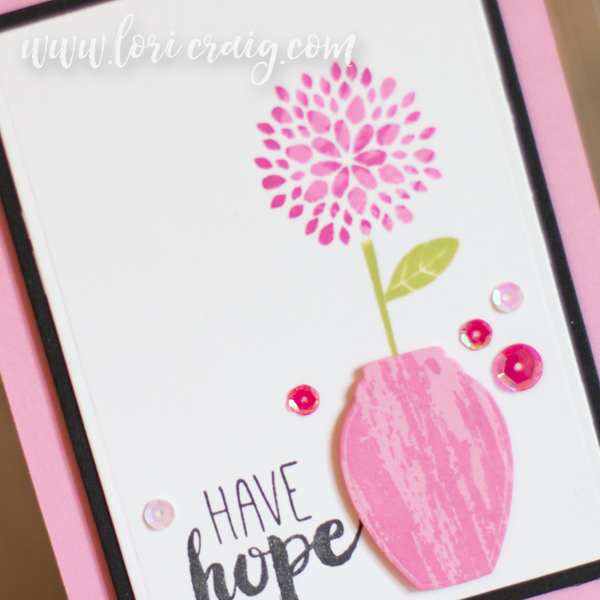
Next, I cut my Various Vase die from Strawberry Milkshake cardstock and stamped with a texture from the Stroke of Genius 2 stamp set in Lollipop Premium Ink. The sentiment is from a sweet small set called Free Spirit! The focal image layer is popped up on Strawberry Milkshake cardstock.

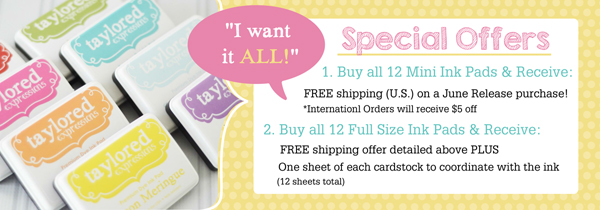
I really hope you’ve enjoyed my introduction to these made in the USA Premium Inks from Taylored Expressions! They are now available and you can only find them at the TE webstore. Plus, check out the two I Want It All to celebrate the arrival of the newest products!

Be sure to leave me some love in comment form below because Taylor will be choosing a lucky visitor from the blog post comments to win a choice of 6 colors of full size pads and coordinating refills! 

TEInk-launchspecials

I’ll have more to share soon! Today, I’m teaching Copic Marker Certifications in The Taylored Expressions Studio in Ankeny, Iowa – of all places! How fun is that! I’m going to sneak over to the warehouse on my lunch break and just oogle at all of the stacks of ROYGBIV!

Thanks for stopping by! See you soon!

Everlasting Love – MISTI video tip & a blog hop

verve hearts close lori craig

Welcome to Verve’s May Release Retrospective Blog Hop!

I love the colorful simplicity of this card and the perfect alignment of these sweet hearts. And… I created a short video to show you exactly how I did it!

It’s been a fabulous post release week at Verve and today the Divas and Guest Divas are back with another dose of inspiration using the brand new release! All of our new products are available to order in the Verve Store and are 25% off through the end of May! Plus, we’ve got a sweet hop prize in store!

verve hearts_lori craig

I used the Love Everlasting set for this card – specifically the two heart image and the Jeremiah 31:3 sentiment.

I have loved you with an everlasting love!

I don’t know about you, but I could never line those hearts up without help, and the honest truth is that my MISTI has helped and really made me fall in love with stamping again. I can obtain crisp, perfect alignments that look great with little to no extra effort on my part.

I created a short video to show you how I did it. Please be kind, I didn’t realize the perspective was skewed until watching the video back, and then I was out of daylight to reshoot. I tried, and I think you’ll still understand the process. 🙂

[youtube]https://youtu.be/2A4sdACE_T8[/youtube]


Want to win some shiny new Verve? Julee will be picking a random comment winner on one of the hop spots below to win a $40 gift voucher to Verve! To be entered in the giveaway, leave a little comment love as you hop around to the blogs linked below! Check out the Verve Blog today for all the prize info and deadlines!

I hope you’ll enjoy hopping. Your next stop is with beautiful Betty!

Release Retrospective Hop List
1. Julee 7. LauraJane {guest}
2. Lori {guest} 8. Marisa
3. Betty 9. Maureen
4. Charmaine 10. Stacey
5. Laurie 11. Teresa
6. Lesley

Thanks for stopping by today! Have a wonderful weekend!

Free first class shipping on US orders over $35 May 27 – 31, 2016. 


Season’s Greetings & Precision Two-Step Stamping


IMG_5892

Much of the midwest was iced in over the Thanksgiving holiday, and I had quite a bit of time to bust out a beautiful new My Monthly Hero  from Hero Arts of poinsettias and create some Christmas cards.

I send a photo card to the majority of my list because they are friends and family who live in other parts of the country, and I really enjoy watching far away family of friends grow through the years, so I feel like they enjoy that, as well. I do, however, try to get a large handful of handcrafted cards created for a few local and my papercrafting friends. Sometimes I send the same person both! 🙂

IMG_5886

As much as I love the look of two-step stamping, I’ve shied away since unmounted or clear stamps became more popular because I had a tendency to mess it up, even with clear stamps and even with my long-haul friend, the Stamp-a-ma-jig.  BUT, I think I’ve mentioned that I bought a MISTI (angels are singing everywhere in stamp land!) a while back, and I really can’t convey what a treat it is to do precision stamping again, especially mass production!

2 step

If you are unfamiliar, you can read all about the MISTI here in a Splitcoast Product Review or catch a bunch of YouTube video tutorials organized and catalogued here in their Splitcoast forum. The nuts and bolts is setting up your image, two-step process or sentiment once time and creating any number of beautiful stamped images with the same placement on each and every card.

Above I locked my white cardstock into a set corner position in the MISTI, stamped the full floral blossom on white cardstock, and then laid the uninked 2nd step stamp on top of that bloom. Then, close the lid of the MISTI to pick up the stamp, open the lid and ink the 2nd step and close to impress over the first blossom… all while the white cardstock stays tucked into the corner of the tool for precise placement. These poinsettias from Hero Arts are actually three-step stamping… the easy way with the MISTI.

IMG_5896

XpressIt GlueThey say the beauty is in the details, and here are two tips for a little extra easy flair!

First, I added glitter to the center of my poinsettia blossoms with an easy application XPress It Fine Glue Pen from Imagination International.  I like the ink-pen sized nib because it let me put glue right where I wanted in the center of each poinsettia. Here you see the size of the tip in comparison to the smallest poinsettia stamp. The glue pens are available in three different sized nibs (pen tip, marker and wide). They seem super affordable, especially considering the amount of glue that they each hold.

IMG_5887

Second, the gold edging on the white panel was super simple. I used a the same rectangle die that I used to cut my main panel and the Kirarina Wink pen in Metallic Gold. I simply traced around the inside edge of the die and used a straight edge for the outer metallic ring. Clean and easy to use, no drips or mess. Just the right amount of polish.

IMG_5892

I’ll be back with more Christmas card ideas tomorrow!

Have a beautiful Thursday!