Category Archives: Tips & Tutorials

Housewarming Birds

bagalope-lcraig-101907.jpg

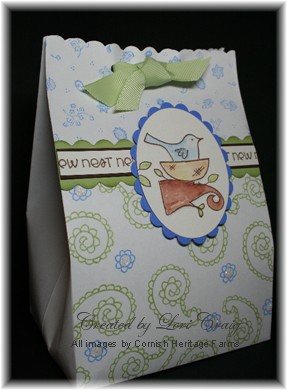
Just in time for many upcoming family and friendly get-togethers, the Splitcoast Tutorial this week is Bagalopes. Here’s the sample that I put together with those oh-so-Pretty Birds by Kim Hughes. You can check the tutorial out in this week’s Weekling Inkling. (I am pre-posting, so I’ll have to add a link later today.) They are so quick and easy! This one will end up holding a candle. Isn’t that the standard issue housewarming gift?

I’m off to do that job called, Domestic Engineer…you know the one where you shuffle children to the dentist, pick up a mountain of fundraiser stuff that no one really wanted to buy in the first place, deliver it all because you don’t have freezer space, take 8 loads of clean, wet laundry to the laundromat because your dryer is broken, pick up and deliver meat tray and rolls for the PTO Teacher Appreciation lunch, dinner at church and Girls in Action activities…oh yeah, DH is travelling..forgot about trash day and taking care of his dog…let’s see if I can squeeze a Route 44 Diet Vanilla Coke ~ easy ice in there somewhere. WHew…it’s too early in the day to be this tired.

Continue reading

Photo Tips

Everyone knows that the honeymoon period is over with my and my Rebel. It’s an awesome camera, but I am just having trouble because I have had very little photography instruction. Jenn was so sweet to send me a link to an awesome photography blog. Check out Candice Stringham’s blog. She has got some awesome photography tips on there.

I’ve been so busy! I’ve a got a fun little, QUICK project that I am going to show you later today. I have some class projects to show you and some more fun, new stuff from Cornish Heritage Farms! See you soon!

Mounting Happiness

mounting-happiness1.jpg

As Mr. Brown starts delivering new catalog orders across the country, I thought I would show a few tips about how I use the Happiness Background set from the Fall 2007 Collection. When I first got my set, I felt like I could do more with the images cut apart, but I wanted to maintain the integrity of my wood mounted stamps, KWIM? I got an extra wood block from a friend (I don’t have another source, sorry) and asked my husband to cut the wood into specified widths. If you want to try this, you will need an extra block of wood. SU! will send you one block which is just enough for the rubber, as is. When you start cutting the wood, the width of the saw blade eats up some of your wood surface. Hence, the 2 wood blocks pictured. I ended up with about half of one block left over.

mounting-happiness2.jpg This is the set after my husband had cut the wood, and I trimmed and mounted the set. This is the only way that I have used it. (click thumbnail to enlarge)

mounting-happiness3.jpg I have often wondered if I did the right thing by cutting this set apart because I found it difficult to use my Stamp-a-ma-jig with the long, skinny images. I had been putting the stamp in the ‘jig’ right angle horizontal. Only today, did I realize that I could have been using the stamp long ways on the ‘jig’. The stability of the ‘jig’ arm makes all the difference. Yep, another ‘blonder than I pay to be’ moment! So, hope that helps you.

While I use Classic ink 90% of the time, with this set (especially with the word, Happiness, I have had the best success with Craft ink because it reduces the chance that I will need to make a repeat impression. It just seems to cover the solid, reverse image art better, in my opinion. 

mounting-happiness4.jpg One last tip: This is the Happiness word block. I have marked on the side of the block where the “H” starts and the final “S” ends. This really helps me position the word center on a 4″ card strip. I can eyeball the placement more easily this way.

Hope these tips have help you.  Knowing what has worked for others, helps me so much when it comes to stamping. Fun images and beautiful font for ‘happiness’ make this what is sure to be a customer favorite. 

Thanks for stopping by!

He amazes me!

 Remember last month when I sent you to check on Kurtis Amundson’s blog? Well, he has had several great tips and tutorials in the last few weeks, but I can’t toot his horn to often now, can I? Tonight I stumbled onto his blog, and my jaw dropped. Go check out his blog tutorial that teaches you how to make your own custom watermark. His presentation is awesome! Folks, he hasn’t even graduated from high school yet!!?

Watermarking your card creations is all the rage for people who upload their creations in cardmaking and paper craft forums.  The main purpose is to protect your cards from image theft, but some of the watermarks are getting pretty fancy. My watermarks are basic and serve the purpose, but I just might have to invest in some new photo software.

I promise some card uploads tomorrow, but this tip was just too cool not to share! Have a good night!