Category Archives: Taylored Expressions

Wildflower Bouquet and Upcoming Copic Classes

FullSizeRender

I can’t believe that it is February, and I am already seeing friends here in the midwest share daffodil and spring flower photos. This is the craziest winter I remember for us here in Kansas. But, I’m not going to complain. I can’t wait for spring to really arrive, and I’ll take all the early peeks I can get!

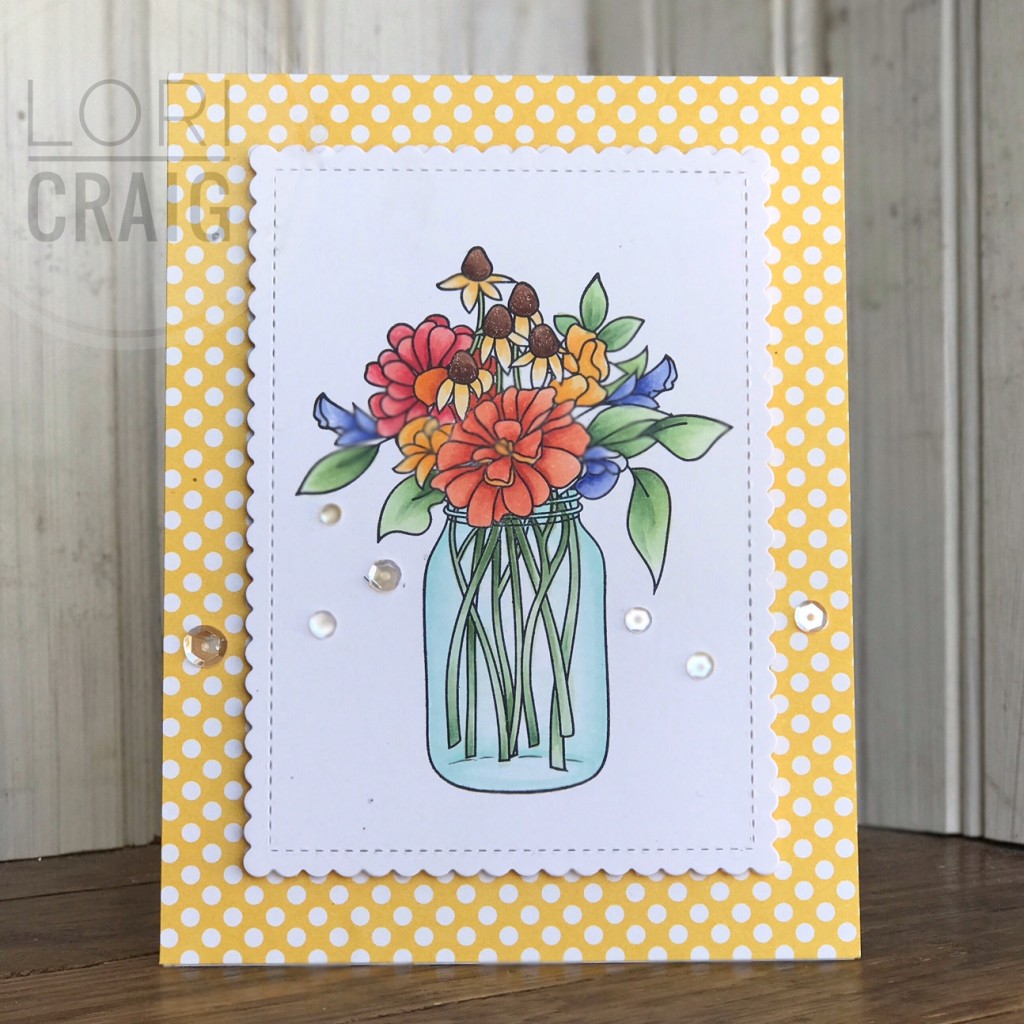
This weekend, I colored Wildflower Bouquet with Copic Marker, thinking the whole time about sunshine and green grass! I love these sweet bouquet images from Taylored Expressions.

The Copic Marker colors I’ve used on this bouquet image are:

FullSizeRender_1

  • Brown-eyed Susans: Y32/Y35/Y38 and E25/E27 – with clear Spica glitter pen
  • Blues: B63/B66
  • Front Zinnia: R02/R05/R08
  • Back Zinnia: R32/R35/R37
  • Leaves: G40/G43/G46 – on top of the bouquet the leaves would be more saturated and vibrant than your stems (and this combo blends so smooth!)
  • Stems: YG61/YG63 – behind the glass you would expect the stems to be a  less vibrant – desaturated
  • Glass vase: BG10/BG11

Wildflowers Vase


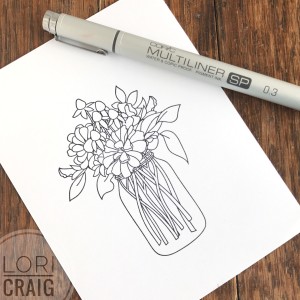
One thing you’ll notice about the line art for the vase is that there is no vase bottom drawn in from the artist.


Wildflowers with Detail Lori Craig

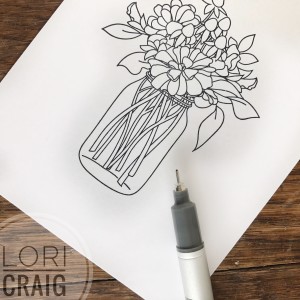
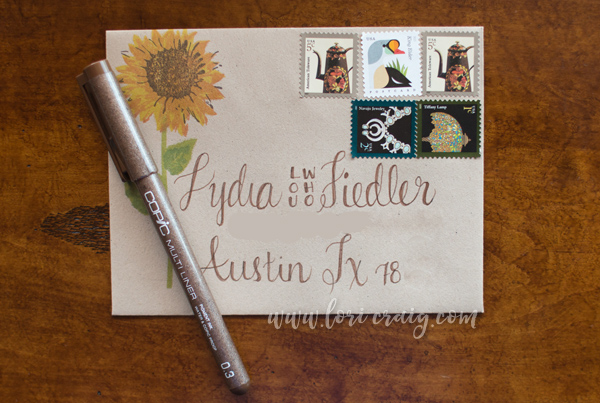
For small style or personal preference tweaks like this, I often use a Copic Multiliner SP to doodle in whatever I feel like I’m missing. Here I’m using a .3 nib for lines that match the artist’s work in the stamp to draw in the back base of the glass mason jar. The ink in these pens is water and Copic tight, making it a great choice for your pre-coloring sketches.

Copic Multiliner SP

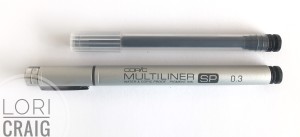
The Copic Multliner SP comes with 10 different nib options. And, in the event that your pen runs dry, it’s easy to slip in a refill cartridge from the back end of the pen.

FullSizeRender

For more Coloring Flowers tips and tricks, visit any of our instructors for a live in-person Coloring Flowers, Standard Copic Certification or Intermediate Copic Certification class. Certifications for 2017 will be ending soon, and we’ll move into our coloring and hand lettering workshops, so if you want learn more about basic blending, shadows, shading and how the Copic number system really works, we have classes coming up in:

  • Irving, Texas
  • St. Louis – with ME!
  • Anaheim
  • Indianapolis
  • Richmond, VA – with ME! 
  • Lyndhurst, NJ
  • Calgary
  • Saskatoon
  • Vancouver, BC – with ME! 
  • Orlando

All of the details and registration info can be found HERE. We would love to see you in any of our classes!

Amazing *A* Decor with Tommy Art Paints

FullSizeRender (84)

Home from CHA today! It’s always wonderful to see new products and connect with so many crafty people. Crafty people are good people.

I also loved learning more about a new product from Imagination International – the Copic Marker people – called Tommy Art Paints. It’s a line of fluid Italian chalk paints that applies and dries so smoothly. And, it comes in over 30 rich colors!

I had made this ‘amazing a‘ to take with me as a classroom sample for our Copic Marker workshops, but I thought you might like to see it!

FullSizeRender (81)

I started with a bare wood accent letter from Hobby Lobby and seriously in less than 30 minutes had this cute accent for my daughter’s room! Here’s how I did it:

  1. With a clean 1″ brush, coat wooden letter with Cream Tommy Paint – allow about 5 minutes to dry.
  2. Rub a small amount of Neutral Wax over the edges of the letter with a brush or soft cloth. This allows for a buffer between the layers of paint without damaging your initial layer of cream paint.
  3. With the 1″ brush, coat letter with Vintage Green Tommy Paint – allow about 5 minutes to dry and repeat a second coat of Vintage Green – allow 5 minutes to dry.
  4. With green paint dry, sanding block (I used the same one I use on paper) and lightly brush edges of the wood letter to remove the green paint and expose cream paint below.
  5. Rub small amount of  Neutral Wax onto dry wood piece a soft cloth – allow to dry and buff to sheen with a clean, soft cloth.

FullSizeRender (82)

The felt flowers were cut from an assortment of florals dies – I had borrowed the dies from a friend, and I believe most of them are from MFT or Papertrey, though some may be retired. The felt is from Taylored Expressions – it’s beautiful quality and you can see how crisp and clean the cuts are on the felt. The dainty word ‘amazing’ is from  Amazing Adjective dies – Verve Stamps!

FullSizeRender (89)

This was a project that we completed at a marketing event last Thursday night at CHA. I started with two plain pieces of smooth MDF and created ALL of the texture and wood grain that you see with 4 colors of Tommy Paints, Neutral Wax, a piece of sand paper and the orange impression tool on the top right. I really like these products, and ordered more colors today so that I could show you a tutorial or two!

FullSizeRender_1

Here is my finished plaque – the “thankful” is a textured Volcano Paste that I put through a stencil with a palette knife – love the raised look and feel.  This project took about 25 minutes start to finish – even with the dry time.

FullSizeRender (84)

I am looking forward to painting all-of-the-things now that I know how beautifully these paints perform! I have aspirations for some furniture that’s in my basement, as well as some crafty gift items…. Given a free day, what would you like to paint?

Be Still and a Winner

FullSizeRender (83)

Between weather, back-t0-New-Year reality and CHA prep, the first few weeks of the new year have felt like a 4-day whirlwind! I thought things would slow down post holidays.

seasons givings blog photoThank you to each and everyone of you who participated in the Season’s Givings Blog Hop. I loved reading all of your responses. It sounds like we have a lot of great creative things planned! Congratulations to my winner Felicita Johnson! And, the best of luck to each of you on your crafty pursuits in the New Year!


FullSizeRender (87)

After days of weathermen prepping all of Kansas for the 2017 Ice Storm, we woke up to this yesterday. Luckily, the temperatures never stayed below 32 long enough for my area to receive significant damage. Though much of our state wasn’t so lucky… It did give me time to do a little stamping.

FullSizeRender (86)

The feathers, dies and sentiment are all from Taylored Expressions. This would be a good resolution for myself the New Year – this and actually sending cards I make!

Stamps: Light as a Feather (stamp and dies) and Be Still – Taylored Expressions

Dies: Build a Tag 4 – Taylored Expressions

Cardstock: Sugar Cube – Taylored Expressions

Ink: Jelly Donut, Blue Corn and Sprinkles – Taylored Expressions


The Week of Joy

Snapseed

This is one of my favorite weeks of the year! The stress of Christmas is behind – for the most part. The new year lies ahead… The kids have another week or more off from school, and it’s just a laid back time around our home. It’s just a time of low-key JOY for us!

Snapseed

I wanted to share a few last minute tags that I created last week before we left to enjoy our Christmas with family!  Easy tags that I dressed up with some simple stamping and foil accents!

Snapseed

This simple one ended up being a favorite.. I started with the Build-a-Tag 5 from Taylored Expressions and stamped with snowflakes from a retired set called Winter Wonderland in Salt Water Taffy TE ink.  Then instead of writing a to/from on my tag, I just a J (for Jen!) from Silver Deco Tape from Imagination International with a “J” die from the Poster Graphic Alphabet dies. I love the decorative flair to these letters!

DTG2510S-2 This 1″ glitter Silver Deco Tape is just wide enough that you can cut narrow dies with it! I adhered to a scrap of paper and then ran it through my Big Shot. And then I glued it to my tag with Glue Marker.


DFT610A-2To finish off my tag, I ran a strip of decorative Foil Tape down the left side of my tag. Love the rainbow of colors in this tape collection!


Snapseed

Next up, I used a My Monthly Hero Kit from Hero Arts to stamp a few poinsettias and the same Build-a-Tag 5 die from Taylored Expressions with a strip of red foil to add a little glitz.

Snapseed

Finally, a replay of the tags I showed you last week with a hint of chocolate colored Decorative Foil added – yes, I said CHOCOLATE FOIL. Yum. This was a gift for my brother and he commented on how cool this tag was… I call that a win!

I’ve been trying to spend some time in my craft room during this week of joy! Of course, that had to start with a little bit of cleaning and organization after the Christmas crafting marathons… Tomorrow morning I’m going to the duck blind with my husband … definite JOY!  I don’t have a hunting license for this season, and I’m not buying one for just one day… so I’ll be taking photos and possibly watercoloring a landscape… If I come up with anything inspirational, I’ll be sure to share! 😉

I do have another paper project to share in a day or two, and I’m participating in a very fun project over the weekend, so stay tuned!

Thank you for stopping by… Wishing you continued Christmas blessings and JOY …

Season’s Greetings


Seasons Greetings Rounded Tag Top Lori Craig

I’m having a wonderful week prepping for the holiday, and I wanted to share a quick tag project I did early in the week. There is a MOPS (mothers of preschoolers) group at my church, and we are a long past the preschool stage at our house, but they graciously invite me to be a mentor mom… I love these moms, their tender hearts for their children and the fellowship we enjoy. I wanted to take each of them a small token of love…

Lori Craig Pine Cone Centerpiece

I also love decorating with pine cones…. This is a centerpiece I made for my dining room table… It has some large sugar pines from California, along with shed antlers that my daughter and husband found laying in a field, some faux-evergreen and some glassy tiffany blue ornaments. It’s all arranged in a box my husband made from barn wood off of the barn on our property in Missouri. It’s become a special part of my Christmas!

Seasons Greetings Bags Lori Craig

I love this Simply Stamped Pinecones set from Taylored Expressions. I had my doubts about it being simple, but it really was… I would not pull your leg over something like that… I stamp for fun, not frustration. Easy peasy to line up! Love.

Seasons Greetings scallop tag Lori Craig

The pinecones were stamped free-hand (without aMISTI) and it was easy! The ink colors I used were all Ranger Distress Inks:

  • Old Paper – bottom layer
  • Brushed Corduroy – middle layer
  • Walnut Stain – top layer

I did use a MISTI to line up my sentiments.   This scallop bottom tag is Gift Card Holder Tag from Reverse Confetti, and the round top tag is Build-a-Tag 4 – it is my favorite in the collection. So easy to use! The gift bags were something I picked up after last Christmas for $.10 each… score.

Seasons Greetings round top side Lori Craig

Finishing cut out cookies today, and a party with my BUNCO girls tonight! I have another card to share tomorrow after my party. Have a GREAT day as you finish your Christmas prepping and partying… Tis the Season!

Deck the Halls in Lavender

full deck the halls white lori craig

Today I am sharing one of my last few cards for the SCS Falliday Fest! This was for Lydia’s challenge to create Melted Snow – watercolor and salt background! Also showing you a fun new product from Copic, the Lavender Multiliner. How fun!

We have had a Salted Backgroung tutorial in the Splitcoaststampers library for years, and trying the technique was an assignment for me in a recent watercolor class that I participated in, as well. Way past time that I tried it! It was easy, and I love how it turned out!

deck the halls lori craig

I used Winsor Newton Cotman Watercolors – Purple Lake and Manganese Blue. I painted both on watercolor cardstock, leaving a bit of excess water on the surface and then sprinkled liberally with coarse sea salt. Allow the cardstock to dry and the salt will absorb and shift the color around on your paper. You can use a heat tool to speed this process up, but I’m a fan of allowing for natural dry time when I can!

I had been so wrapped up in the technique, I decided to follow Lydia’s inspiration and go the Christmas ornament route. I cut my bulbs from a retired die set from Taylored Expressions.

deck the halls lori craig full

I “hung” my ornaments with string I drew in with a new Lavender Copic Multiliner. They arrived a few weeks ago, and I love the rich purple color.  As you would expect with a Multiliner, the ink from these pens will hold tight with Copic and water when they are dry on the paper.

IMG_1803Here, I’ve just dropped a few lines of string in to hold my ornaments. You could totally free-hand the lines of the ornaments, but here, I wanted crisp, straight lines for the string, so I’ve used a small clear ruler from Aristo. I keep two of these in my stash. Love that I can tuck them into a pencil pouch and that they are clear to see my work underneath. lavender set


The Lavender Multiliners for drawing, sketching and coloring over are available in four tip sizes: 0.03, 0.05, 0.1, 0.3, & 0.5mm. Pen sizes are embossed on the caps for durability. Available as single pen purchases and in this set of four.

  • deck the halls sentiment

I wanted texture to my white layer, and I also did not want to add a sentiment tag. So, the Deck the Halls sentiment (retired MFT) was stamped in Grape Jelly ink (Taylored Expressions) and then my panel as run through the Big Shot between the Dotted Lattice folder. I love how it embossed right over the top of the sentiment without distorting the words.

I added the bulbs with XPress It Foam Tape to my white panel.The glittery frame (glitter paper from Stampin’ Up! – a gift from Lydia!) is from the Taylored Expressions die set – Frame in Frame 2.

deck the halls full no ml lori craig

I appreciate you stopping by… I know it’s Halloween, but it will be time to Deck the Halls before you know it! Have a great day!

Falliday Feathers

FullSizeRender (19)Falliday Fest Lori Craig

I wanted to share two cards I’ve made for the Falliday Fest at Splitcoaststampers! We’ve partnered with some amazing sponsors for a fun event for October! Still plenty of month left to join us for challenges and inspiration, wonderful card-drive opportunities and prizes!

This was a card that I made for Dina Kowal’s Masquerade challenge. This was a new idea to me, and it was so fun…and easy. I’m definitely going to be trying this technique again! My sentiment came from the Autumn Splendor set from Verve, and the feathers are a die-cut from MFT.

FullSizeRender (5)Falliday Fest Lori Craig

This fun card was for Lydia’s challenge, Start Spreading the News! I used the Give Thanks stamp and die set from Concord and 9th for this one. Love the clean look here. I tied to keep it clean and simple. That is something about Lydia’s style that I really admire: clean and classy!  The woodgrain is an embossing folder from Taylored Expressions.

I’m off to a marching band competition this weekend, but plenty of cards to share in the next few days! Hope you squeeze some crafty into your weekend! Thanks for stopping by!


Hello Friend!

hello friend lori craig

Hello friend! The Splitcoaststampers Product Focus team shared a review of a new ink product from Clearsnap today (you can read their review here), and I thought I’d share my creation!

lori craig hello friend close

I stamped all of my flowers from the Taylored Expressions Fresh Florals stamp set using a combination of pinks and purples from the ColorBox 4-Color Premium Dye inks and cut with the coordinating dies. I had also been itching to use the scalloped Frame-in-Frame 2 die from Taylored Expression – here I used it with silver glitter paper from Stampin’ Up!

ColorBox-4-Photo-6a  These inks are fun because they have four different colors on each seasonal (Fall, Winter, Spring) pad. Vibrant color and great for small stamps, journaling or planner decor.

The ink coverage was beautiful. I did not use a MISTI or positioner, and you can see how fluid and vibrant my flowers are above!

color box lori craig

I layered my Fresh Floral frame on a piece of embossed cardstock – Dotted Lattice Folder from Taylored Expressions! Love how this turned out!

I really have been stamping up a storm, so I’ll be back again soon with more! Thanks for stopping by!

Scatter Sunshine with Envelope Art

Sunshine Lori Craig_5870

I’m scattering kansas sunshine today… sticking this card in the mail to a friend who is a real blessing to me! Love these Simply Stamped Sunflowers and sentiment from Taylored Expressions. I’ve used them here with Taylor’s new premium dye ink and the Prairie embossing folder.

lori craig IMG_6434

I’m still working on my hand~lettering and taken to the old school postage look! I love the colored Copic Multi-liners for my hand~lettering. I like these because they are inexpensive, safe to use with water-color or Copic Marker, and they come in nine different colors with a variety of nib sizes.

Adding some postage flare is an easy way to make your hand-stamped card stand-out in the recipient’s mailbox! It was fun to shop for smaller valued postage stamps at www.usps.gov. My local post office doesn’t seem to have many options or variety anymore for 1-cent to 20-cent values… Ordering online, the shipping was super cheap and a one – maybe 2-day turn-around.

lori craig IMG_6433

Thanks for stopping by… I hope you have a beautiful day! And … let’s get those cards in the mail today, friends … scatter some sunshine!

So Loved and a Copic Class Giveaway

so loved lori craig IMG_6297

 Thanks for stopping by today! I’m sharing in a Copic Team Blog Hop and prize!

My personal Copic classes are finished up for the spring, and the entire team is taking a break from traveling this summer to prep for our upcoming 2016 fall workshops and the 2017 curriculum!

This fall More Whimsical Faces and HairVintage Values and Mono Tones, and Dress For Success: Clothing and Accessories Workshops will all be taught in the following locations:

  • Chicago, IL August 19th-20th **
  • Dallas, TX  August 26th-27th ** and taught by ME! 
  • Edmonton, AB August 26th-27th **
  • Charlotte, NC September 9th-10th
  • Las Vegas, NV September 23rd-24th
  • Sacramento, CA September 23-24th
  • Boston, MA October 14th-15th
  • Hanover, MD October 14th-15th
  • Portland, OR October 14th-15th

** Registration now open

Be sure to register for Copic e-mail notifications HERE (bottom of the page) so you will be the first to know whenever new classes are open in your area.

Now for the prize:

One lucky winner will receive a pass to attend a Copic Coloring Workshop in the US or Canada in the 2017 season.

We will not be offering an alternative prize for those living outside the US or Canada. You are welcome to participate, but be aware that the prize is for a class in the US or Canada in the 2017 year.

How do you win?

There are six simple questions at the end of Michelle H’s post HERE. Visit each of the blogs listed below to find the answers then send those answers to Michelle in a quick e-mail at [email protected].  Those who have all six questions answered correctly will be entered into a drawing to win. E-mails must be received no later than midnight eastern time,Saturday, June 25.

so loved lori craig IMG_6304

Today I’m sharing a card that I made for my daughter using one of my favorite non-marker Copic techniques: Dripping with Copic Various Ink Refills! I love how vibrant the ink remains on the surface of glossy cardstock!

For this card, I have dripped YR04, Y32 and Y35 onto glossy cardstock and allowed the drips to dry. The trick for colors that blend seamlessly from one shade to the next is to keep each color wet on the paper while you are still adding other colors (example below).

I followed the dripping up with an over-stamped floral image from Taylored Expressions Sketch Blooms in black and a sentiment from Free Spirit stamped in Strawberry Milkshake Premium Dye Ink from Taylored Expressions. The white sequins are so shiny! Shine Bright Mix from Verve Stamps! The floral layer is cut with Build-aTag #4 – Taylored Expressions.

lori craig IMG_9398

Dripped inks are vibrant on glossy cardstock and dry very quickly, making it a fun, artsy technique to try. The glossy cardstock allows this ink to sit up ontop of the paper, mixing and melding.

Above on the left, I have dripped three colors together very quickly so that all of the inks are wet at the same time and blend smoothly. On the right, I’ve allowed individual drips to dry before adding more, creating distinct lines of ink between each color! There isn’t a right or wrong way to do it – it’s all personal preference!

So that is all I have today, but I’ll be back soon! Be sure to visit Michelle H’s blog HERE to find the questions and the blogs below to find the answers:

Good luck, and thanks for stopping by!  🙂