Category Archives: Christmas

Concord & 9th September Release

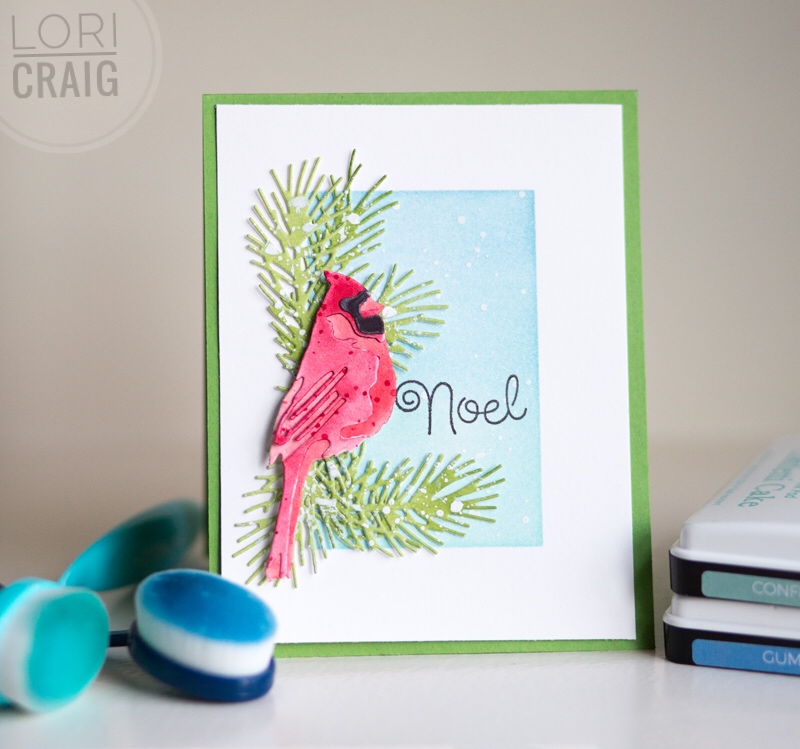
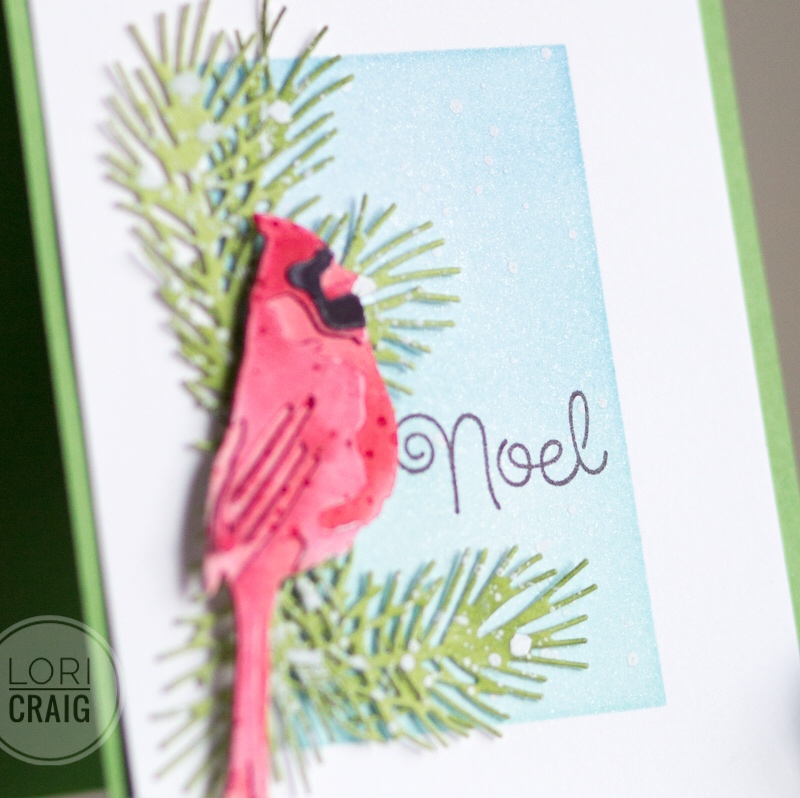
How about some Season’s Greetings from Concord & 9th. I am thrilled to be a guest designer for Concord & 9th this month because there are so many beautiful things to share.

If you are new to my blog, thank you so much for stopping here today. Please follow me on Instagram (wheatfield_designs) or Facebook where I share frequent creative snippets.

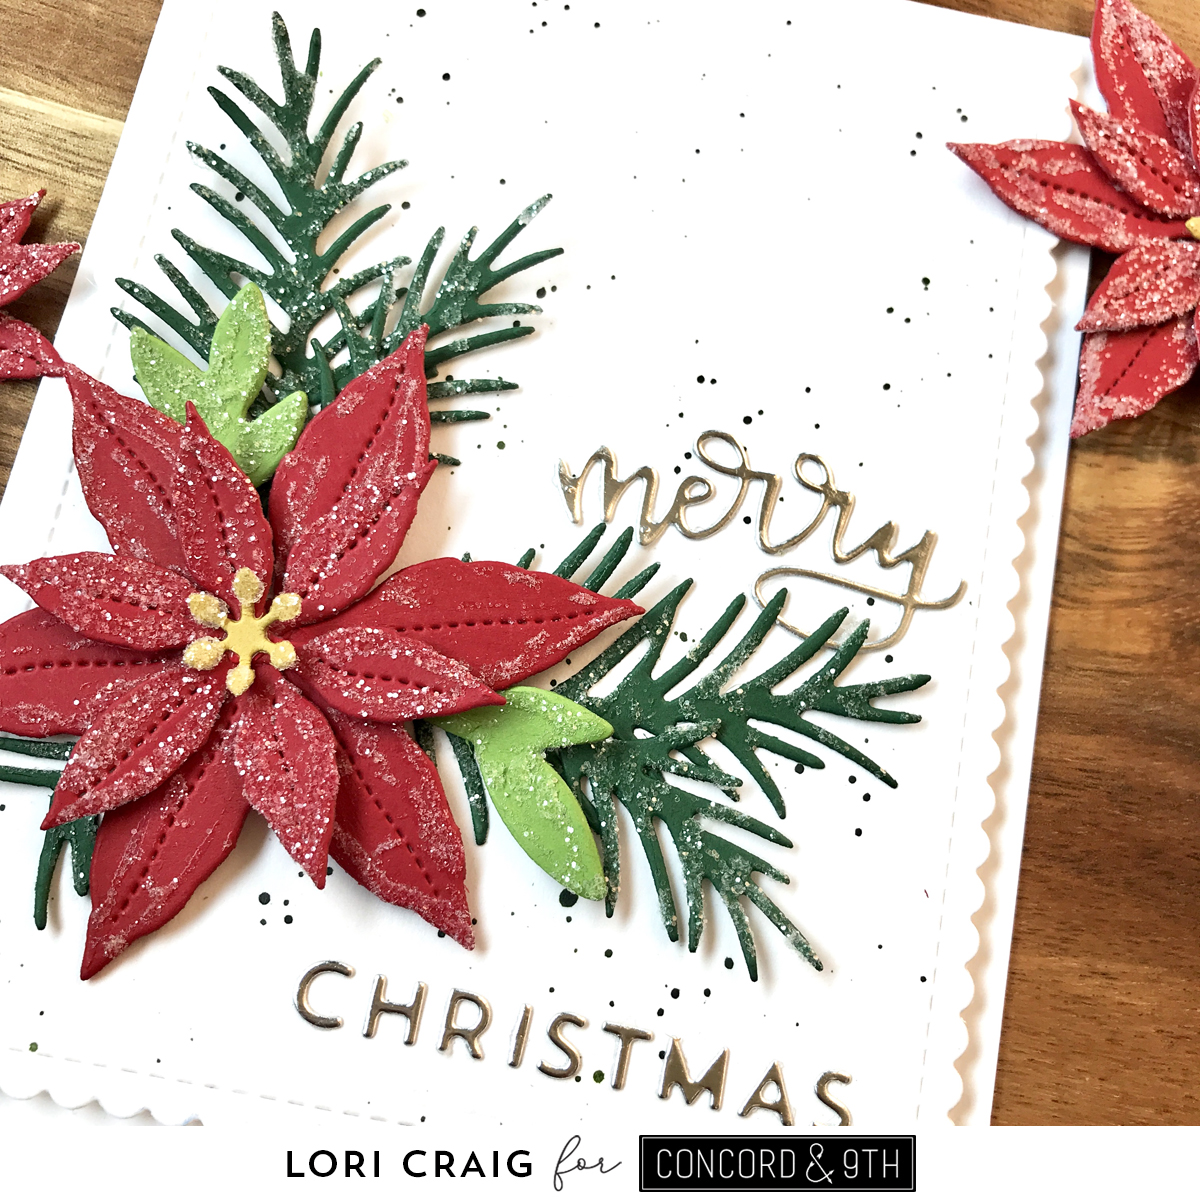
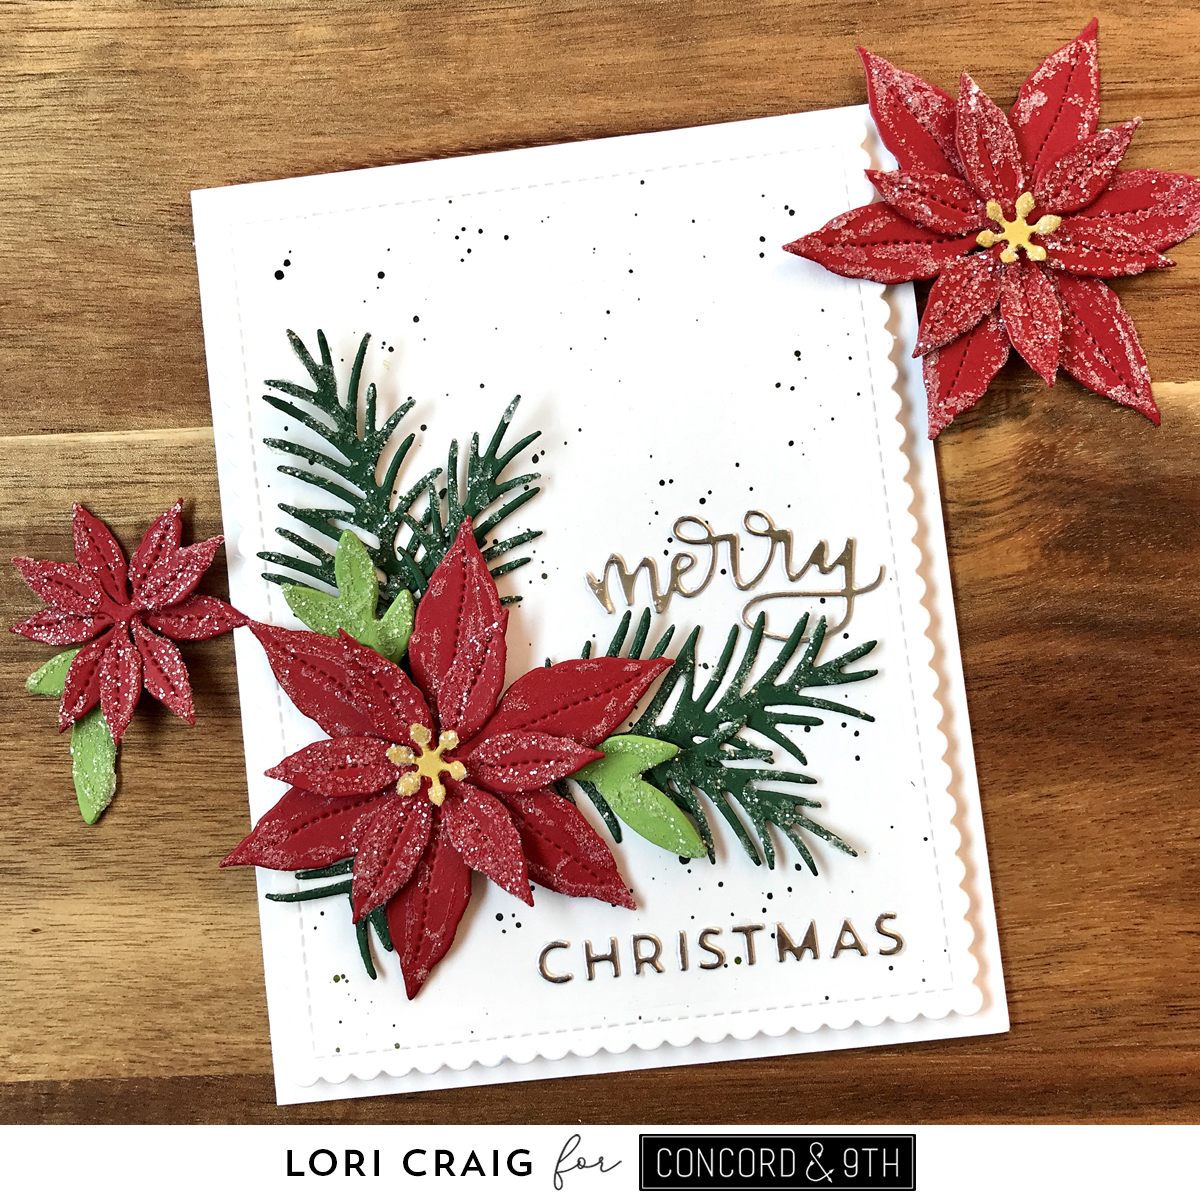
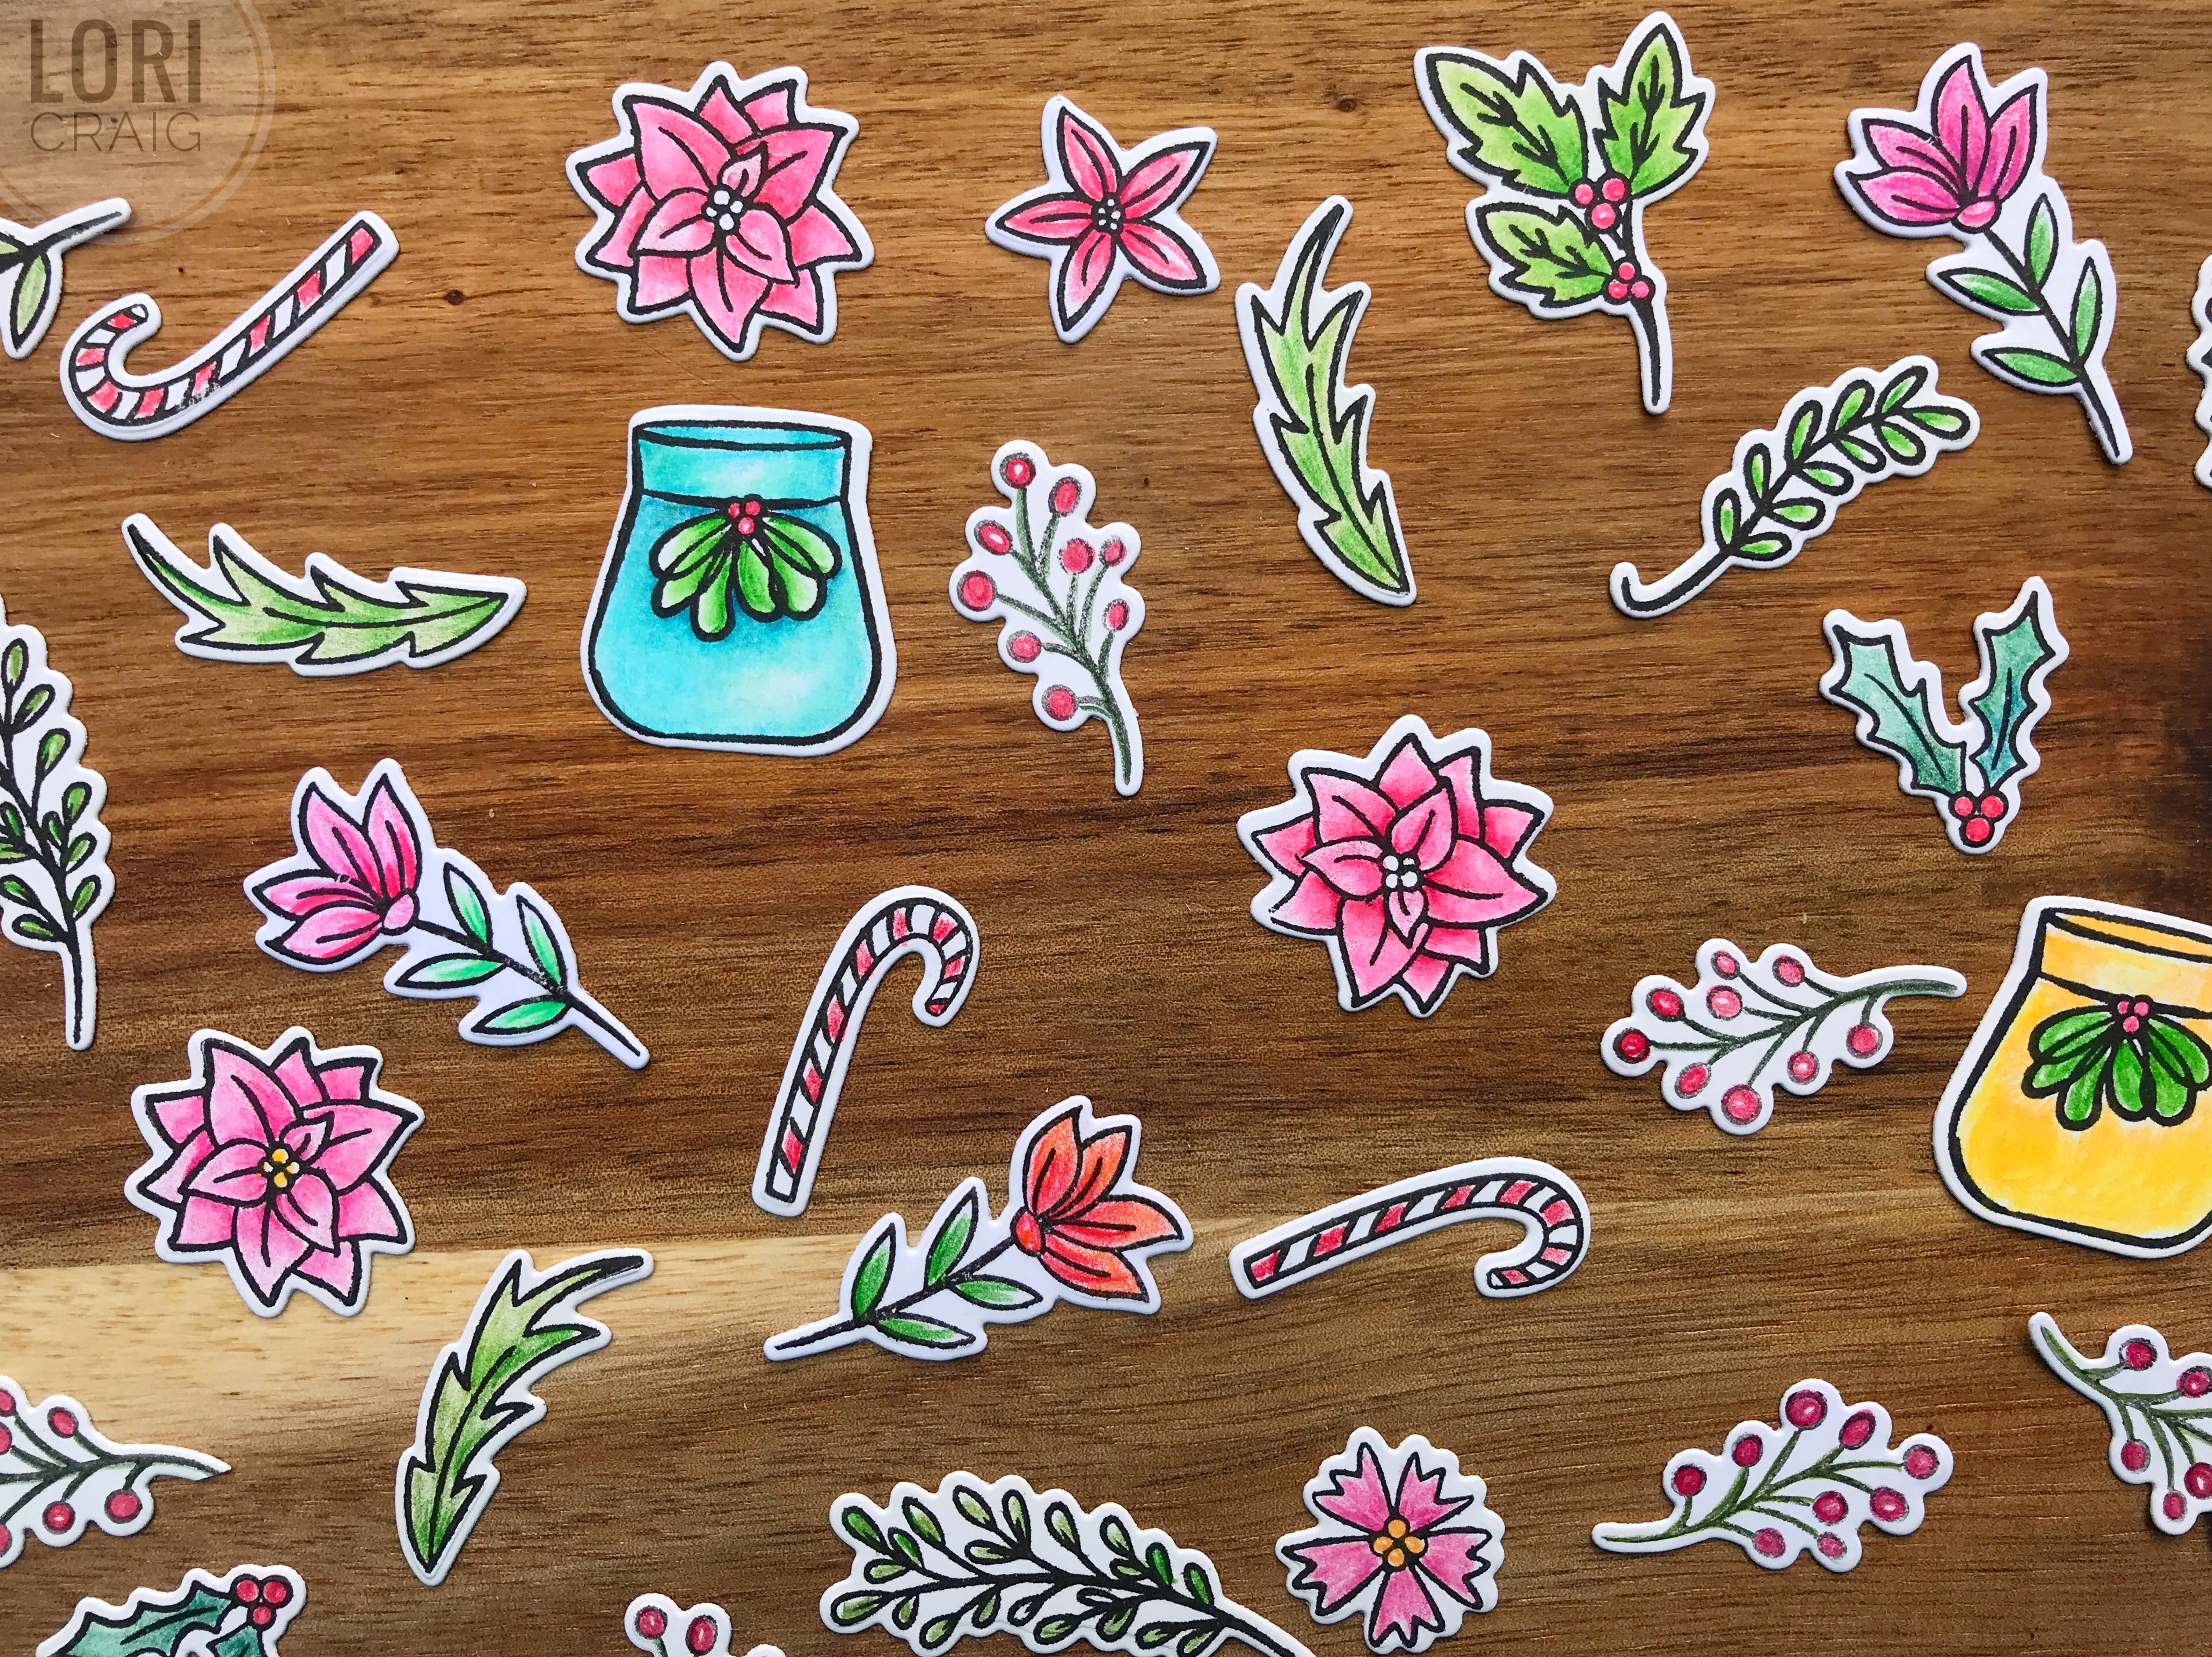
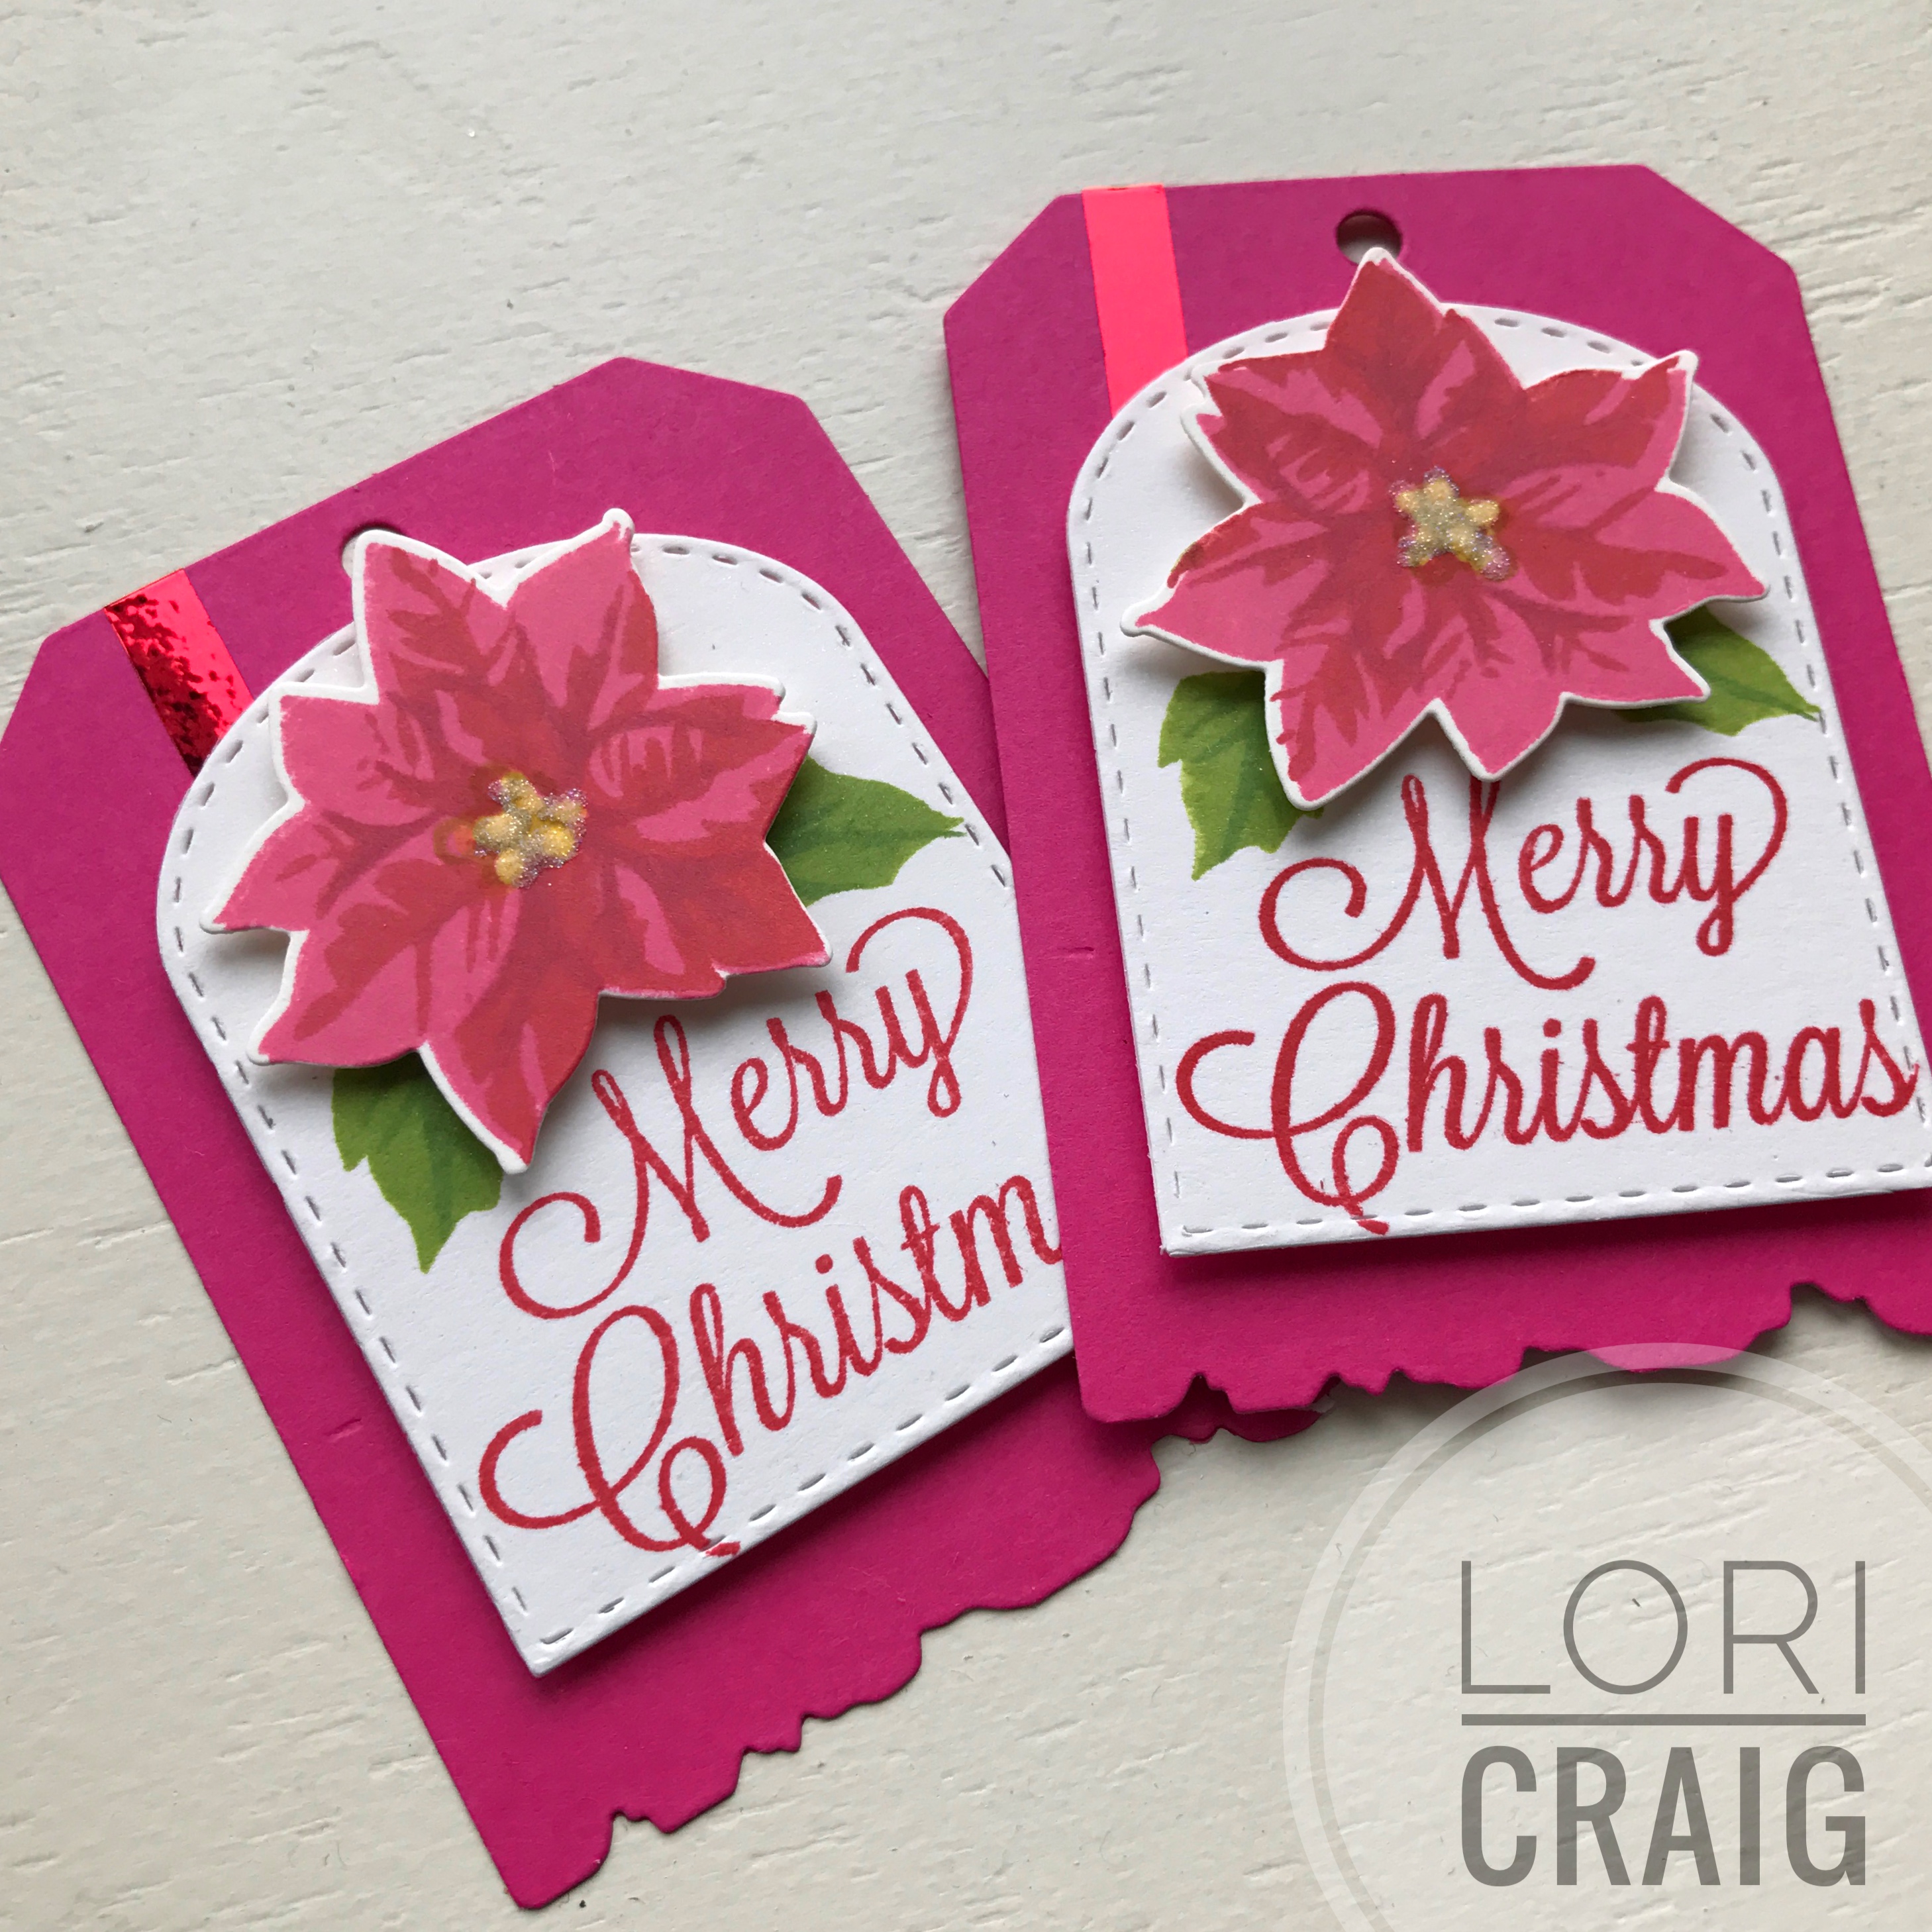
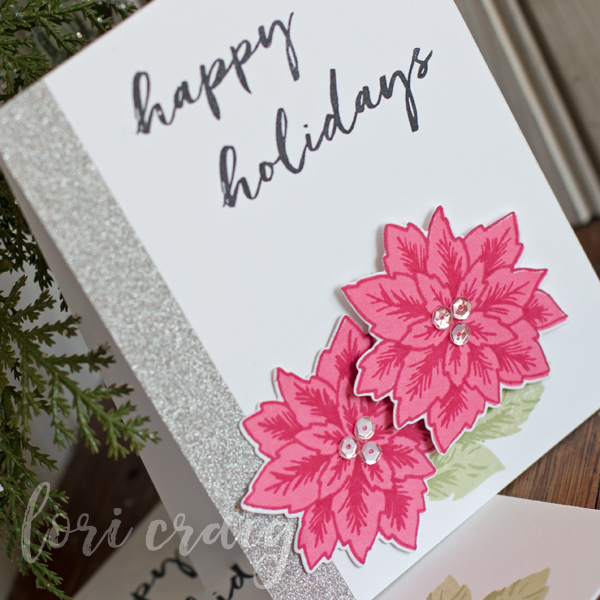
Because I like starting with the REALLY good stuff, I’m sharing this FREE (FREE!) die set called Fresh Cut Florals Edition 4 – Poinsettias and Pine Boughs. The set is free with the September Product Release Bundle. I used beautiful colors from the Concord & 9th color collection: Parsley, Evergreen and Cranberry.

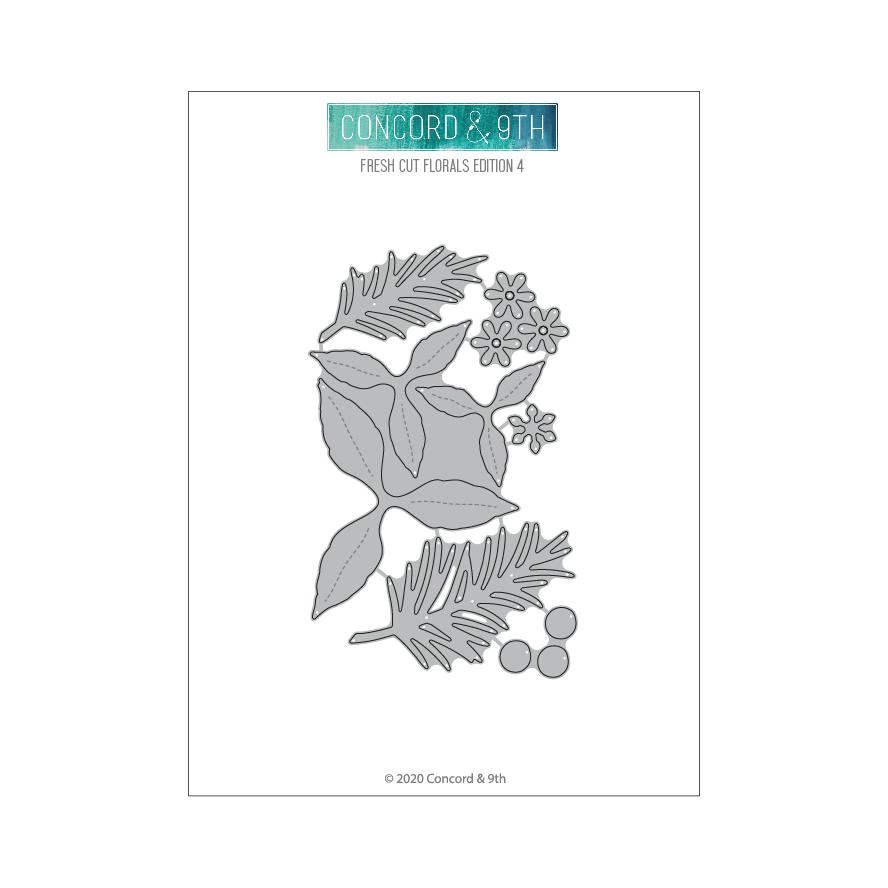
The die set allows you to create 2 different sized poinsettias. The flower petals can also double as leaves to layer behind a finished flower. Create a festive spray by including the pine bough with the poinsettias.

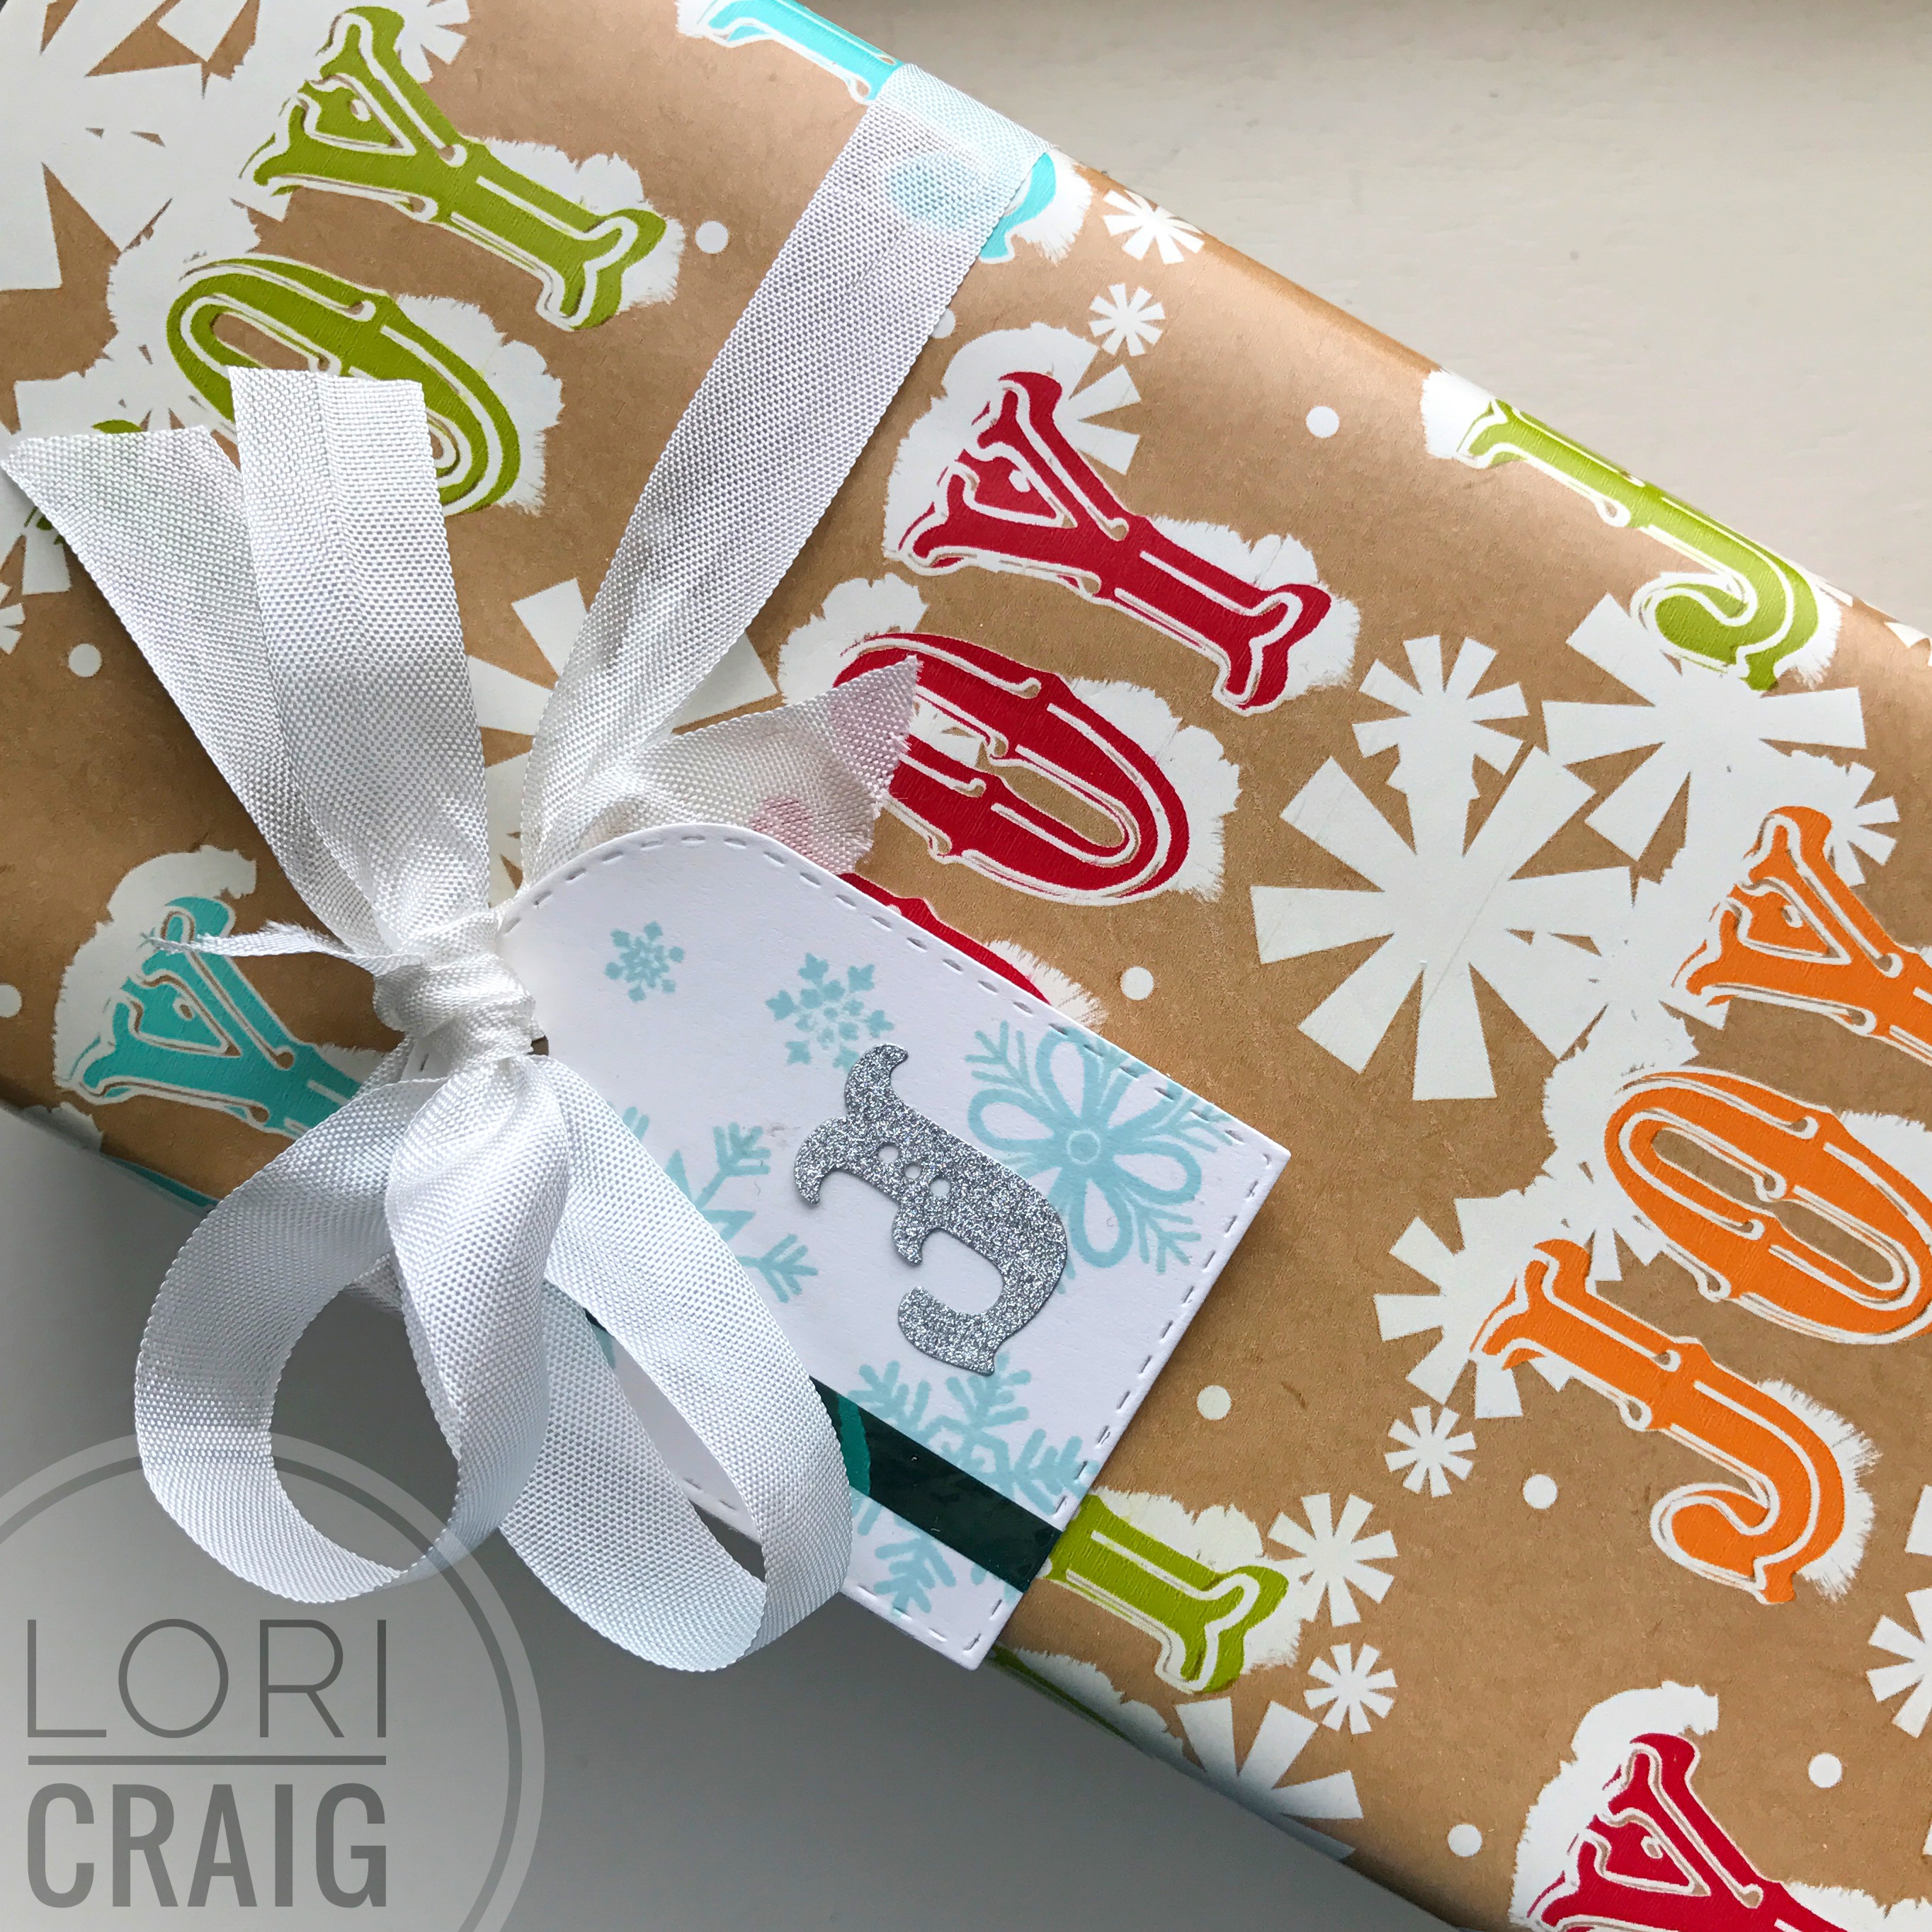
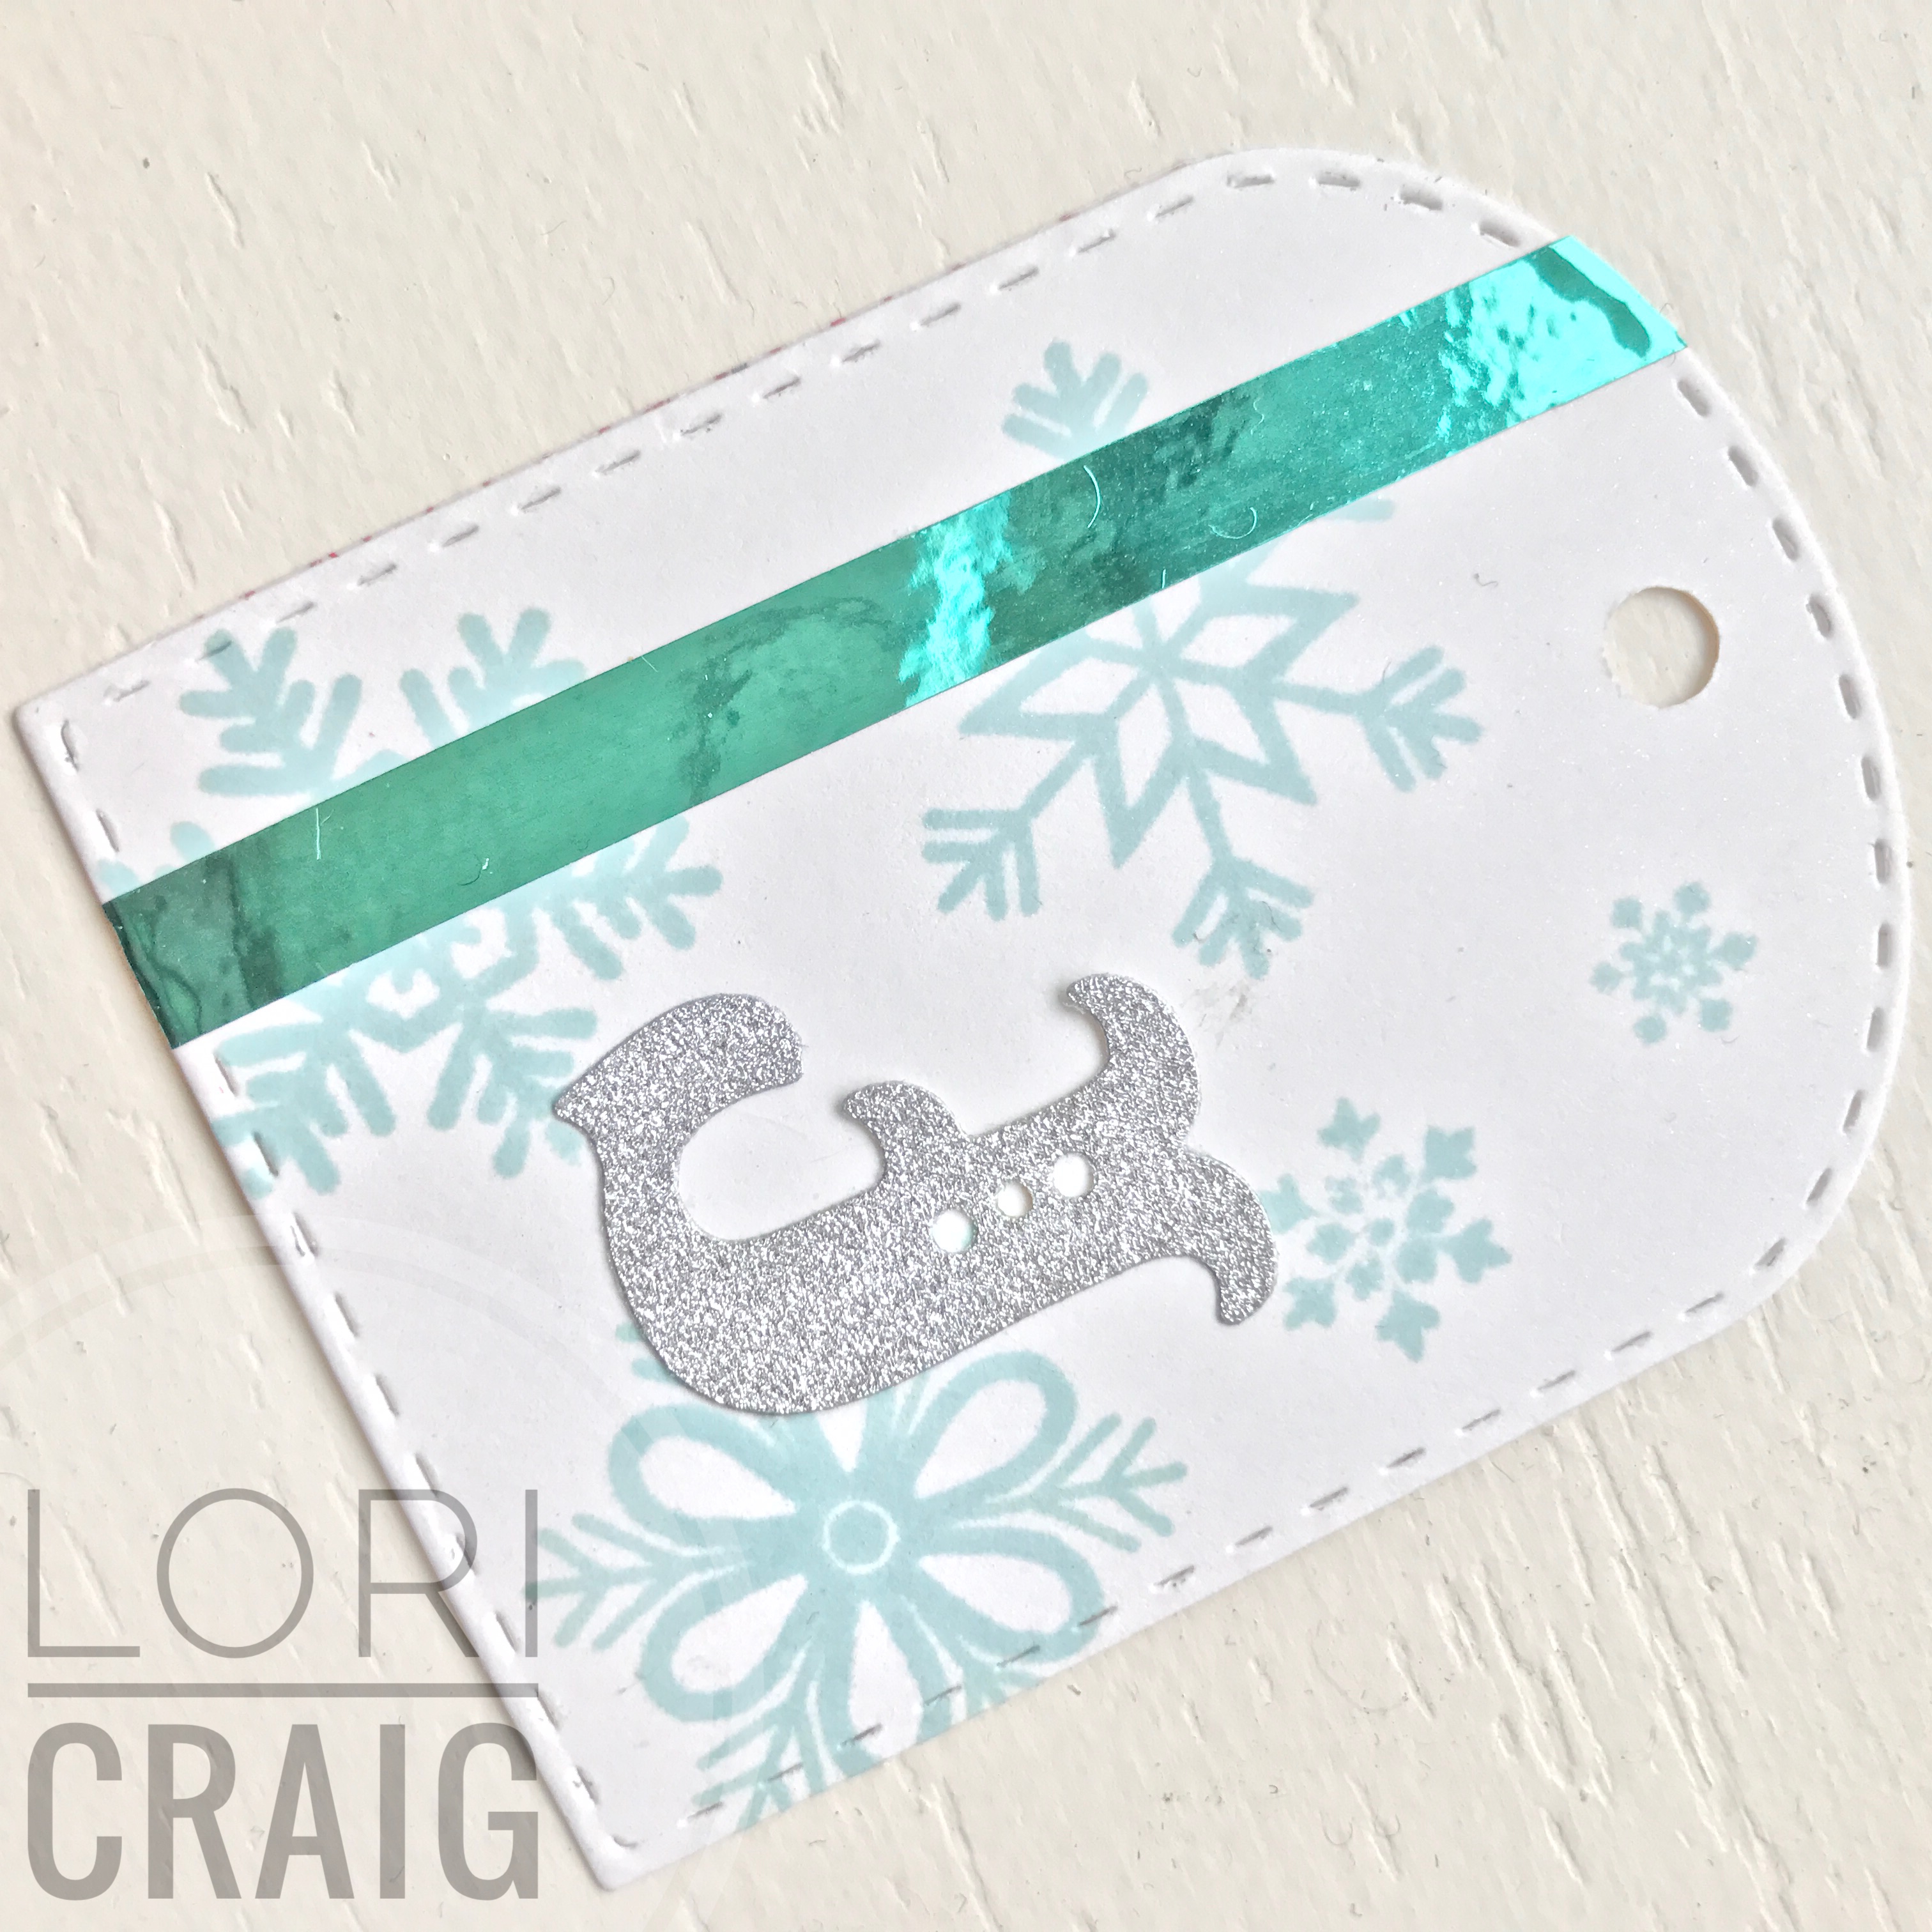
Fresh Cut Florals Edition 4 is also available for purchase, and it’s a show-stopper with a little glitter pizazz on the petals. Use it to adorn a card front, tag or package trim. The sentiment is cut from silver foil paper using the Festive Friends Dies.

Check out the full Concord & 9th September release here. So many fun, festive ideas to make quick work of holiday creativity.

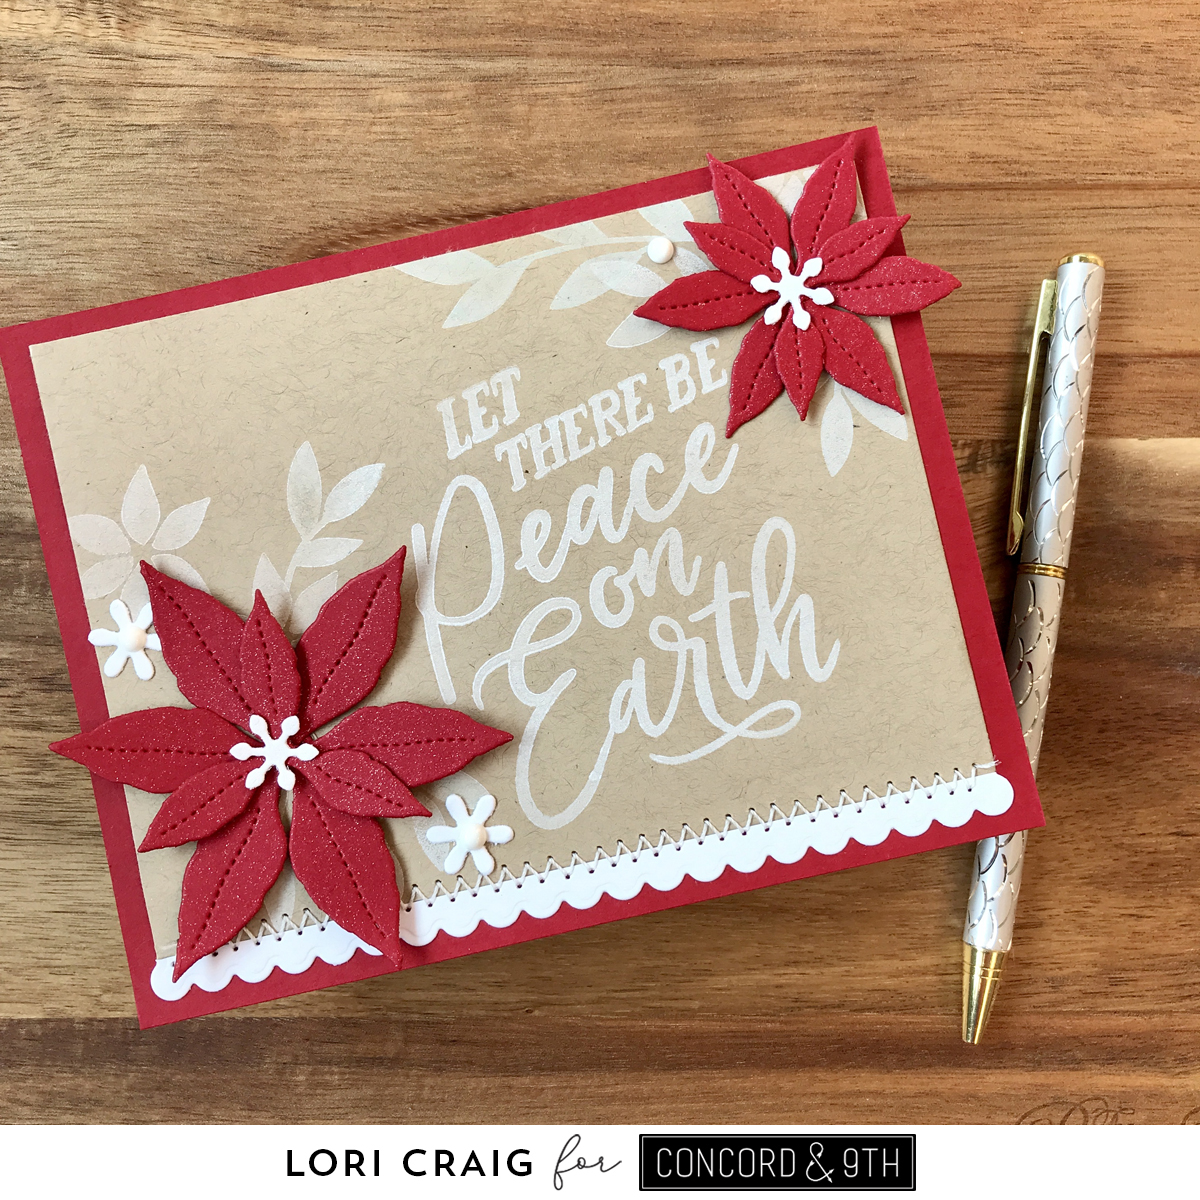
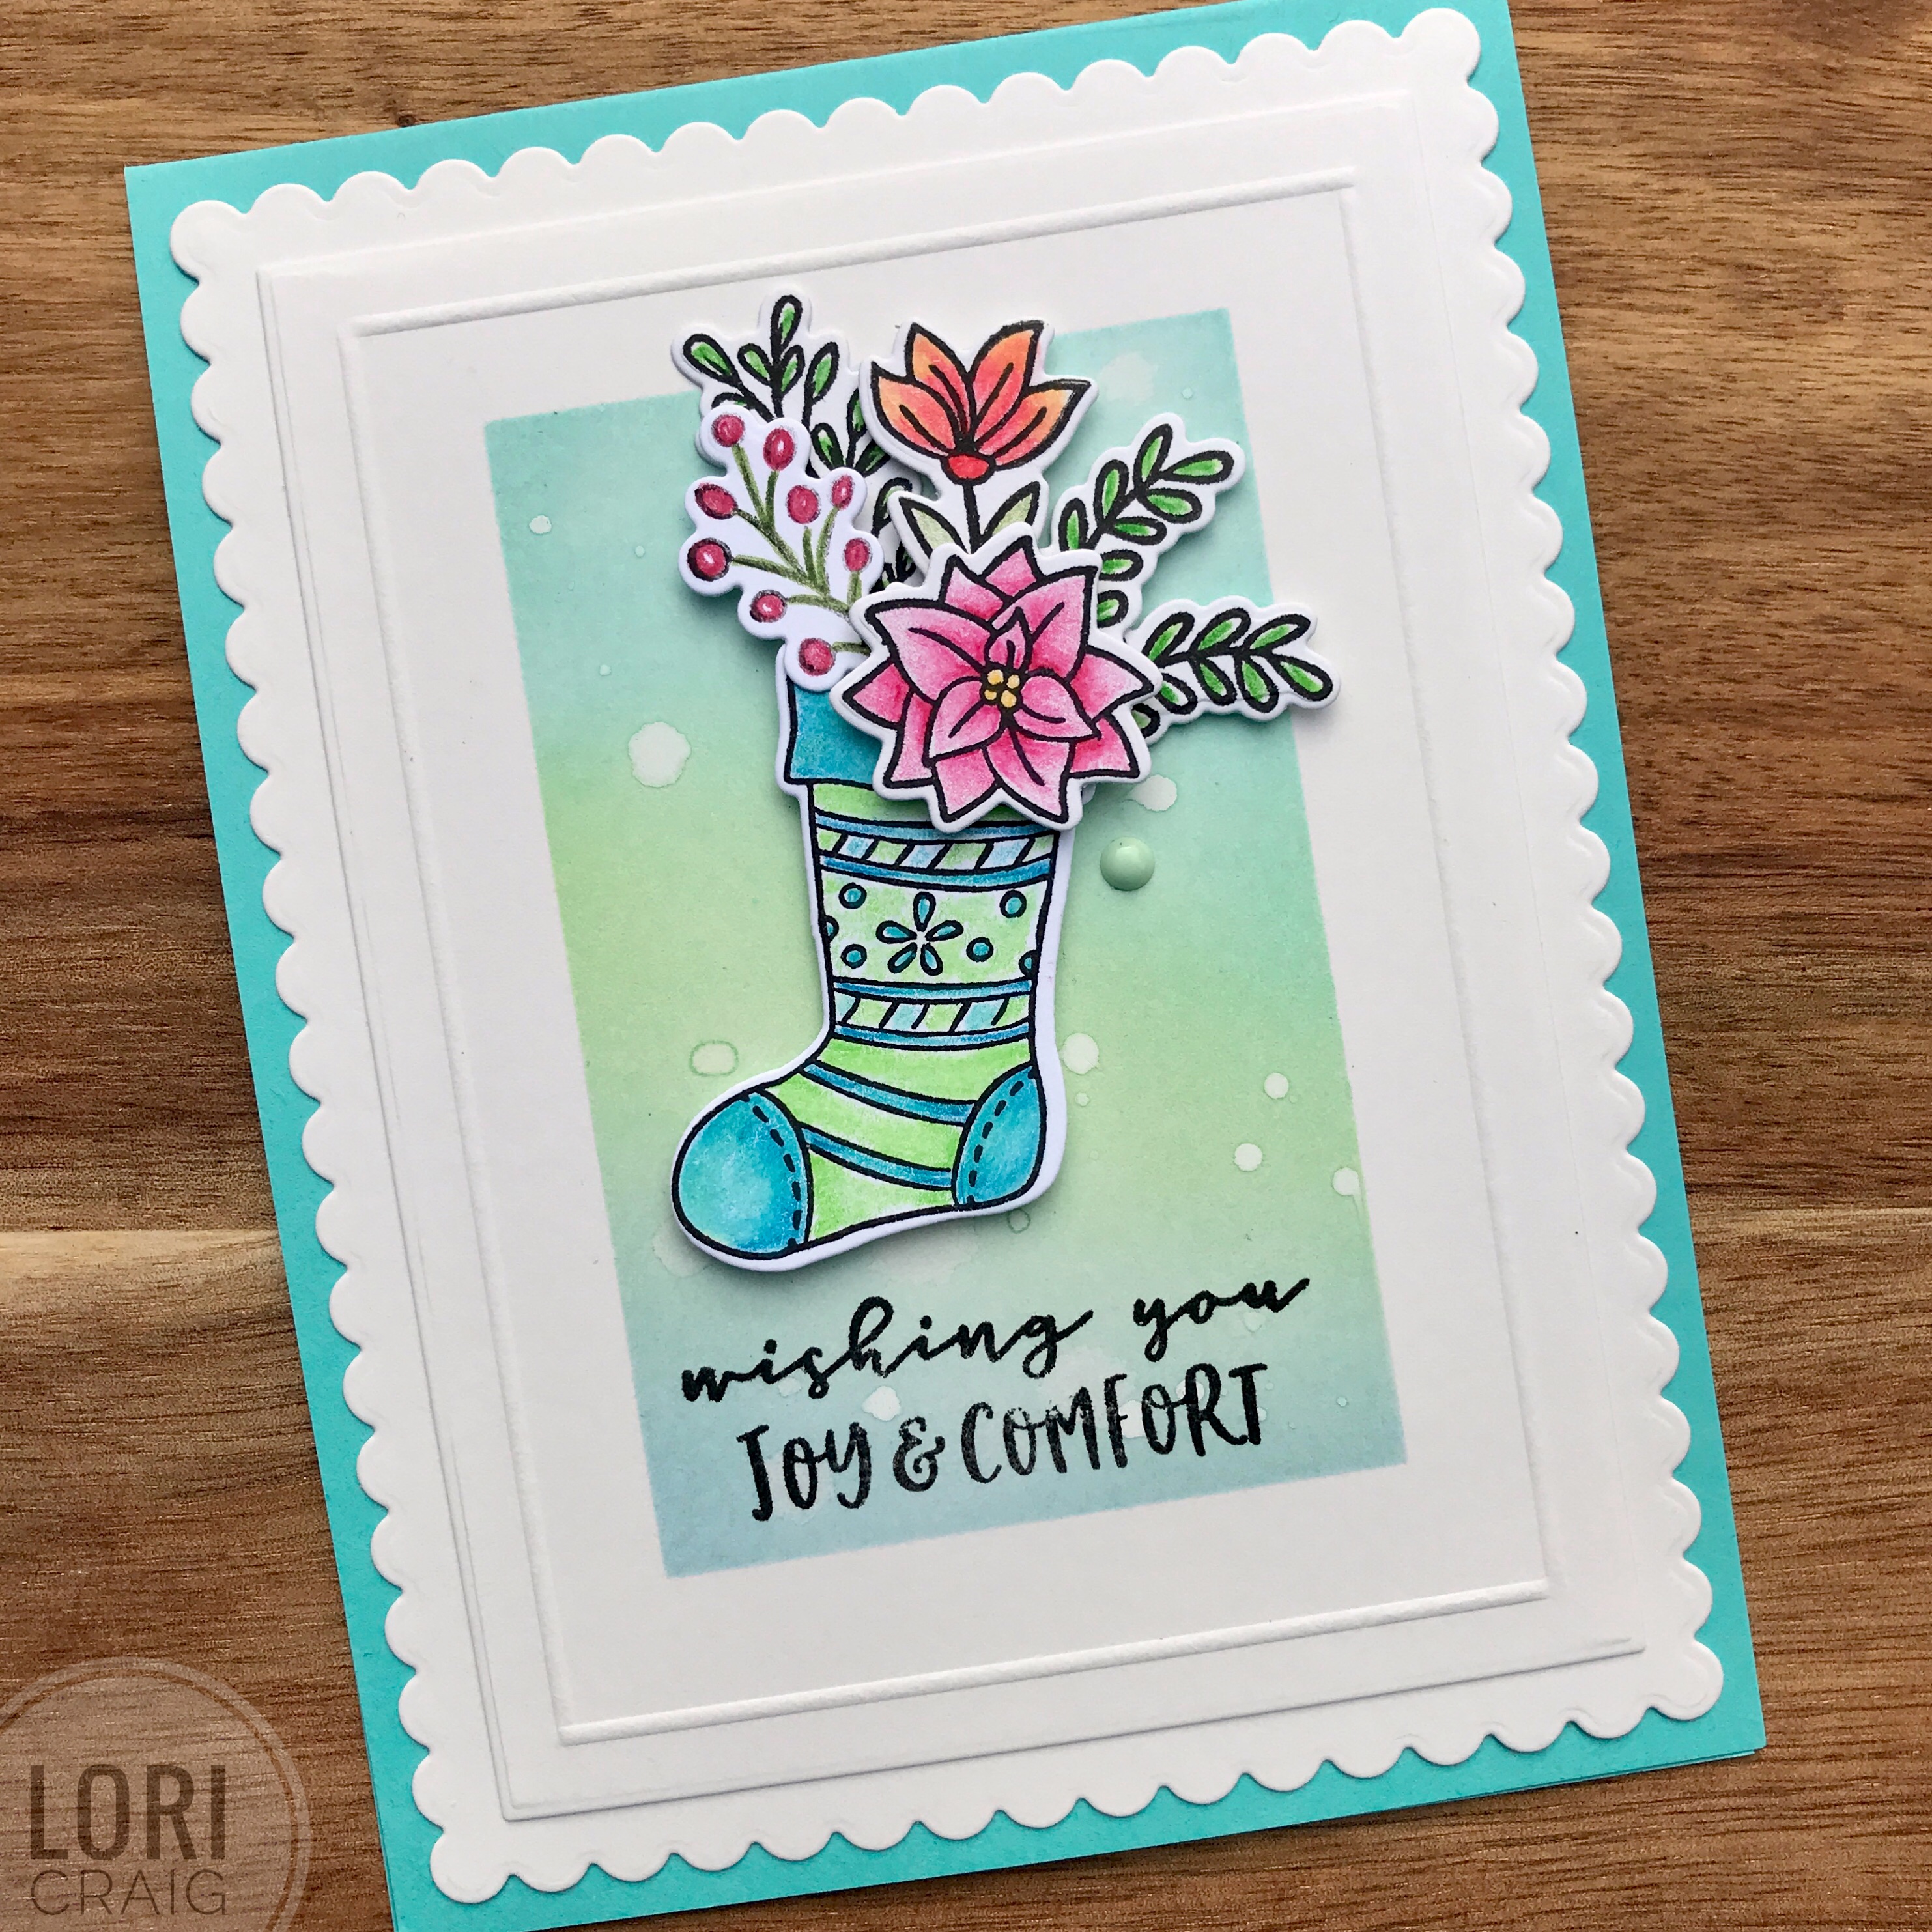
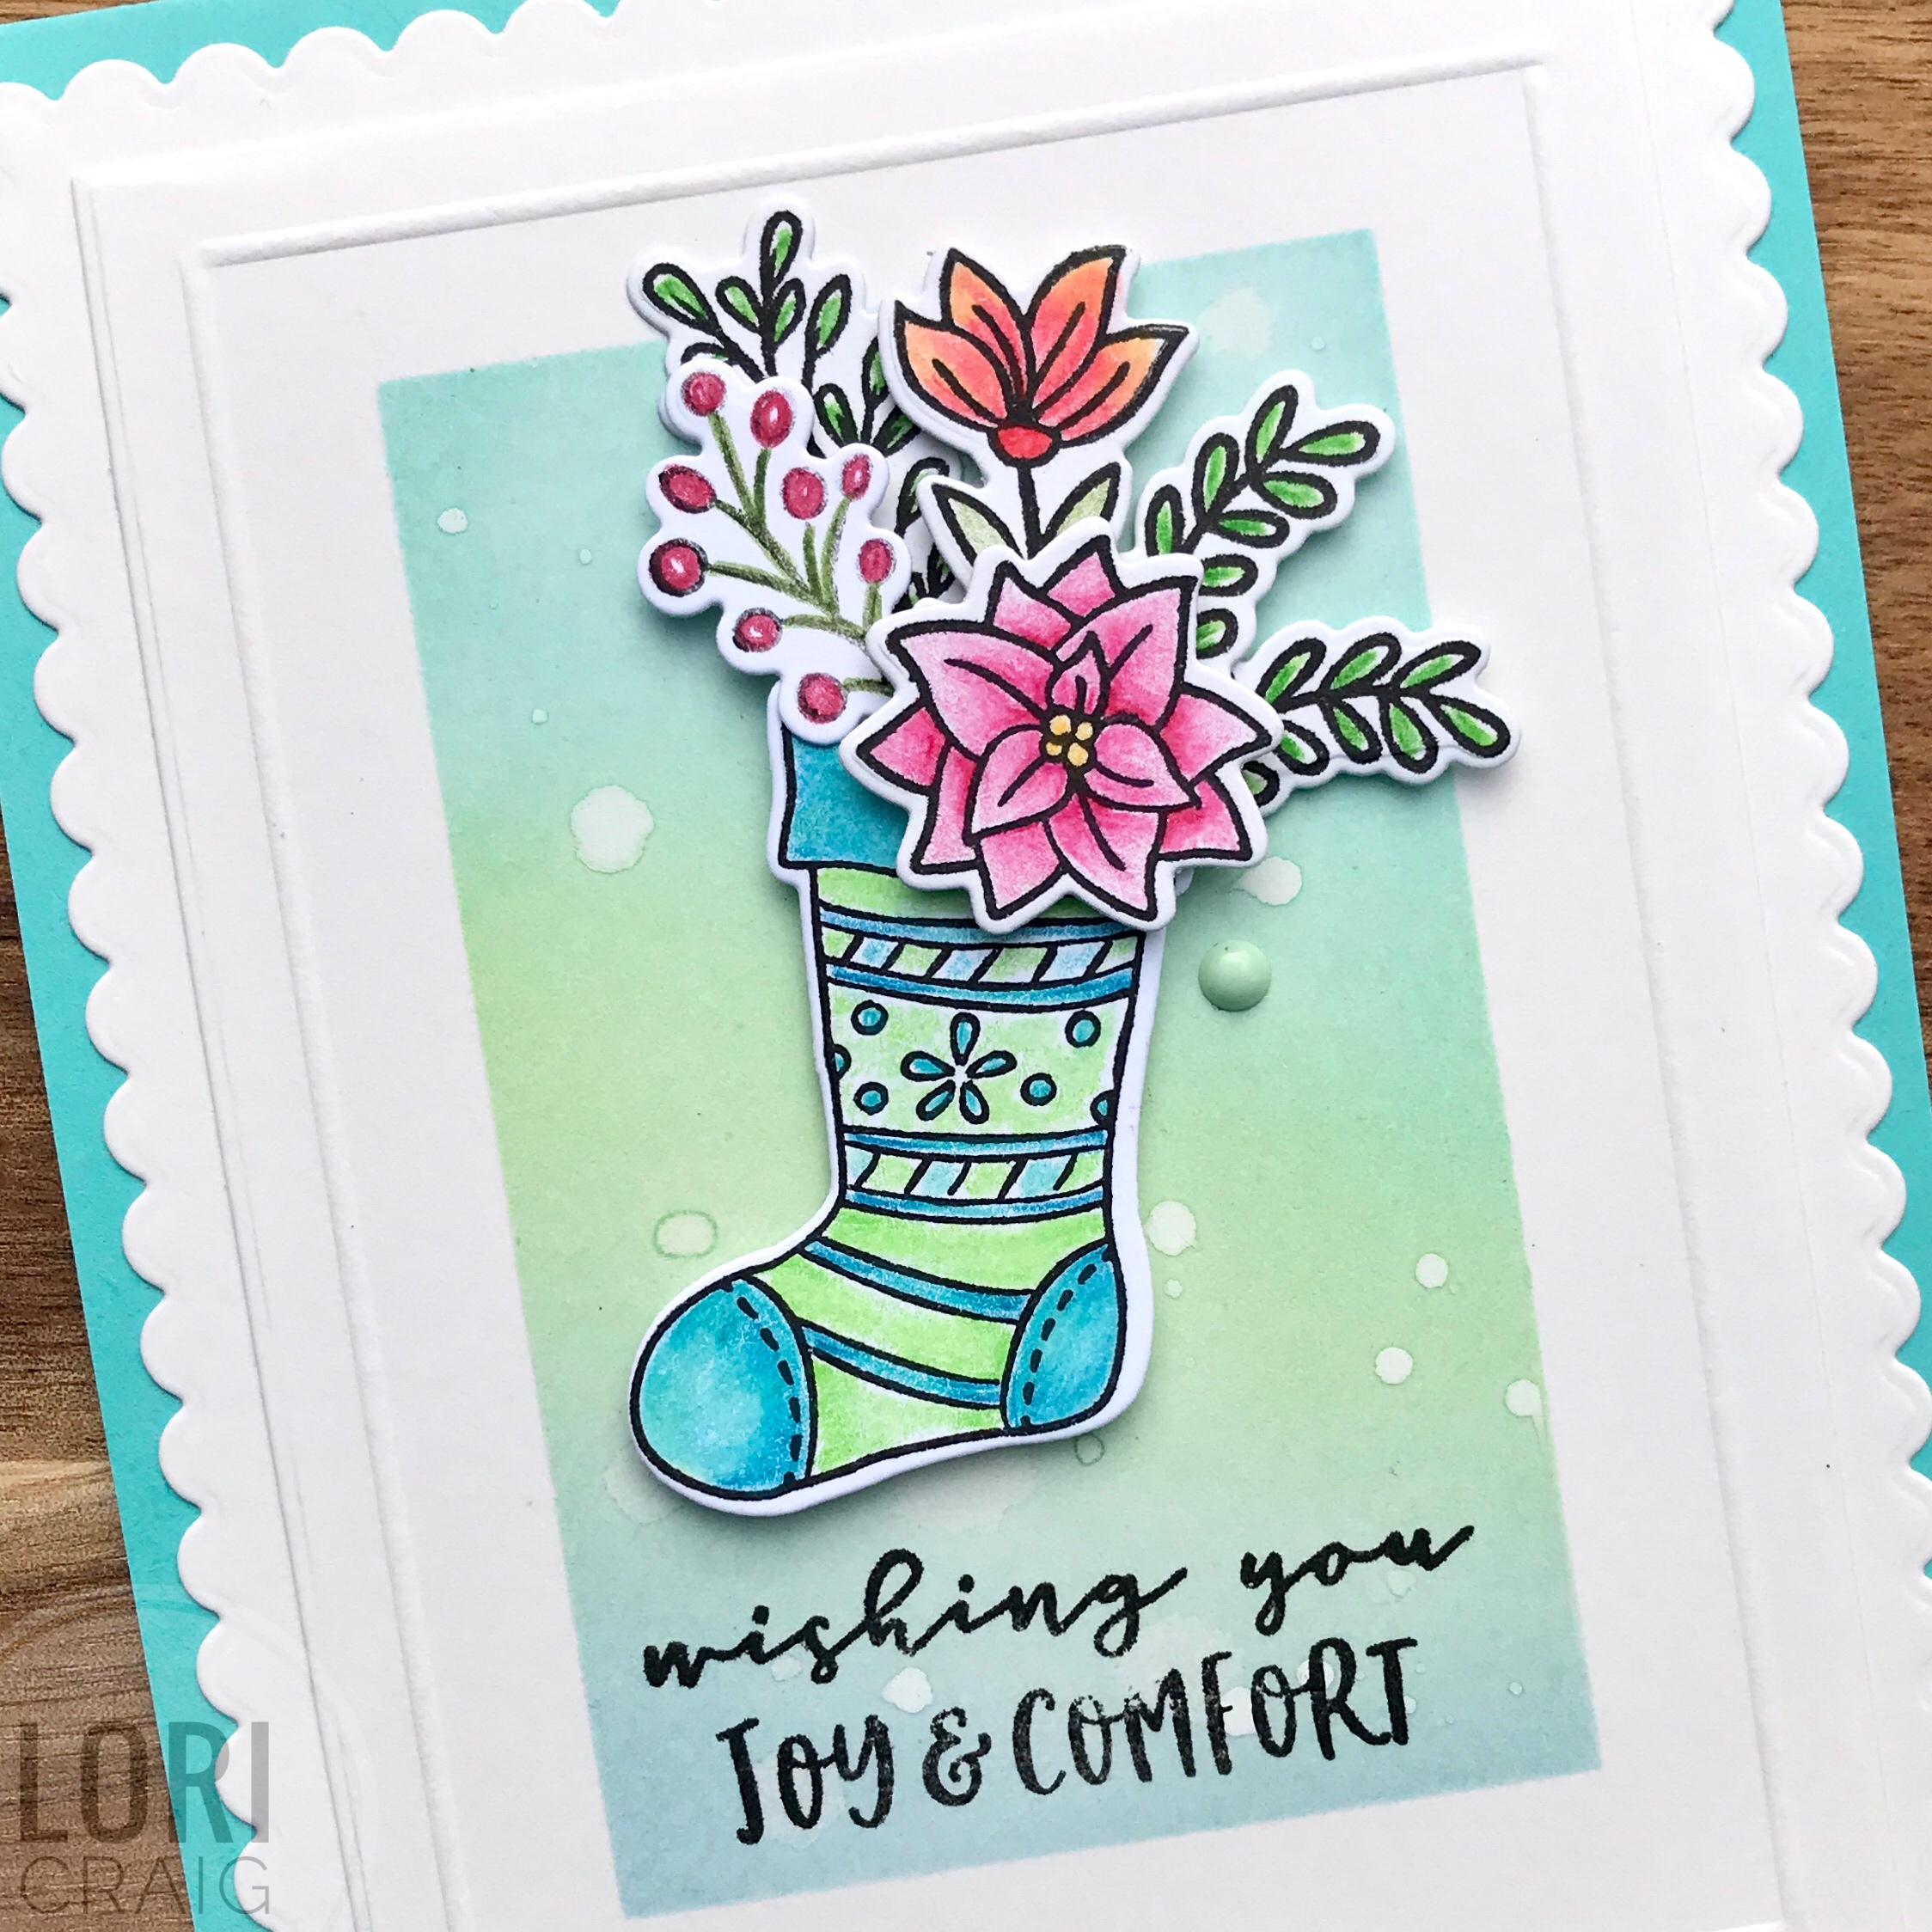
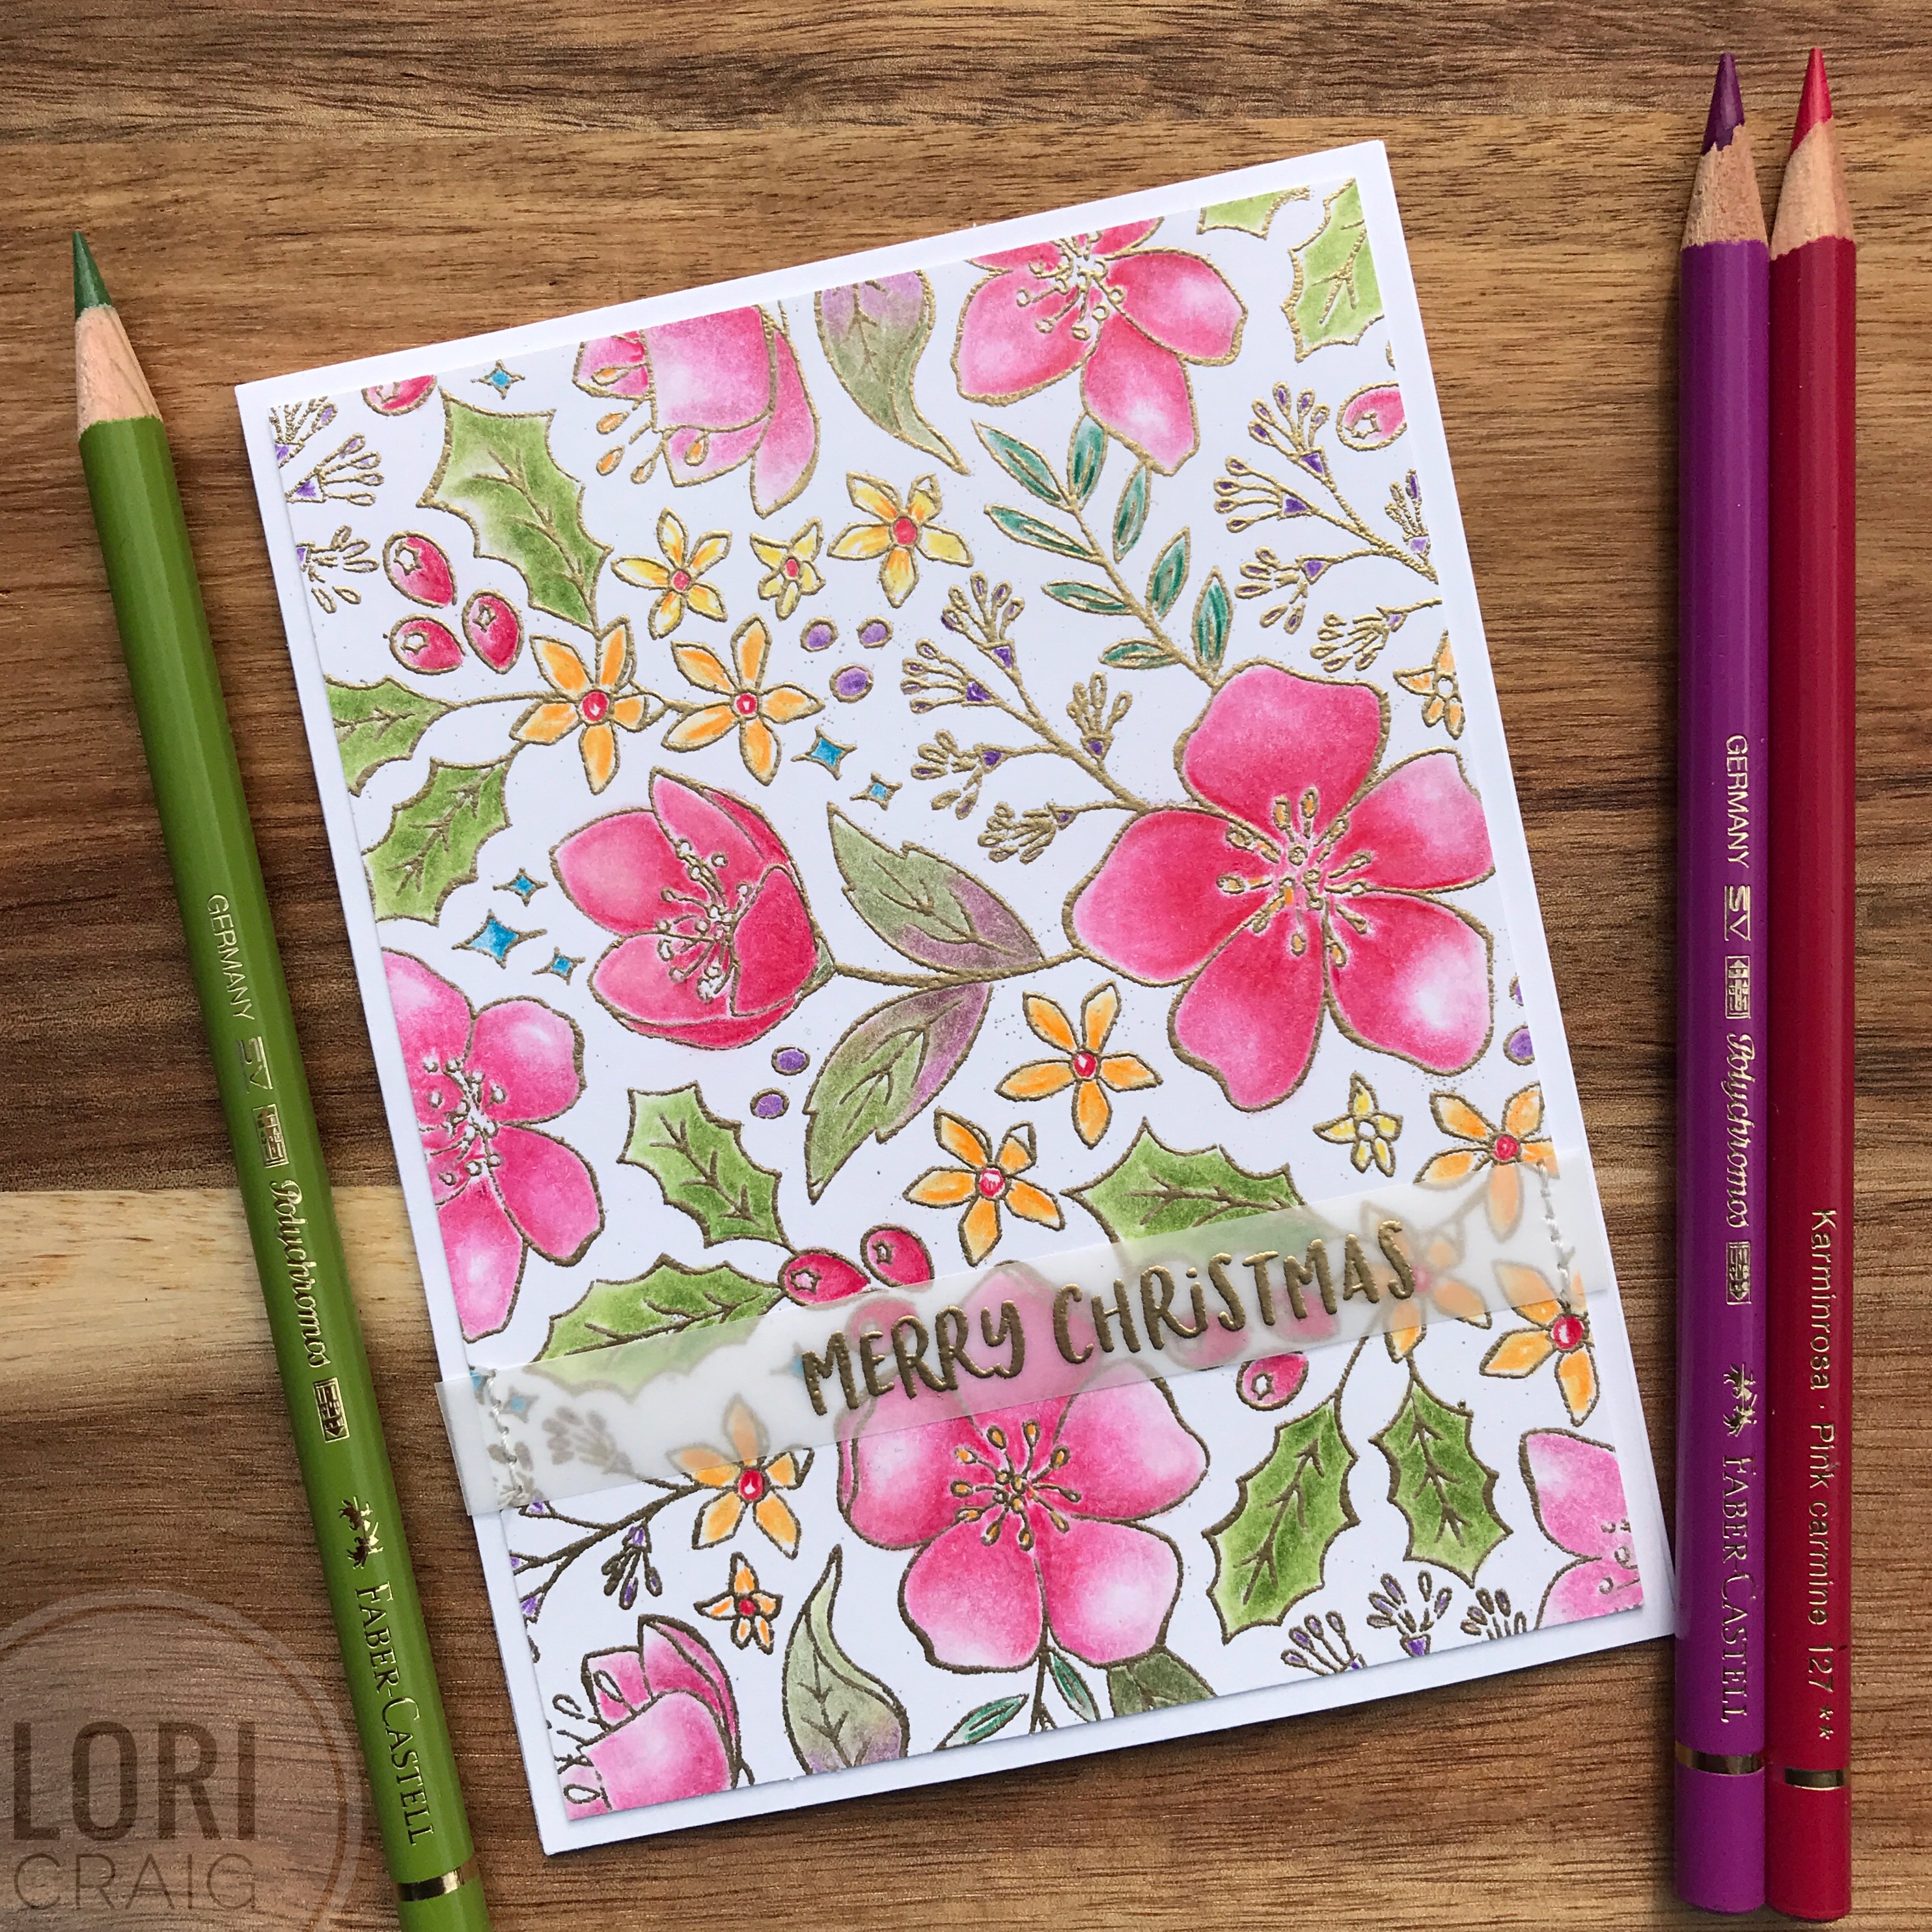
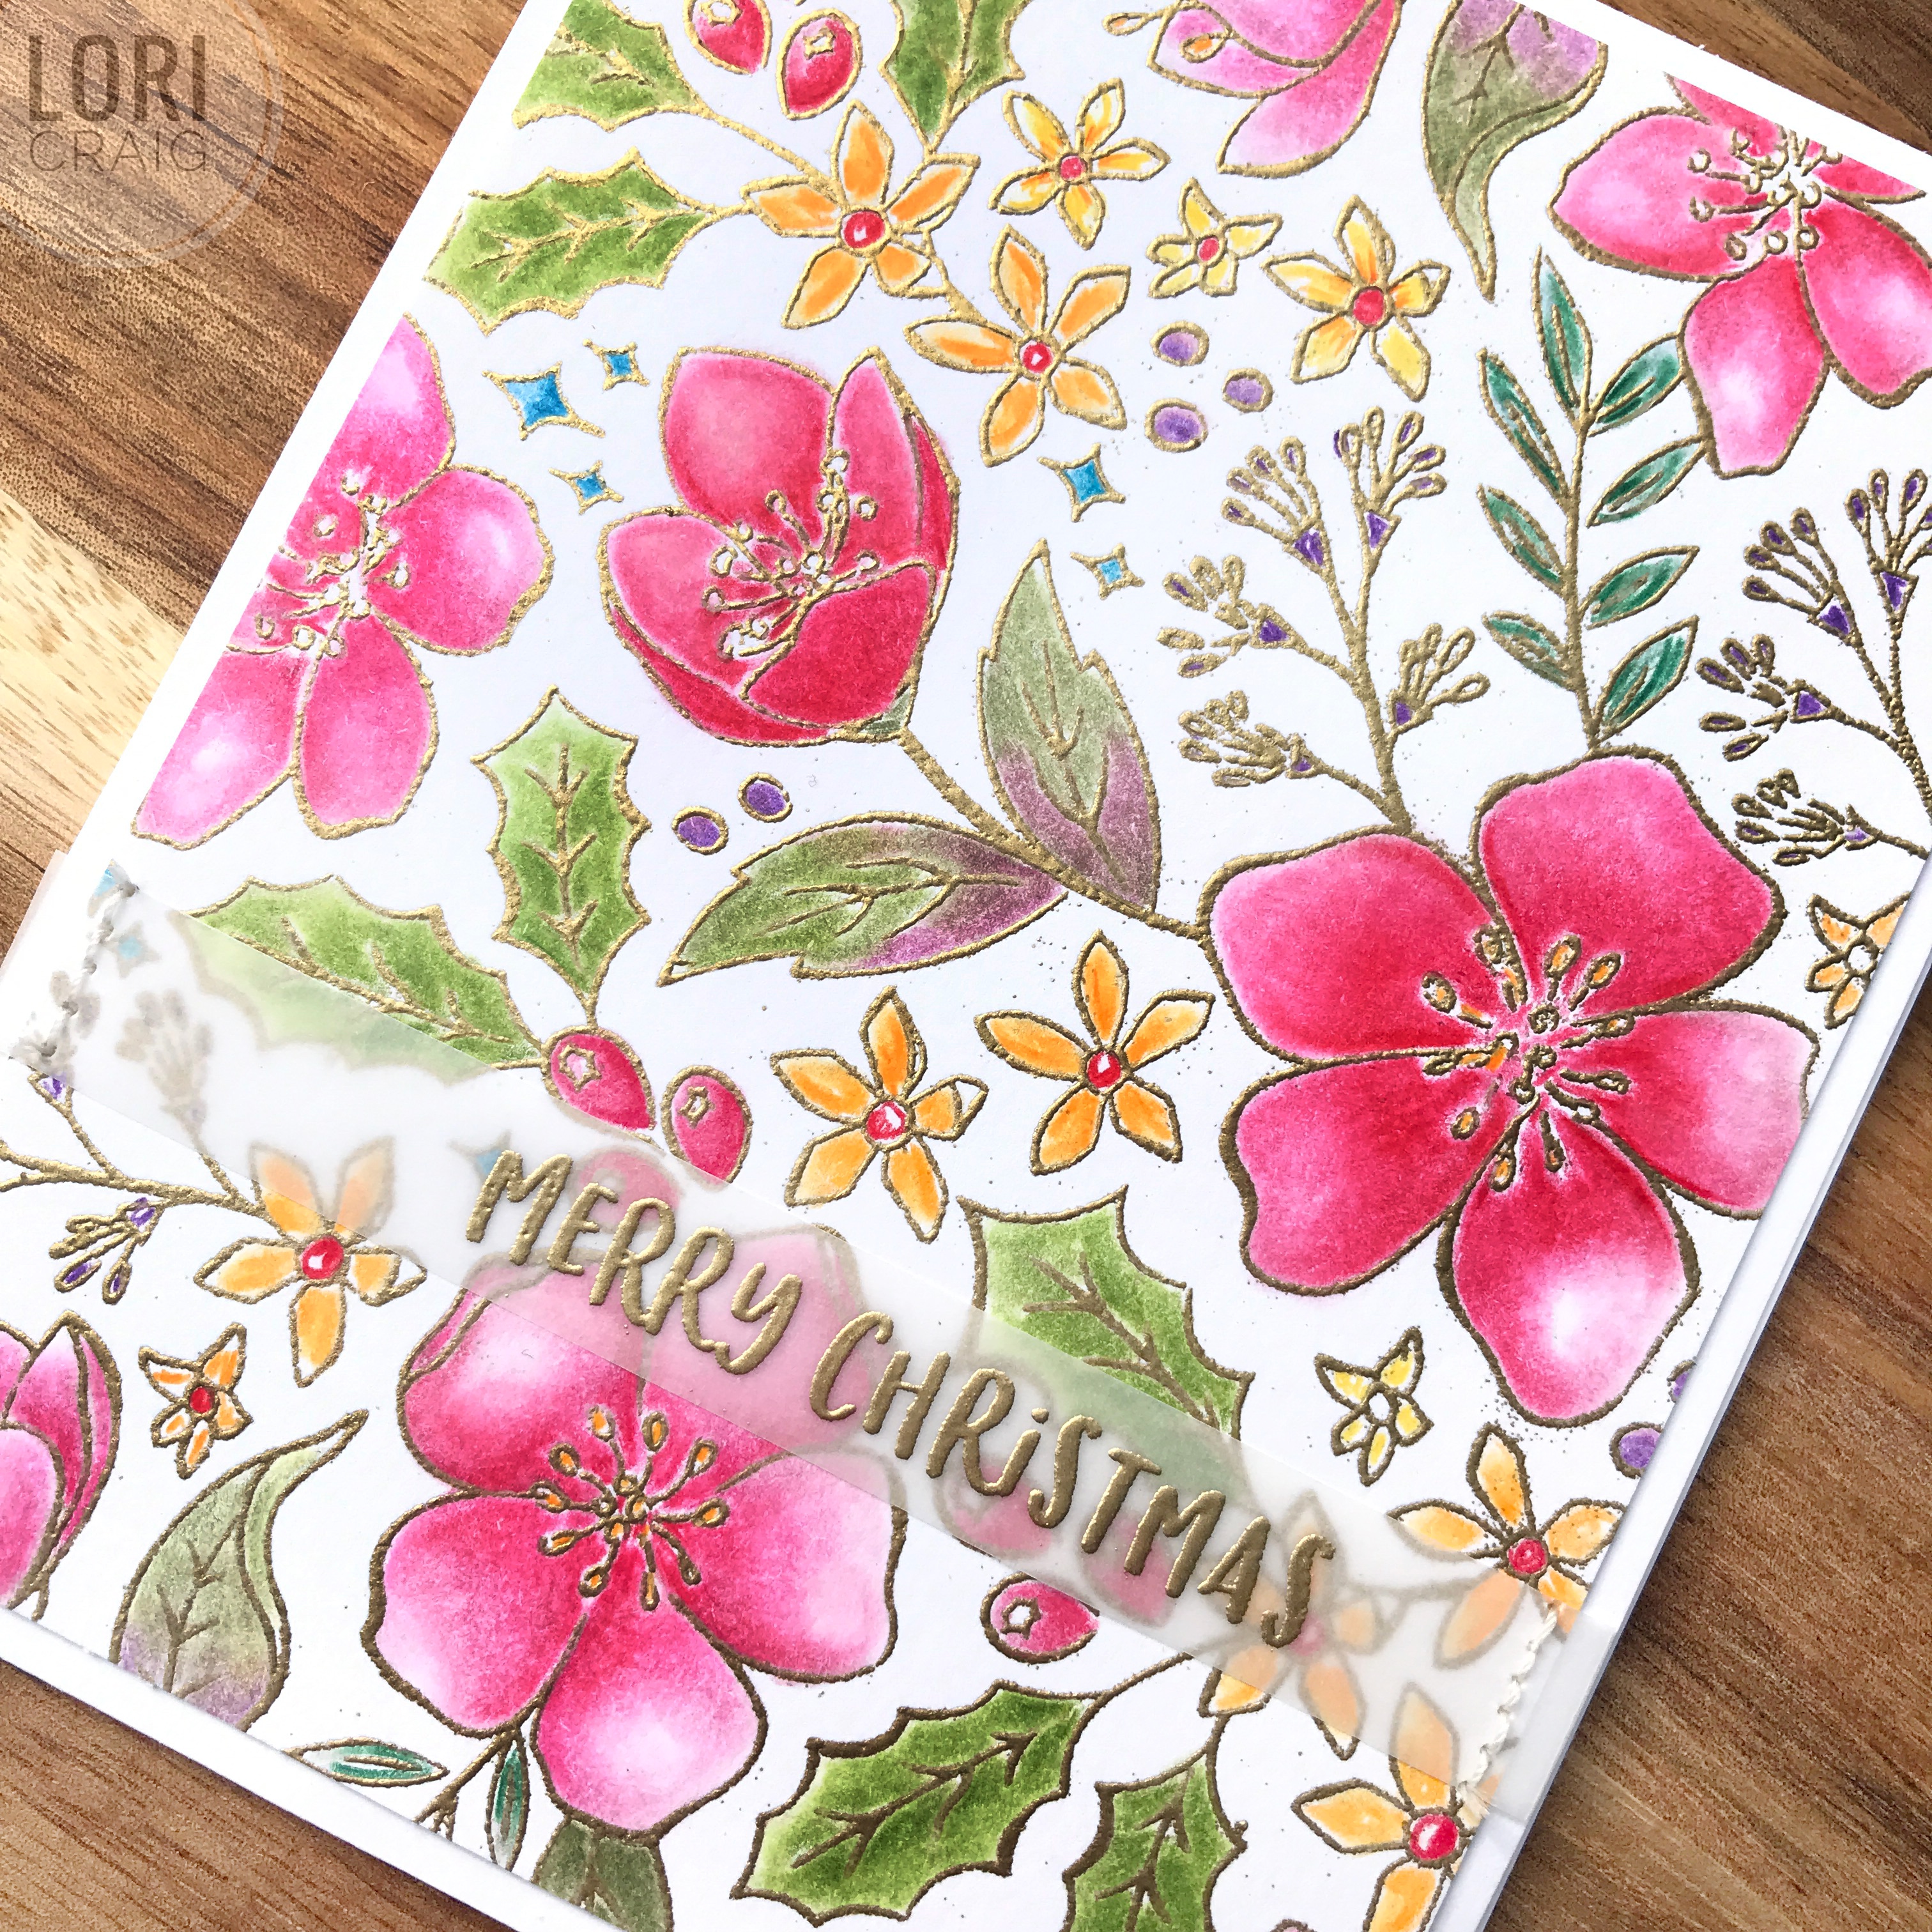
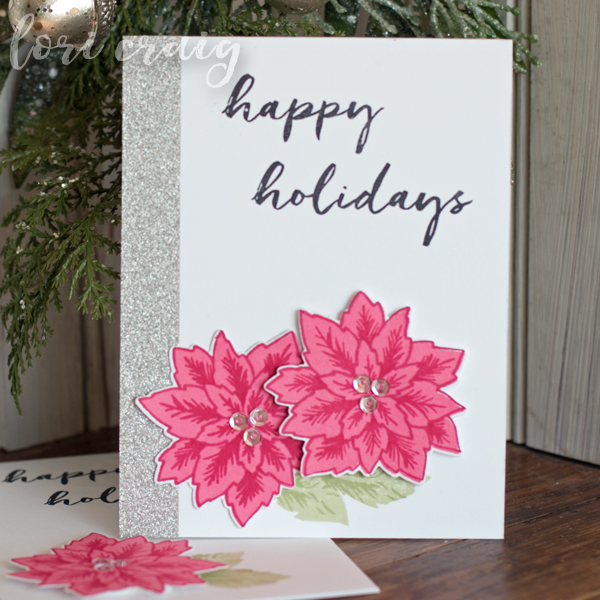
The second project I wanted to share this morning is a card created with poinsettia accents but shows off the sentiment from Peace on Earth. I’ve paired the Cranberry color with wheat and white for a crisp, classic look.

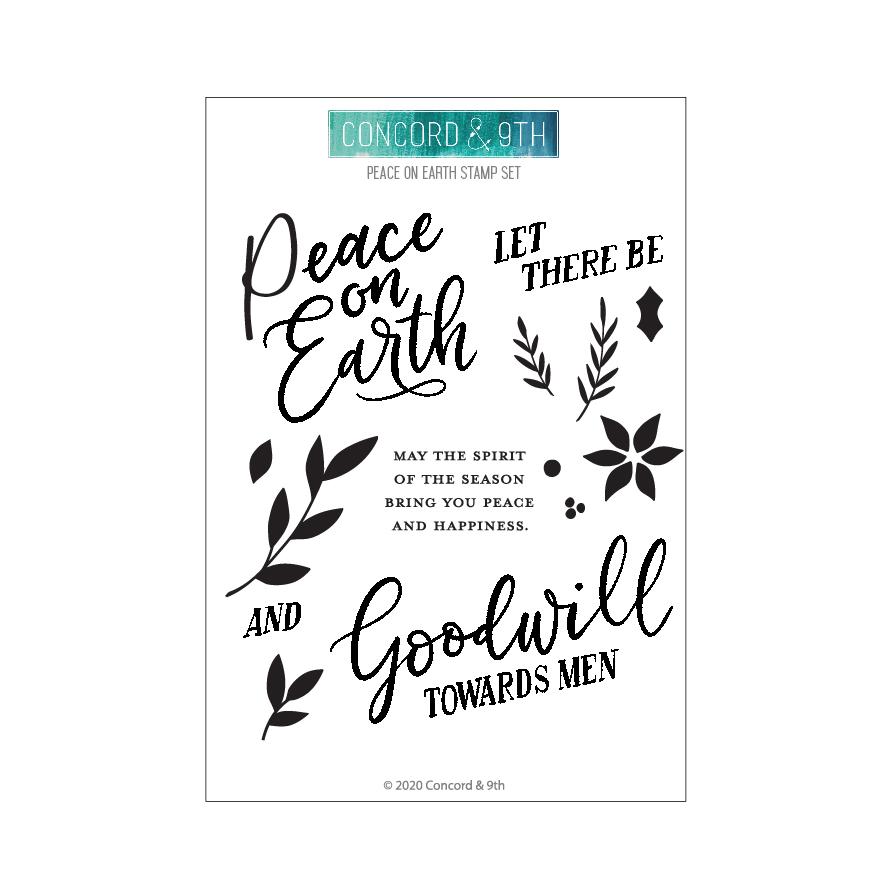
Peace on Earth with it’s coordinating dies was a fast favorite for me. I love the typography, and the phrasing is split in all the perfect places for beautiful stand-alone sentiments or to use all together.

With all that is going on in our world, I’m going to hold tight to this prayer through our coming days. Let the be peace on earth...

Thanks for stopping by, and stay with me all month long as I share my favorite projects from every piece of the release. I’ll be back soon with more to share.

Hero Arts Winter 2020 Release Blog Hop

Is it too early for Joy & Comfort? I think not!

I’m thrilled to be on the Hero Arts 2020 Winter Catalog Blog Hop today. This hop celebrates a beautiful holiday collection from a company that everyone loves! I think when you’ve had a chance to see all of the beautiful projects, you’ll agree that it’s time for Joy & Comfort!

I loved working with Stocking Bouquet from the new catalog. Loads of beautiful Christmas springs and florals to color and arrange. I had a car ride this week, so I packed up stamped images and my Polychromos Pencils for the long haul.

Then, I spent an afternoon mixing things up and adding them to a blended ink background for my first Joy & Comfort card.

Tip: my ink blended background is on Bristol Smooth cardstock. When I cut the scalloped white layer to frame, I also used Bristol Smooth. I do this so that the tone-on-tone of the papers is the same. Continuity in paper tones and texture gives your finished card a polished look!

I love sending Christmas cards, and usually send quite a few. So, one thing I try to keep in mind is design ideas that keep them flat for mailing to avoid the need for extra postage and/or damage in transit.

Christmas Rose Bold Prints was an instant winner in my book! Lots of beautiful, (but open!) detail for easy coloring. These panels quickly transition to full card front panels. With 6″ by 6″ of stamped space, there’s plenty of beauty to cut up for tags or smaller card elements, too!

First, I stamped the full background in Versamark on white cardstock and embossed with gold embossing powder. Then the image was colored with Polychromos Pencils and blended with Gamsol.

After trimming the colored panel down to allow for a slight mat to frame the images, I centred the panel on a white cardstock base. Finally, I added a small vellum banner with Merry Christmas embossed from Stocking Bouquet to complete the card front.

I appreciate you swinging by my blog today. It’s an honor to participate with this company and these incredibly inspiring artists. I hope you enjoy the hop, and I hope your day is full of Joy & Comfort!

See many other projects from the wonderful winter stamp collection and find lots of inspiration from the amazing artists below.  Be sure to leave as many comments along the hop as you can – Hero Arts will give away three $50 gift cards, drawn from the comments left across the hop. Enter by leaving a comment between now and Sunday, September 6th at 11:59pm Pacific, and the winner will be announced on the Hero Arts blog the following week.


a Winter Noel and a Taylored Expressions Blog Hop

Welcome to the Taylored Expressions Blender Brushes Blog Hop! Christmas crafting is among my favorite of favorite activities, and I the addition of this Layer It Cardinal die in the fall release made me smile. Like many families, the cardinal was a special sign to my grandma, and now I think of her every time I see one.

I used my blender brushes and the Taylored Expressions masking stencils to create this soft blue background with Confetti Cake and Gumball TE Premium Inks. Before I lifted the mask, I gave it a spritz with Liquid Shimmer mixed with water in spritzer – I love the Nuvo Spritzer – even, fine mist. LOVE. I’ve been using my extra to spritz my Christmas Cactus plants… time to order more! lol

Next, I cut the Layer It Cardinal die and the Pine Clippings die from watercolor cardstock and painted them with TE Liquid Watercolors. I mixed a little pink with Cherry POP for a cooler red, and these are a series of layers of color to build depth. After painting, the pine boughs are splattered with a bit of liquid white watercolor for snow. So easy!

Something fun to share today is the TE Holiday Gift Guide! So, just go ahead and hand your significant other or kids the link… For every $100 they spend, you’ll get a $20 voucher to be used in January… oh who am I kidding!? Just order what you want! LOL

Thanks for stopping by my blog today. I know the rest of the hop team has lots of pretty paper goodness today, please check them out:

Farmhouse Lantern for All Seasons


Thrilled to be sharing a few projects today featuring a new set available tomorrow from Taylored Expressions called All is Bright. I was immediately drawn to the lantern because I have several decorated lanterns here at home that I love to switch around for the seasons.

Continue reading

Seasons Givings Blog Hop

seasons givings blog photo

Welcome, my friends to the 6th annual Seasons Givings Blog Hop! I can’t believe 2017 has come and gone, but I’m thrilled to be hopping today with my favorites and welcoming 2018 with a little bit of papercrafting love for lucky readers. This hop is always a fun way of saying thank you to each of our faithful readers and paper crafting community! So, thank you so very much for stopping by!

If we have never met, my name is Lori Craig, and I love working in our industry. I am the advertising manager for Splitcoaststampers.com – the largest online resource for stamping and papercrafting with forums and the largest cardmaking gallery in the world. I have also worked for 10 years with Imagination International – known to most as the North American home of Copic Marker. I have traveled North America many times over teaching Copic coloring classes, as well as class for other Imagination International brands, like Tommy Art, Terial Magic, and X-Press It.

FullSizeRender 6Today I’m sharing a Christmas card that I created with Tommy Artmineral paints, Timbrillo Paste (for sparkle and shine!) and Stencil Light Paste. This one was fun!

The white background is simply Stencil Light Paste through a swirl stencil design, set aside to dry. The ornaments were painted with a mixture of mineral-based paint and Timbrillo paste, then lightly sanded to release the sparkle.  The border was created with smooth and sparkly Silver Deco Glitter Tape from X-Press It! I simply apply the tape to cardstock and die-cut my frame.  The tape works beautifully for these types of die-cuts. Seams don’t show when pieces of the tape are laid side-by-side, and it cuts beautifully.

FullSizeRender 4

Here is another project I created with the same products, and you can see the shine! The pieces of painted and lightly sanded cardstock were diecut with flowers and feathers from Taylored Expressions, and stamped with a Taylored Expressions stamp – Light as a Feather. I’ve had a lot of fun with this!

Check out my giveaway! 

FullSizeRender 5

Would you like to try some creative fun from Imagination International?

To enter my giveaway, just leave me a comment and let know what type of crafting or hobby you plan to enjoy through the new year…especially if you are exploring something new-to-you!  🙂  I’ll select a winner on January 8th. 

After you leave me a comment to enter my drawing, visit my friend, Lisa Henke!

Seasons Givings Blog Hop

seasons givings blog photo

Such a treat to be joining an incredible group of women for the 5th Annual Seasons Givings Blog Hop! So much thanks and appreciation to Latisha for putting this together each year and for inviting me to participate! It’s always fun for the bloggers and the hoppers, and it is especially fun to host a give away on each and every blog listed below… Just our way of saying thank you to each of our faithful readers and paper crafting community! So, thank you so very much for stopping by!

If we haven’t crossed paths before, my name is Lori Craig. I am very blessed to work with some amazing people in the papercrafting industry. Day-in-and-day-out, I am starting my tenth year as the advertising manager at Splitcoaststampers.com – the largest online resource for stamping and papercrafting with forums and the largest cardmaking gallery in the world.

I also have the pleasure of being a Copic Certification and Workshop Instructor for Imagination International – the North American distributor for Copic Marker! This will be my 8th year with Copic, and I love traveling around the country and spending my time with people who are just as crazy about color as I am! Maybe our paths have or will crossed soon! 🙂

Verve_May2016_Lori Craig_1370

Today I am sharing two one of my favorite projects from 2016… First, this is a card that I made as a guest designer for Verve Stamps back in the spring. The set for this card is called Beautiful Things. The flowers and the sentiments are just perfection. Orange (Copic YR04 – single color blend here!) is a favorite color, and I consider kraft cardstock to be the perfect backdrop for almost everything! 🙂

Copic Wide Roses Lori Craig

And, second favorite would probably be this one. I made these cards using a Copic Wide marker back in the spring to free-hand florals. (Original post and step-outs are HERE.)  I loved the richness of the red and the acrylic look that I got with my Copic Markers hand-drawing these flowers. I also loved the crisp black mats. Clean and simple.

Check out my giveaway! 

And here is a photo of my giveaway… I pulled out a few of my favorite things from Imagination International (the Copic Marker people!) because that is the one manufacturer I work with most frequently!

FullSizeRender (80)

  • an awesome grid paper journal – I personally love these… I shared about them HERE … 6×8 square grid Red Rubber SenseBook 
  • two Sepia Multiliners – for journaling or sketching – water and Copic safe
  • X-Press It foam mounting tape and double sided tape – for card making and papercrafting
  • PLUS $25 to spend at Imagination International Inc. for Copic Markers or any of the products in the III store! 

To enter my giveaway, just leave me a comment and let know what type of crafting or hobby you plan to enjoy through the new year…especially if you are exploring something new-to-you!  🙂 Edit to add: I’ll select a winner on January 8th. 

After you leave me a comment to enter my drawing, visit my dear friend, co-worker and Splitcoaststampers partner in crime: Lydia Fiedler!  

If you are jumping in mid-hop, the full list of participants is here: 

Thank you so much for stopping by and

have a wonderful, blessed New Year! 

The Week of Joy

Snapseed

This is one of my favorite weeks of the year! The stress of Christmas is behind – for the most part. The new year lies ahead… The kids have another week or more off from school, and it’s just a laid back time around our home. It’s just a time of low-key JOY for us!

Snapseed

I wanted to share a few last minute tags that I created last week before we left to enjoy our Christmas with family!  Easy tags that I dressed up with some simple stamping and foil accents!

Snapseed

This simple one ended up being a favorite.. I started with the Build-a-Tag 5 from Taylored Expressions and stamped with snowflakes from a retired set called Winter Wonderland in Salt Water Taffy TE ink.  Then instead of writing a to/from on my tag, I just a J (for Jen!) from Silver Deco Tape from Imagination International with a “J” die from the Poster Graphic Alphabet dies. I love the decorative flair to these letters!

DTG2510S-2 This 1″ glitter Silver Deco Tape is just wide enough that you can cut narrow dies with it! I adhered to a scrap of paper and then ran it through my Big Shot. And then I glued it to my tag with Glue Marker.


DFT610A-2To finish off my tag, I ran a strip of decorative Foil Tape down the left side of my tag. Love the rainbow of colors in this tape collection!


Snapseed

Next up, I used a My Monthly Hero Kit from Hero Arts to stamp a few poinsettias and the same Build-a-Tag 5 die from Taylored Expressions with a strip of red foil to add a little glitz.

Snapseed

Finally, a replay of the tags I showed you last week with a hint of chocolate colored Decorative Foil added – yes, I said CHOCOLATE FOIL. Yum. This was a gift for my brother and he commented on how cool this tag was… I call that a win!

I’ve been trying to spend some time in my craft room during this week of joy! Of course, that had to start with a little bit of cleaning and organization after the Christmas crafting marathons… Tomorrow morning I’m going to the duck blind with my husband … definite JOY!  I don’t have a hunting license for this season, and I’m not buying one for just one day… so I’ll be taking photos and possibly watercoloring a landscape… If I come up with anything inspirational, I’ll be sure to share! 😉

I do have another paper project to share in a day or two, and I’m participating in a very fun project over the weekend, so stay tuned!

Thank you for stopping by… Wishing you continued Christmas blessings and JOY …

Season’s Greetings


Seasons Greetings Rounded Tag Top Lori Craig

I’m having a wonderful week prepping for the holiday, and I wanted to share a quick tag project I did early in the week. There is a MOPS (mothers of preschoolers) group at my church, and we are a long past the preschool stage at our house, but they graciously invite me to be a mentor mom… I love these moms, their tender hearts for their children and the fellowship we enjoy. I wanted to take each of them a small token of love…

Lori Craig Pine Cone Centerpiece

I also love decorating with pine cones…. This is a centerpiece I made for my dining room table… It has some large sugar pines from California, along with shed antlers that my daughter and husband found laying in a field, some faux-evergreen and some glassy tiffany blue ornaments. It’s all arranged in a box my husband made from barn wood off of the barn on our property in Missouri. It’s become a special part of my Christmas!

Seasons Greetings Bags Lori Craig

I love this Simply Stamped Pinecones set from Taylored Expressions. I had my doubts about it being simple, but it really was… I would not pull your leg over something like that… I stamp for fun, not frustration. Easy peasy to line up! Love.

Seasons Greetings scallop tag Lori Craig

The pinecones were stamped free-hand (without aMISTI) and it was easy! The ink colors I used were all Ranger Distress Inks:

  • Old Paper – bottom layer
  • Brushed Corduroy – middle layer
  • Walnut Stain – top layer

I did use a MISTI to line up my sentiments.   This scallop bottom tag is Gift Card Holder Tag from Reverse Confetti, and the round top tag is Build-a-Tag 4 – it is my favorite in the collection. So easy to use! The gift bags were something I picked up after last Christmas for $.10 each… score.

Seasons Greetings round top side Lori Craig

Finishing cut out cookies today, and a party with my BUNCO girls tonight! I have another card to share tomorrow after my party. Have a GREAT day as you finish your Christmas prepping and partying… Tis the Season!

Christmas Delivery

Christmas Delivery full lori craig

I have two more Christmas cards to share with you today! I am getting excited for the Christmas holidays. I love the time with my family, and the laid back calendar, but I have several things to tackle between now and the 20th for that to happen… don’t we all? 🙂

Special Delivery upclose

This cute stamp is one I’ve loved from Verve for several years. Such a cute image to color! I used colors from my favorite custom Copic set (you can see the color list here!) to color my reindeer and then cut my pieces with Taylored Expressions Build-a-Tag 4.

When I had my general layout done, I added some pizazz with XPress It Deco Green Glitter Tape.  I really like using this tape for a few reasons: 1) It sticks… sounds crazy, but some don’t, and I’ve had good luck with this! 2) It is easy to apply, it doesn’t wrinkle or stick so tight to anything other than your paper – the application is smooth and bubble free. 3) It is smooth to the touch. You’d think with the shimmer and shine this has that the feel would be chunky and scratchy – it’s super smooth. 4) It is super easy to lay rows of the thinner tape next to each other without visible seams – this is two pieces of the green glitter tape side-by-side.

happy holidays close

This next card is one that I started at my stamping retreat in October…The design was a swap from the uber-talented Tracy McNeeley I stamped the elements at our retreat and then came home to finish assembly. The poinsettias are from Birch Press. Stamped and then die cut… These were super easy for me to line up – and with my MISTI, I was able to make several flowers without any trouble. The die cut flower pieces are popped up for dimension with XPress-It Double Sided Foam Tape.

happy holidays full lori craig

I have accented the left side of my card with silver Deco Glitter Tape from XPress-It. This comes in a wide 1″ roll, and I LOVE it! It has the same features that I like about the skinnier tapes, but it cuts like butter – even with scissor. I trimmed the far left edge of this glitter tape with scissor after applying to my card front. Nice, clean and straight cut… So easy…

I’m off to the phone store. Both of my girls needed new phones so I can reach them when I want to talk to them. So, in the spirit of nothing is ever fair, I got an upgrade and we played the hand-me-down phone swap-a-roo.  I detest the phone store, so if I’m not back in a day or two… give me a shout. Make sure I survived!

Thanks for stopping by!

Sparkly Christmas Tree Tags


sparkly tree tag lori craig square

I’ve started making my Christmas tags… even when I do not take time to stamp all of my Christmas cards, I like to make a lot of tags. I keep my wrapping fairly simple with solid or minimal pattern papers and add a hand stamped tag!

At a stamping retreat in October, I received the Take a Bough bundle from Concord & 9th as a door prize! (Thanks Greg and Angie!) Loved all of the elements to the set! I’m planning to have my girls help me make some of the dimensional trees, but today, I used the O Christmas Tree stamps for making a few cards!

sparkly tree side view lori craig

I stamped my trees with waterbased green inks for the tree branches and used Tsukineko Espresso Truffle on the trunks. The bases are colored with Copic Markers (E31/E33) and then the branches are accented with Clear and Green atyouSpica Glitter Pen. I love the shimmer that the glitter pens add without any bulk or thickness to my project! The sentiment is embossed with Ranger Princess Gold Embossing Powder.  I love that this gold isn’t so brassy…

Spica-Clear

The Spica glitter pens come in 24 different colors, and they are available in multiple set options or as individual pens. The micro-glass flakes in atyouSpica glitter pens are more reflective and brilliant than the glass beads typically used other glitter pen brands.

The pens are archival, non-toxic, acid-free, no-clog nib and pigment-based. I use them most often, just like I did on these tags, layered over color for extra shine. My stamping ink held tight with no running or smearing!

Calendar Pages

One other way I love to use these pens is in my calendar. I don’t do a lot of fancy work in my day-to-day planner, but I still love paper and I like it colorful. The Spica Pens add a little bit of shimmer without bleeding through to the backside of my pages. You should be able to click and enlarge the photo. 🙂

sparkly tree tag lori craig square

So that’s three tags down… About 2 dozen more to go! I do love Christmas crafting, and while I promise myself I’m going to do a little bit here and there through the year, I just can’t get into swing until the holidays actually roll around! I hope you are finding time to get crafty! See you soon!