
In the spirit of the season, today I’m sharing a nativity project that I have noticed on several crafting sites in the last few years, and wanted to create for myself.
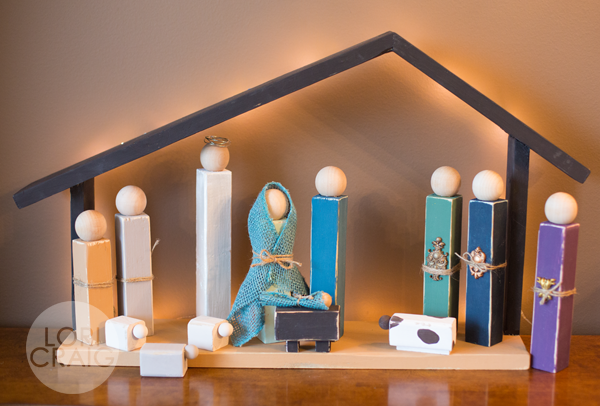
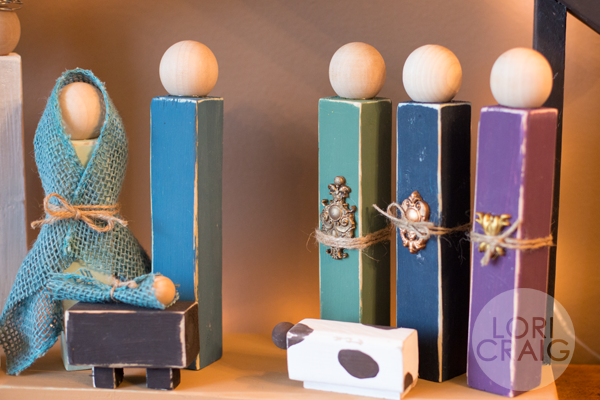
The fun thing about this full nativity project is that it can be scaled back to a few key pieces if you are short on time, and I’m sure I can think of a few new pieces to add next year. It’s the perfect gift for a friendship where small items are exchanged each season – start with Mary, Joseph and the manger. Add the angel, wisemen, shepherds, animals, etc. in future years.
I’m thankful for my friend Darcie who helped in anticipation of Christmas, and we created three full nativity sets in just 2 hours (plus a 24-hour rest for glue to cure!). Supplies from Tommy ART, Thibra and Better Ultimate Adhesive take this project from simple to striking, and the first-rate quality of the supplies means the sets will be enjoyed for years to come.
SUPPLY LIST
- Tommy ART Neutral Wax
- Tommy ART Metallic Colors
- Tommy ART Mineral Colors
- Tommy ART Antiquing Coating
- Thibra Thermoplastic
- Better Ultimate Adhesive – FAST
- 1 – 8 foot piece of 2×2 lumber that can be cut to individual pieces – we used a circular saw (don’t forget your safety glasses!)
- 180-grit sandpaper
- 8 – 1 ¾” round wood knobs
- 4 – ½” round wood knobs
- Burlap scraps
- Jute
- Silver Wire – 10” piece
A few affiliate links to reputable sources have been used in this post at no additional cost to the buyer.
Directions for Creating the People
Step 1: Cut your character pieces from the 2×2 lumber and quickly sand to smooth any rough edges, especially at cuts on each end. We used a circular saw. Please be sure to wear your safety glasses – a great idea when snipping dies, too! (Ask me how I know!)
You have some flexibility, but these measurements seemed to work well with proportion of the 1 ½” knob heads. The measurements and colors of this set as shown this set are:
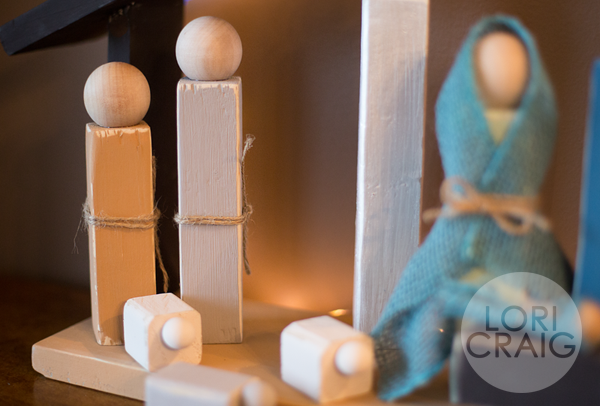
- Joseph – Tommy ART Petroleum – 6 ¾”
- Mary – Tommy ART Pale Blue – 6”
- Angel – Tommy ART Metallic Pearl – 8”
- Manger – Tommy ART Brown Black – 3”
- Shepherd 1 – Tommy ART Dove Grey – 5”
- Shepherd 2 – Tommy ART Wheat – 6”
- 3 Wiseman – Tommy ART Avocado, Plum and Navy Blue – 7” each
- Donkey – Tommy ART Dove Grey – 2”
- Sheep (cut 2) – Tommy ART Cashmere – 1 ½” each
- Cow – Milk and Dark Brown – 3”
The stable shown here is made entirely of scrap wood. My friend Darcie whipped this together for me – in 10 minutes, and I do not have a pattern or angles for the mitered cuts. The base is 6” x 20”. The sides are 7.5” tall on the left and 9.75” tall on the right. The roof pieces are 19.75” and 11.25” long. The pieces were glued with Better Ultimate Adhesive and secured with finishing tacks. The stable was painted with Dark Walnut and Honey Tommy ART Mineral Color.
Step 2: Use a natural bristle brush (these are super affordable at your local craft or discount store!) and apply thin swipes of Tommy ART neutral wax to all of the edges of each 2×2 pieces. Allow the wax to rest about 5 minutes.
Step 3: Paint each of the pieces and allow to dry. Again, the colors shown here are:
Tip: If painting animal heads, glue heads to the animal bodies before painting. (Better Ultimate Adhesive gluing instructions in step 5)
Step 4: Gently wipe edges with sandpaper to remove hints of paint for a slight distress look.
Tip: A damp cloth to wipe dust from pieces is helpful. Use a clean corner of cloth for each different color of paint.
Step 5: To apply heads:
- gently sand the top of each body and apply thin layer of Better Ultimate Adhesive AND
- also apply a thin layer of glue to the flat base of the round knob.
(A special spreading tool is included with each tube of Better Ultimate Adhesive sold, but if that isn’t with your tube, a craft stick works great!) Allow the adhesive to rest on each piece for 1 minute and then apply pressure to match each head with a body. Stand upright and allow glue dry/cure. Adhesive will “set” firm in 2-3 minutes (this gives you a little bit of work time for perfect placement!) and will cure in 24 hours.
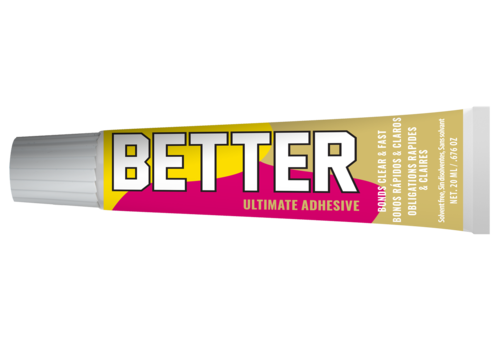
Better Ultimate Adhesive is a all-purpose super glue. It’s great for the garage, home, craft, office, hardware and more. Bonds in 1-2 minutes, NO ODOR, won’t glue your fingers together, incredible hold, and you CANNOT glue the lid to the tube! Use 100% of the product.
Step 6: Accessorize your wisemen with easy Thibra gifts.

Thibra is a sheet of thermoplastic that can be shaped and molded with hot water or a low-temp heat tool. It is easy-to-use, and can be molded, shaped, sculpted and slumped. It paints easily without sanding or priming. Here we’ve used it with a Prima decorative silicone mold and Tommy ART Metallic Color – bronze, gold and copper. Learn how to mold the Thibra and paint the finished pieces with metallic color this short video:
Holds detail beautifully. Super fun.
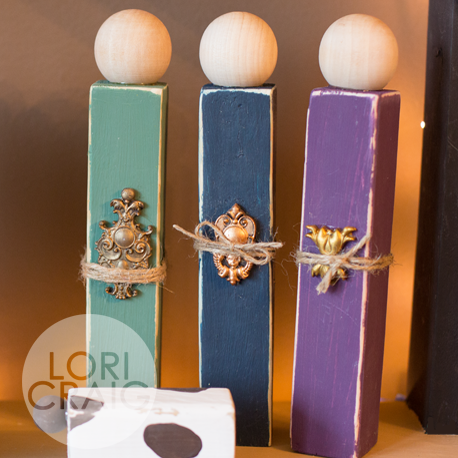
Glue gifts to the front of the wise men with Better Ultimate Adhesive and tie with jute belts.

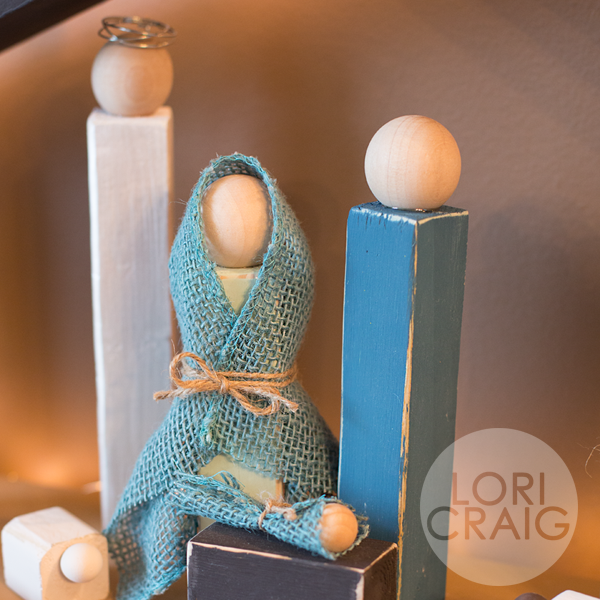
Step 7: The angel shimmers with Tommy Art Pearl Metallic paint and halo. To make the halo, wrap wire around a cylinder (I used the lid of a shampoo bottle), leave a 1-2” wire tail and secure to the back of angel head with Better Ultimate Adhesive.
Tip: Secure halo in place with the wire stem down the back of the body using painter’s tape the head and the body before applying glue. Allow glue to rest and cure with angel face down on table.

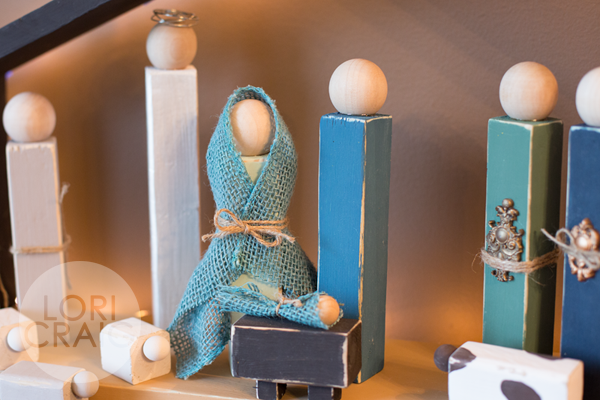
Step 8: Wrap burlap scrap around Mary. Also tie a piece of jute around a scrap of burlap for the swaddled baby. Glue a small ½” knob to swaddling for baby’s head.
Wishing you and yours a beautiful holiday season.


5 responses to “Primitive Nativity”