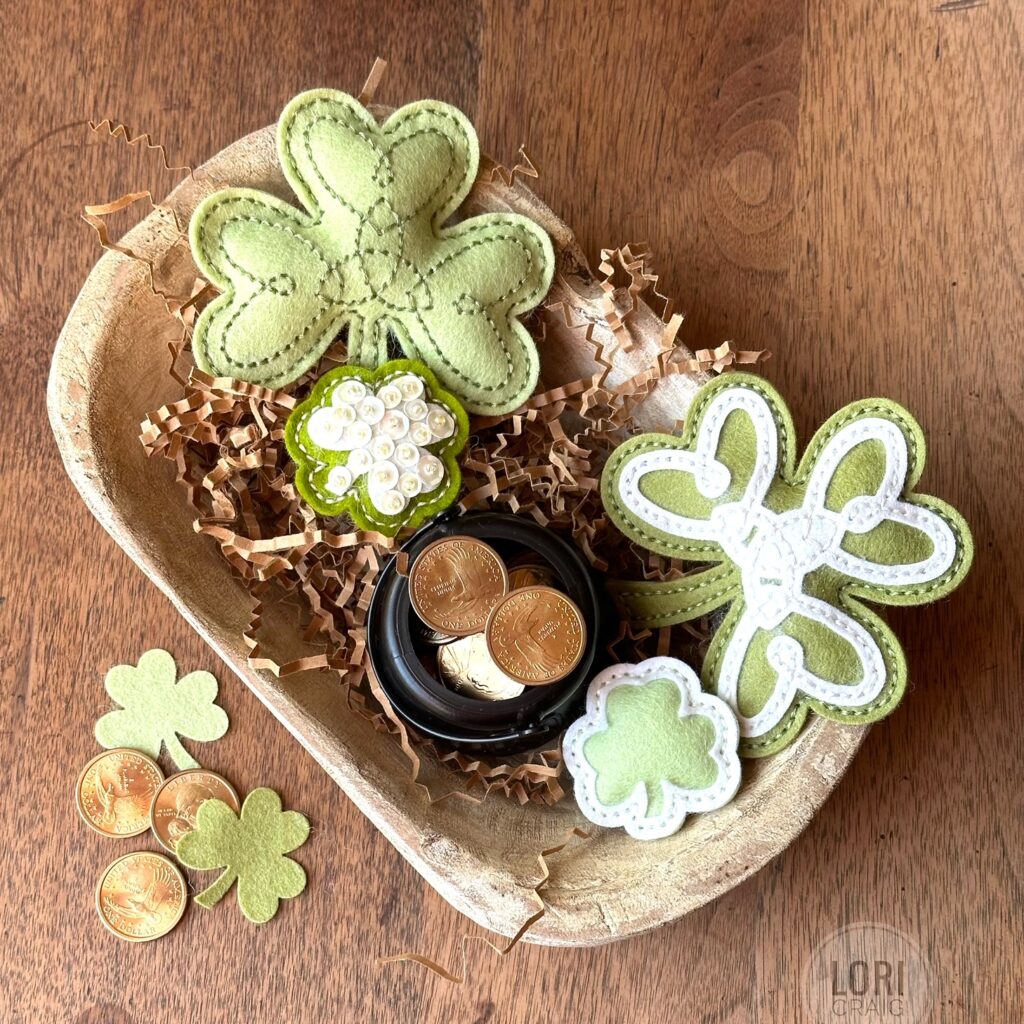
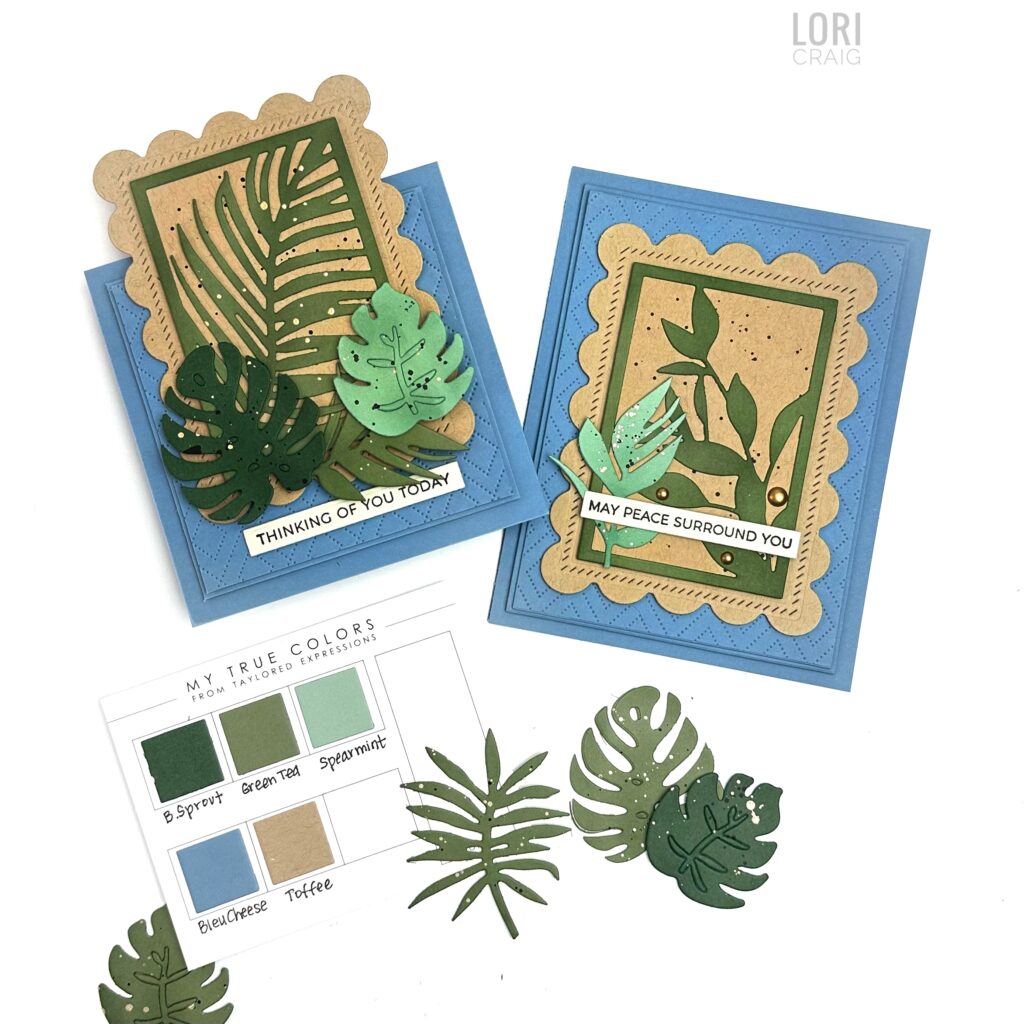
Gorgeous greens and beautiful Bleu Cheese blue are making a grand entry at Taylored Expressions today. Fabulous new hues to the growing TE color palette: Brussels Sprout, Green Tea, Bleu Cheese, and Oat Milk.

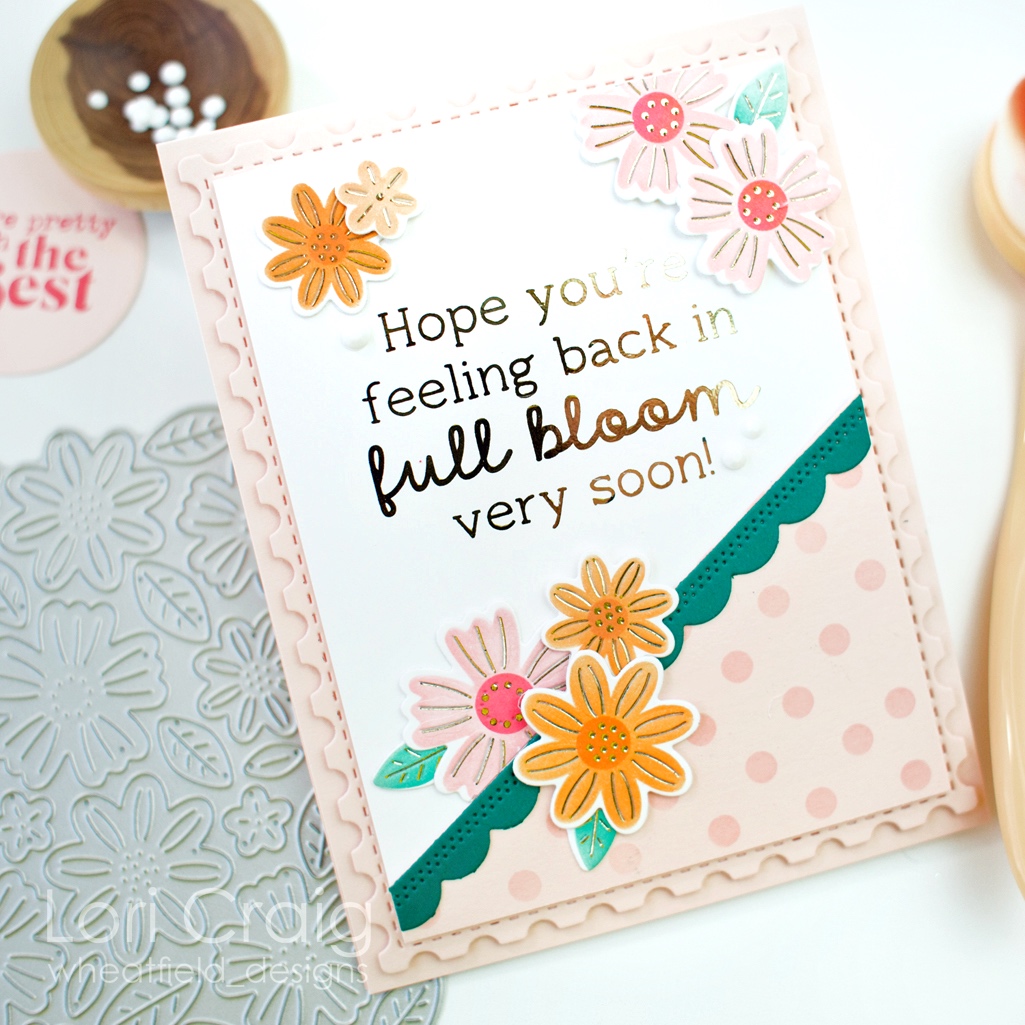
Leaves and elements for these cards are created with a variety of the new colors of inks and cardstock. I threw in Spearmint and Toffee for a soothing color palette.

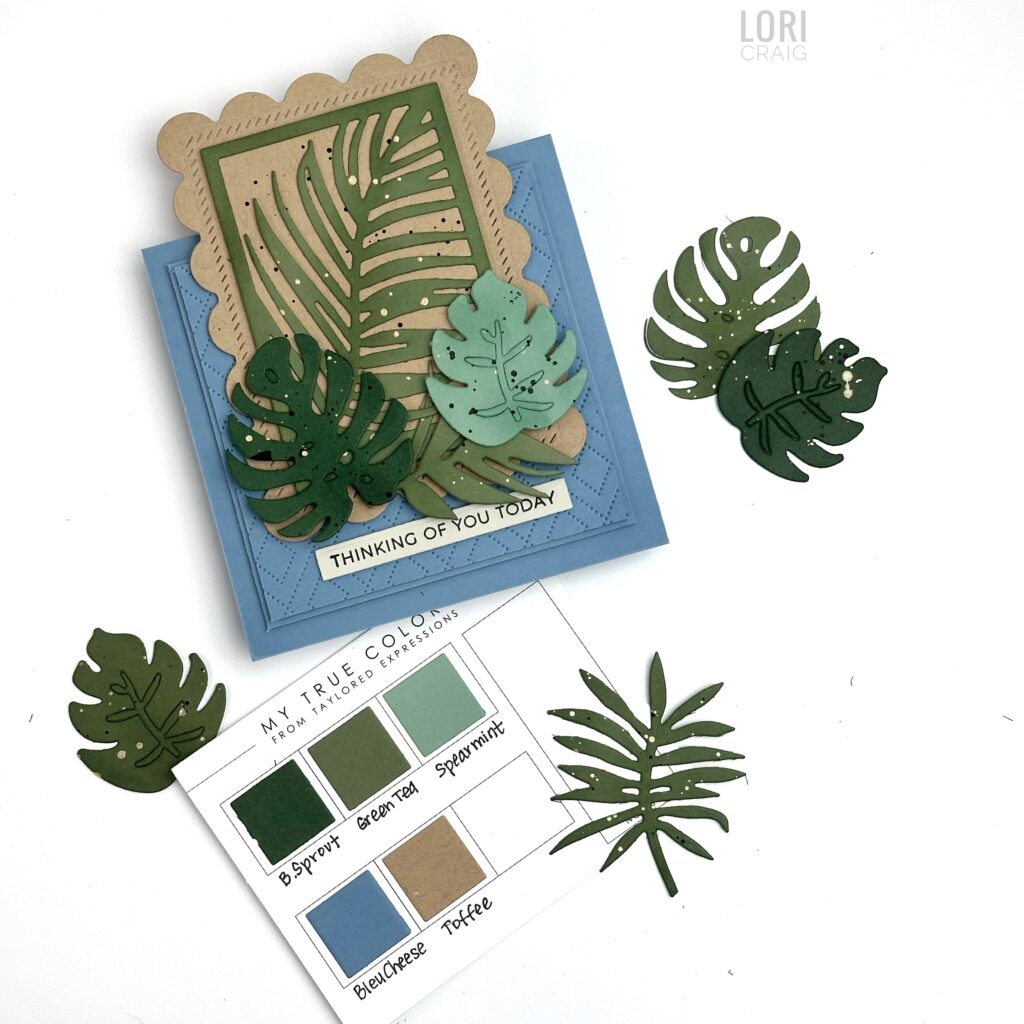
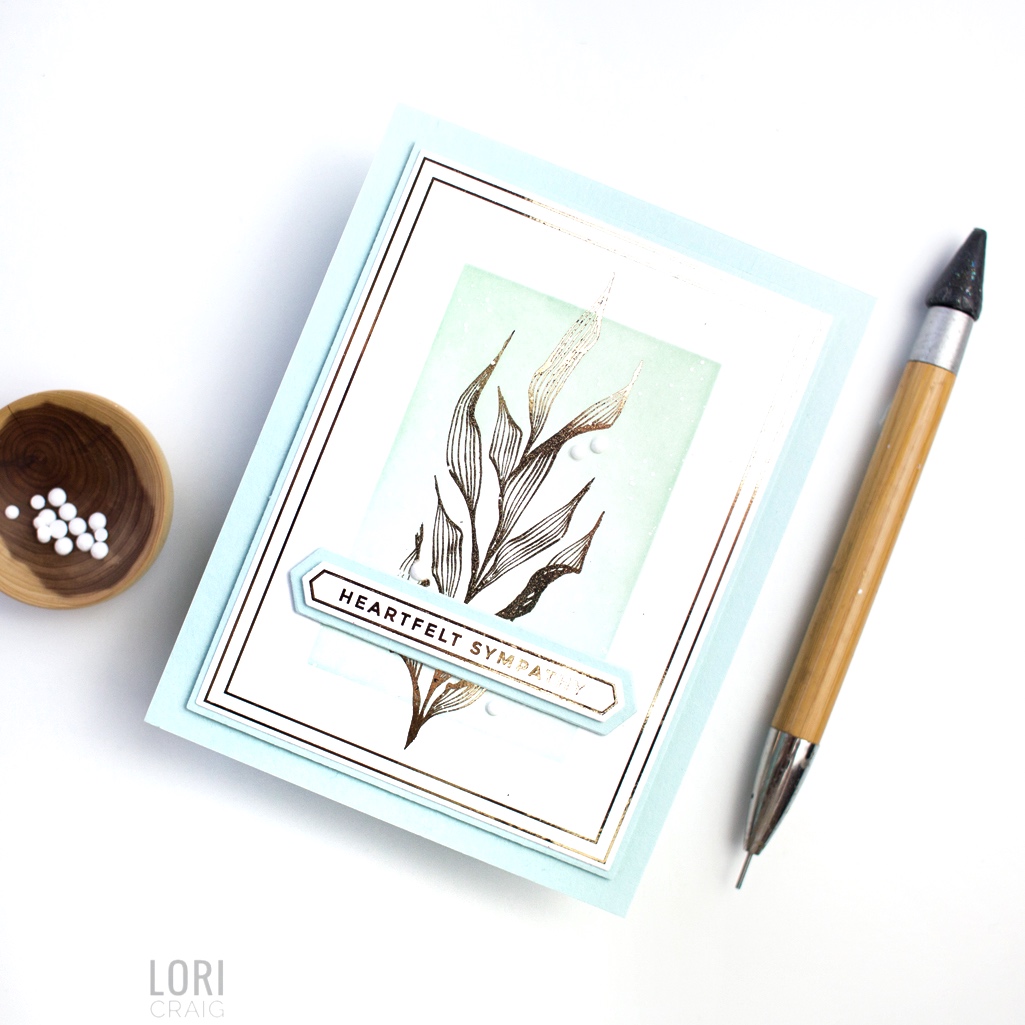
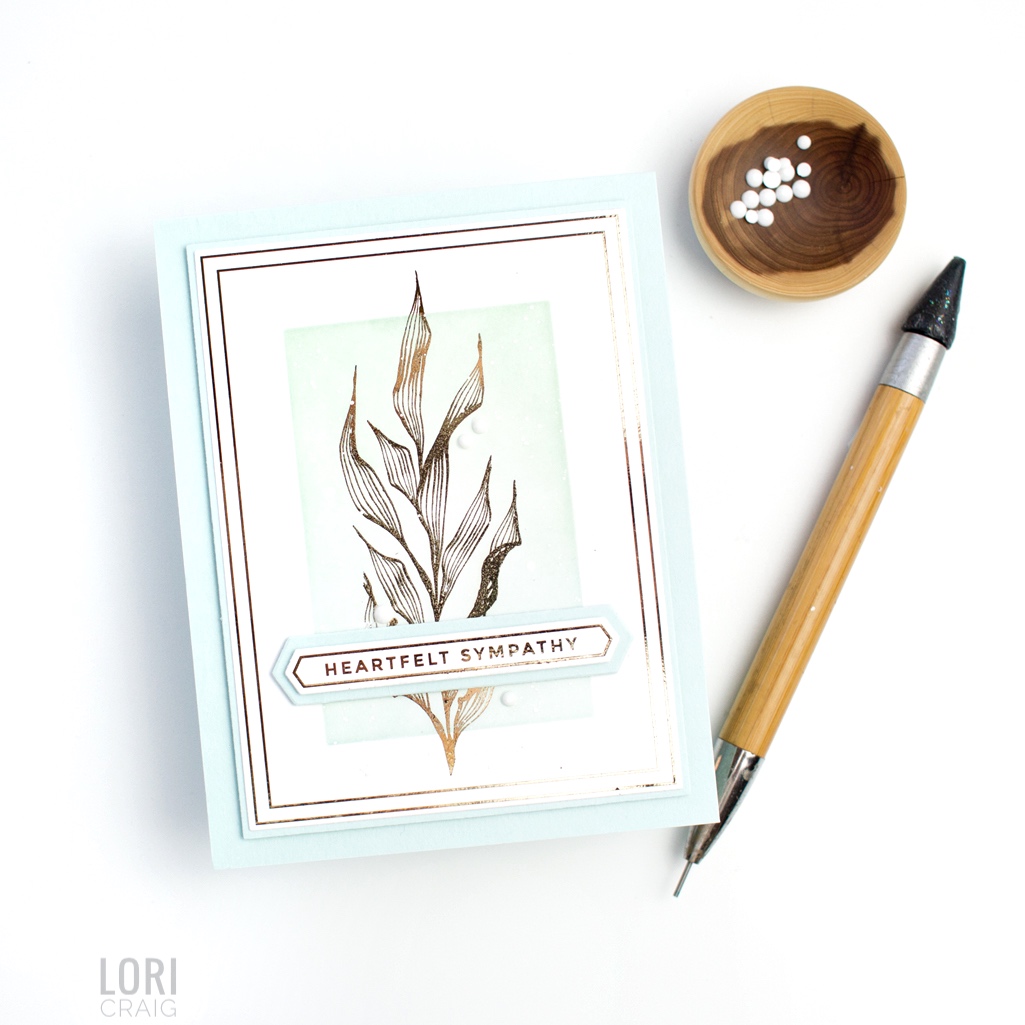
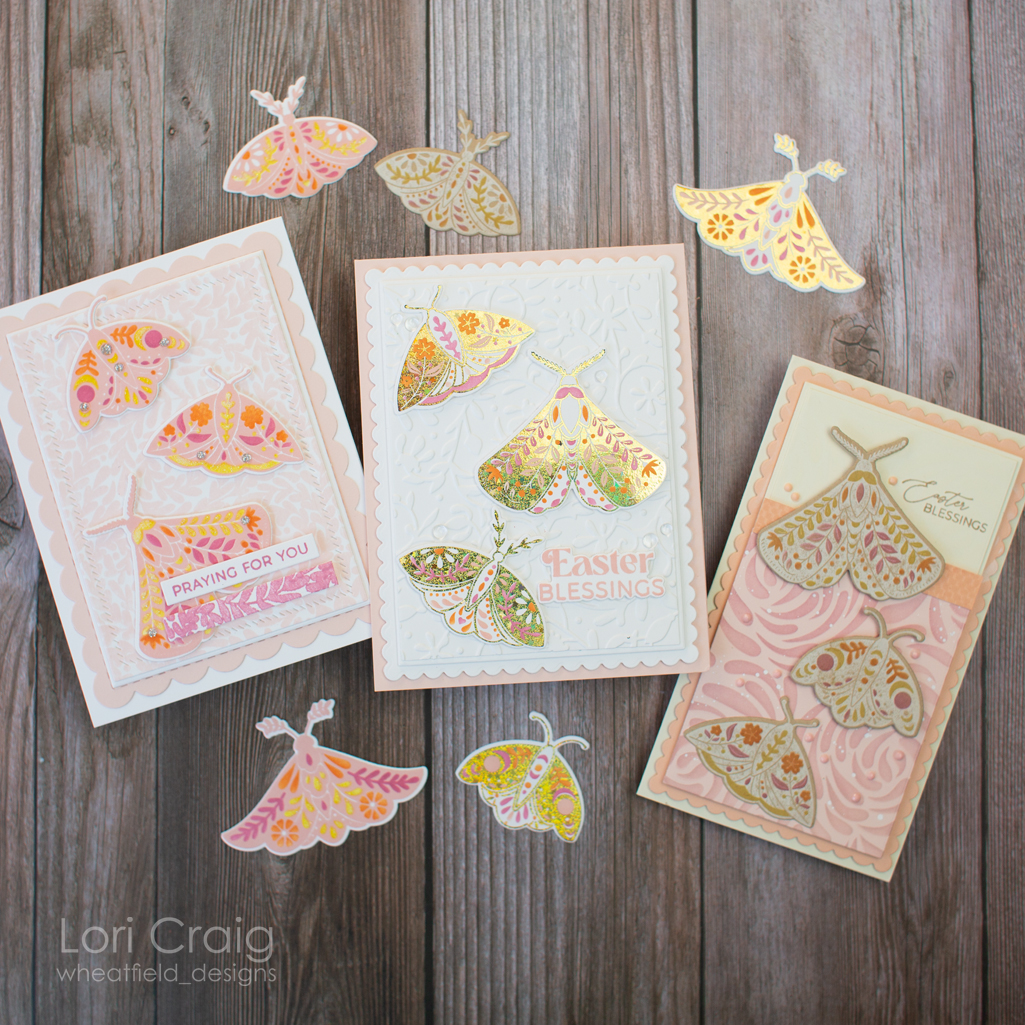
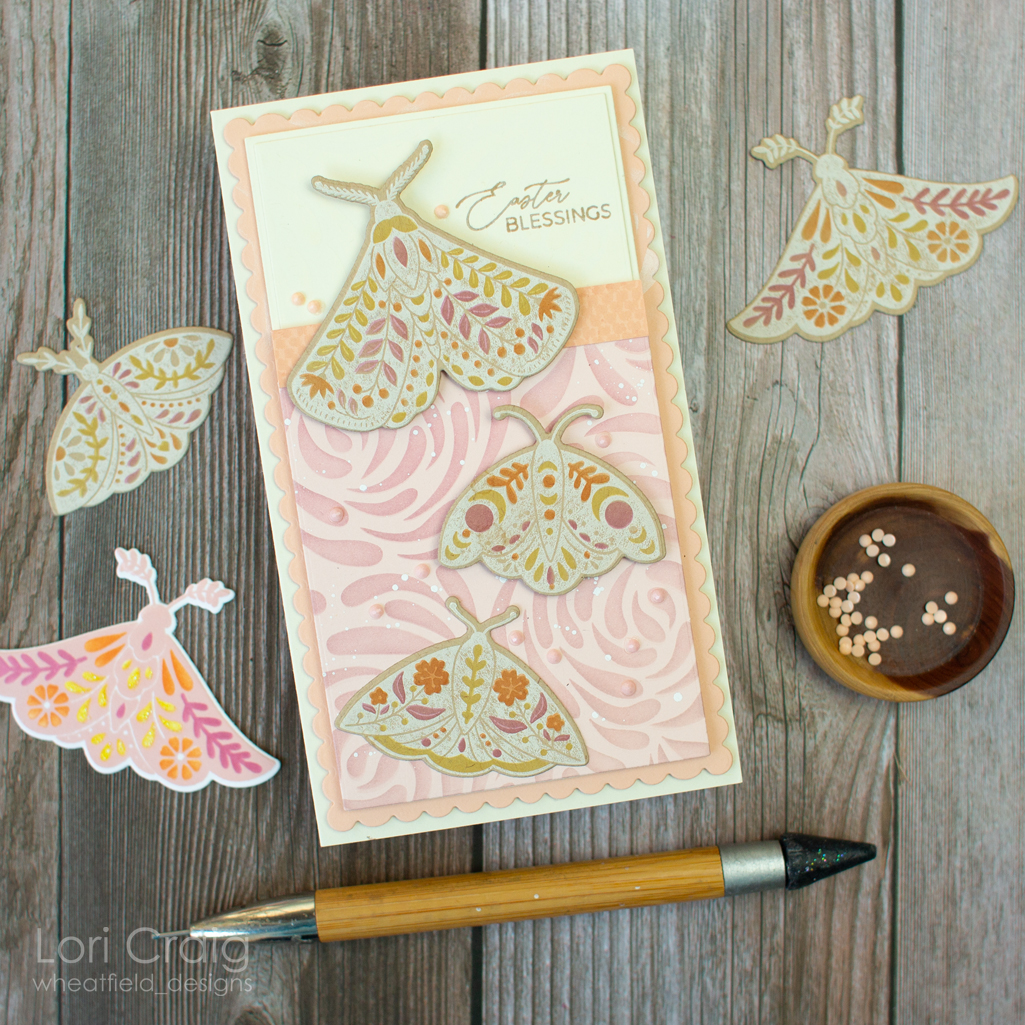
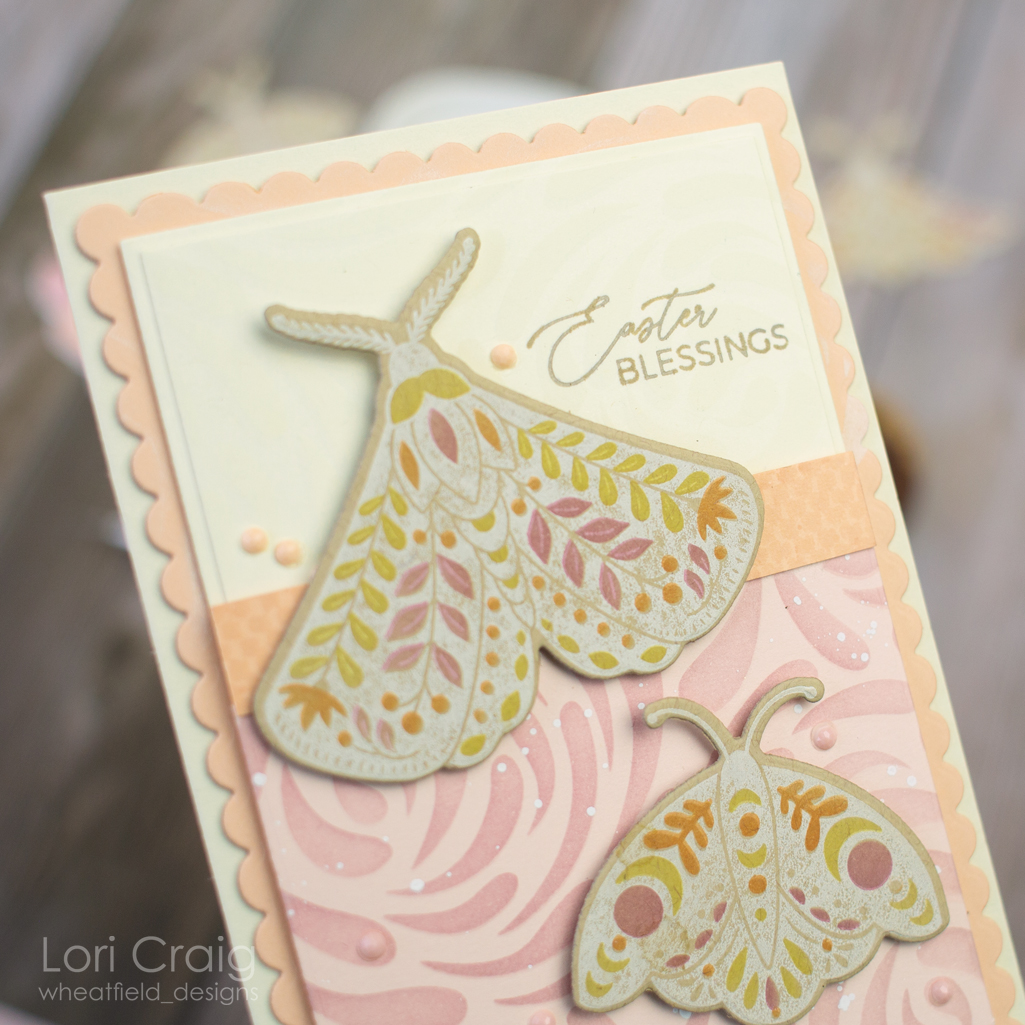
I used the Peace Within collection and Topical Leaves to create a pair of cards that say, I care about what you are facing. The leaves are cut from the array of cardstock colors and blended with ink before being splattered with a combination of PH Martin’s Black Star and Starry Colors watercolor.

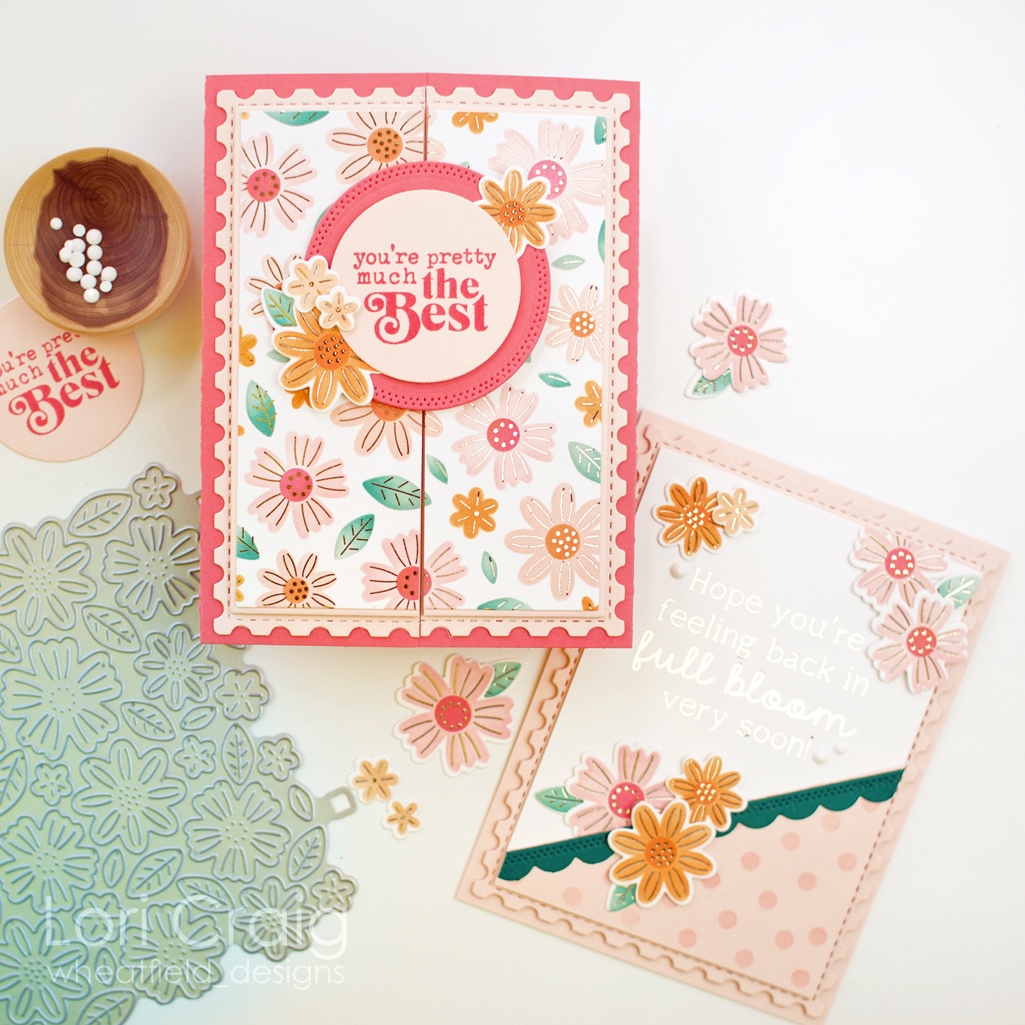
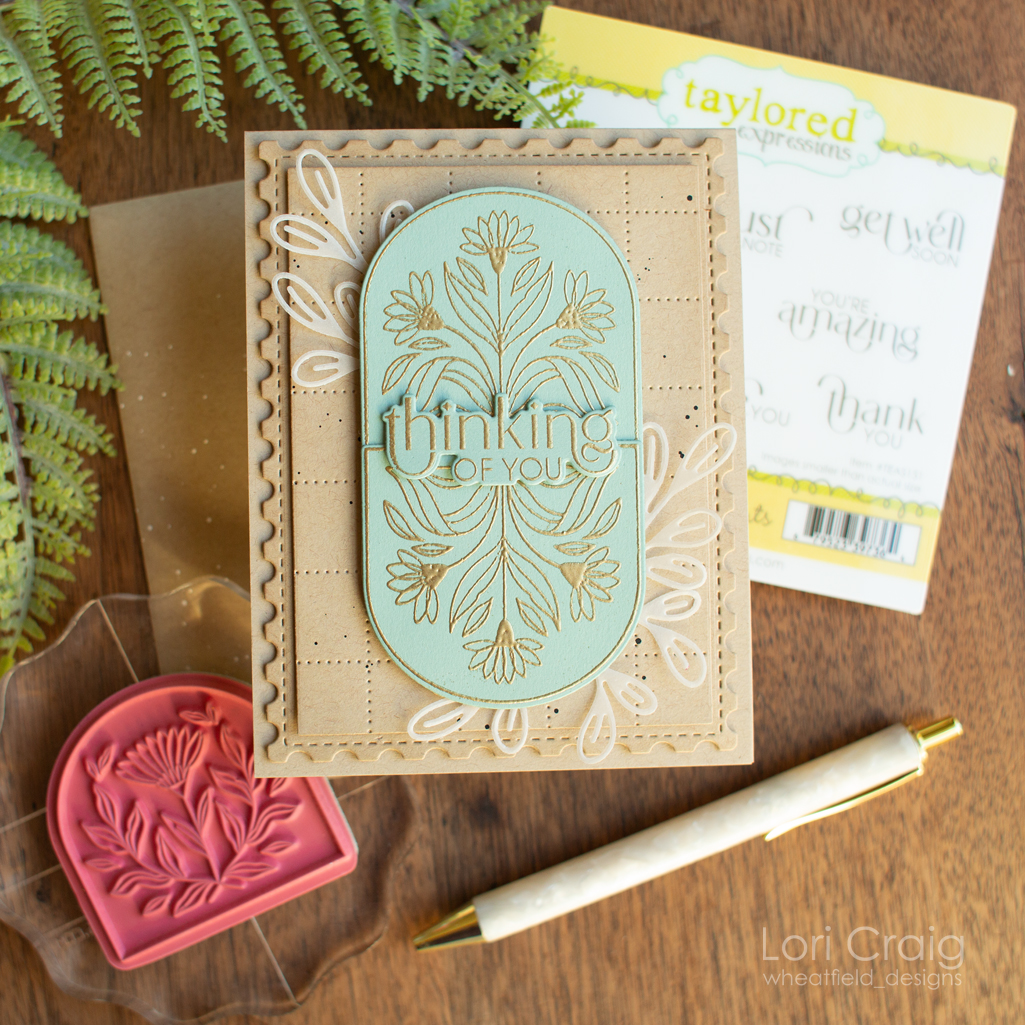
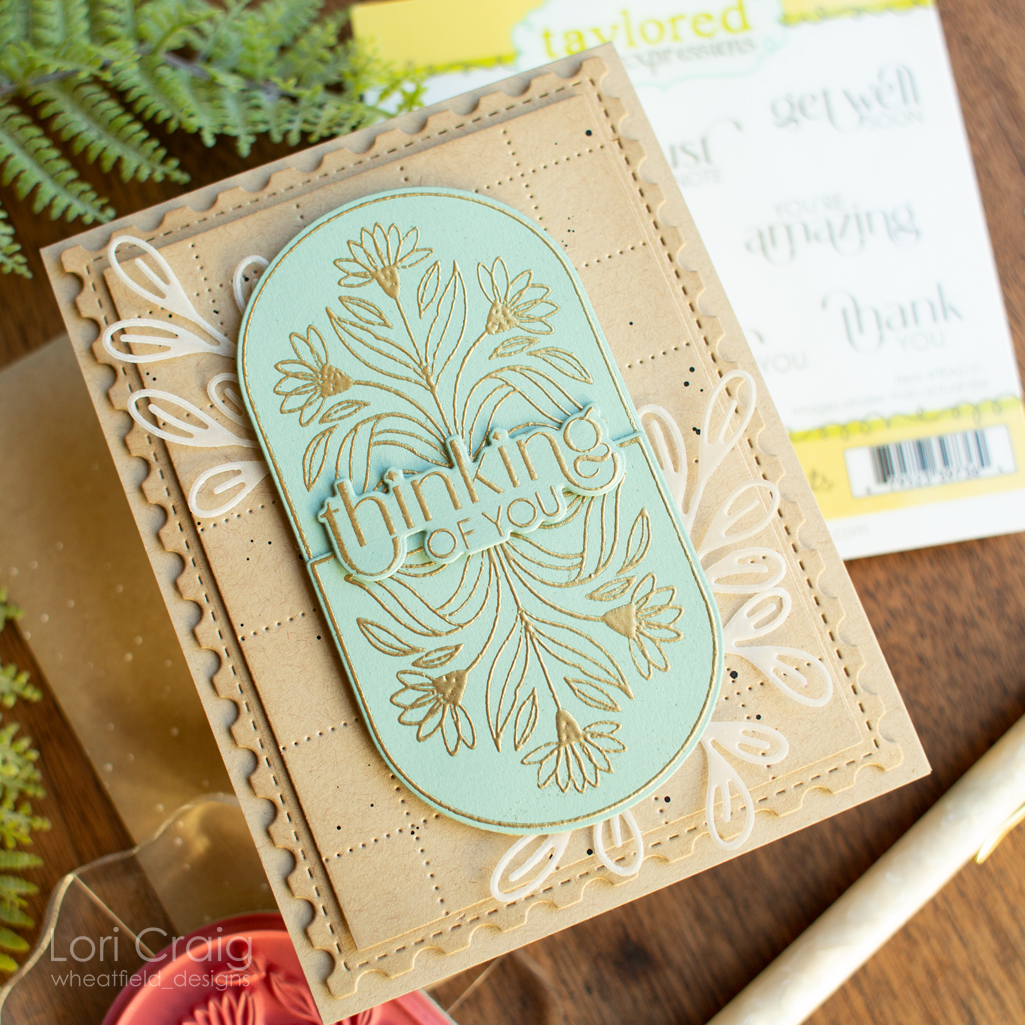
The thinking of you card features a joy-fold top. The card base is created with a 4.24″ square of Bleu Cheese cardstock. The Diamonds Piercing Plate provides a textured backdrop for the scalloped panel created with the Peace Within collection of dies. The scalloped layer is off-set to stick off of the top for a fun popped up message when the card stands upright.

I tucked the sentiment into the bottom of the Tropical Leaves.

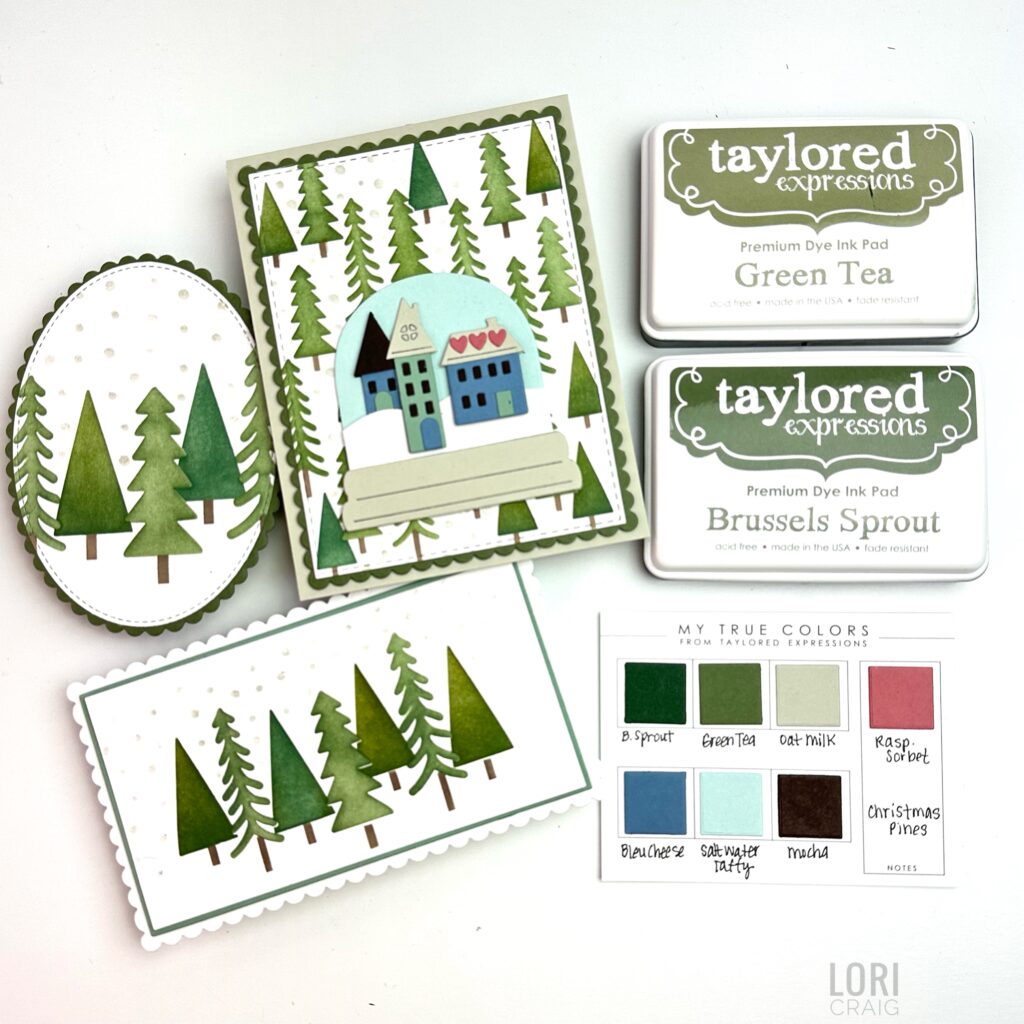
My 2nd set of cards features the Peaceful Pines Create-in-Quad to make gorgeous Christmas tree backgrounds for a Tiny Town snow globe. Perfect Christmas greens with soothing Bleu Cheese accents or a punch of Raspberry Sorbet. These new greens will be a favorite all year long!

Oat Milk ink and a dab of Happy Medium create beautiful snow effect with the Peaceful Pins snow layer. I blended Oat Milk ink first, shifted the stencil slightly and then covered with Happy Medium for a glitter blizzard.

Love the addition of these classic colors to the TE line up. I don’t think you can ever have enough green, and I’ll be reaching for these over and over again.

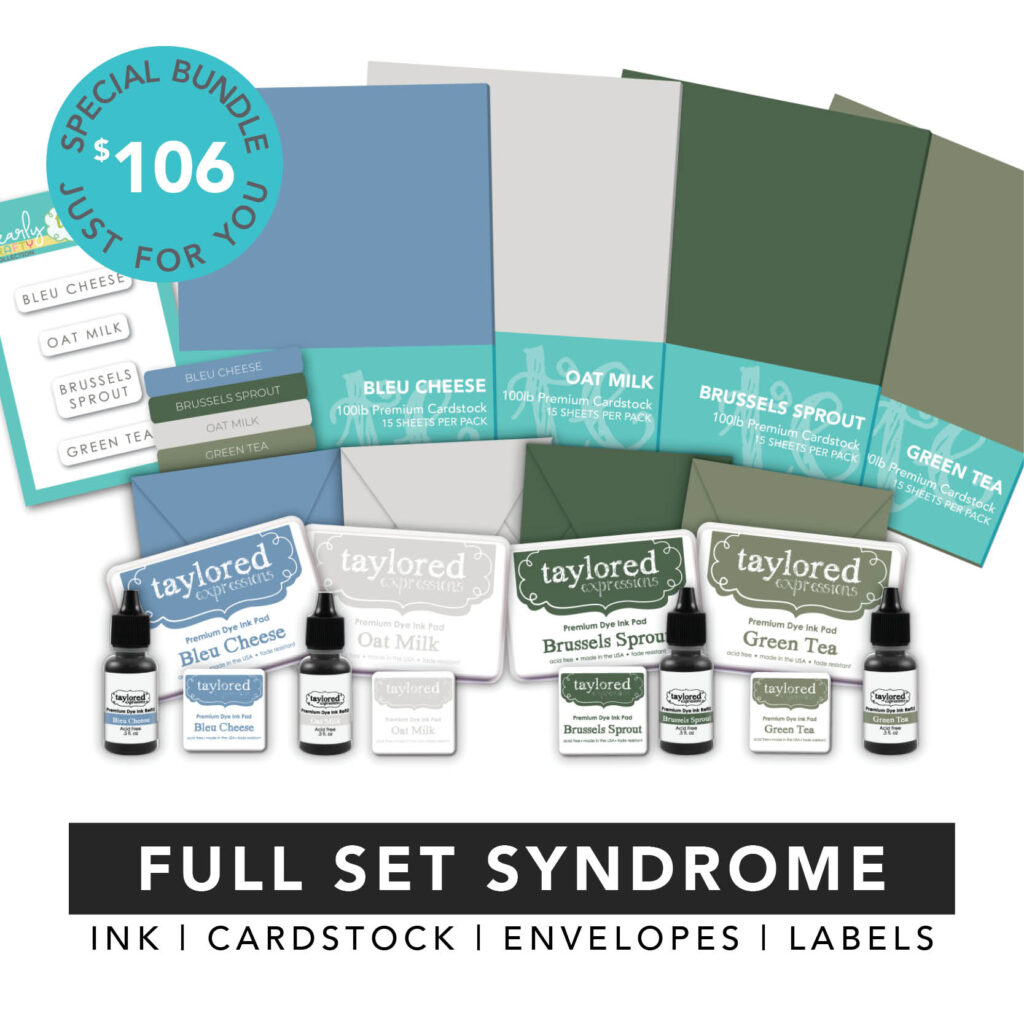
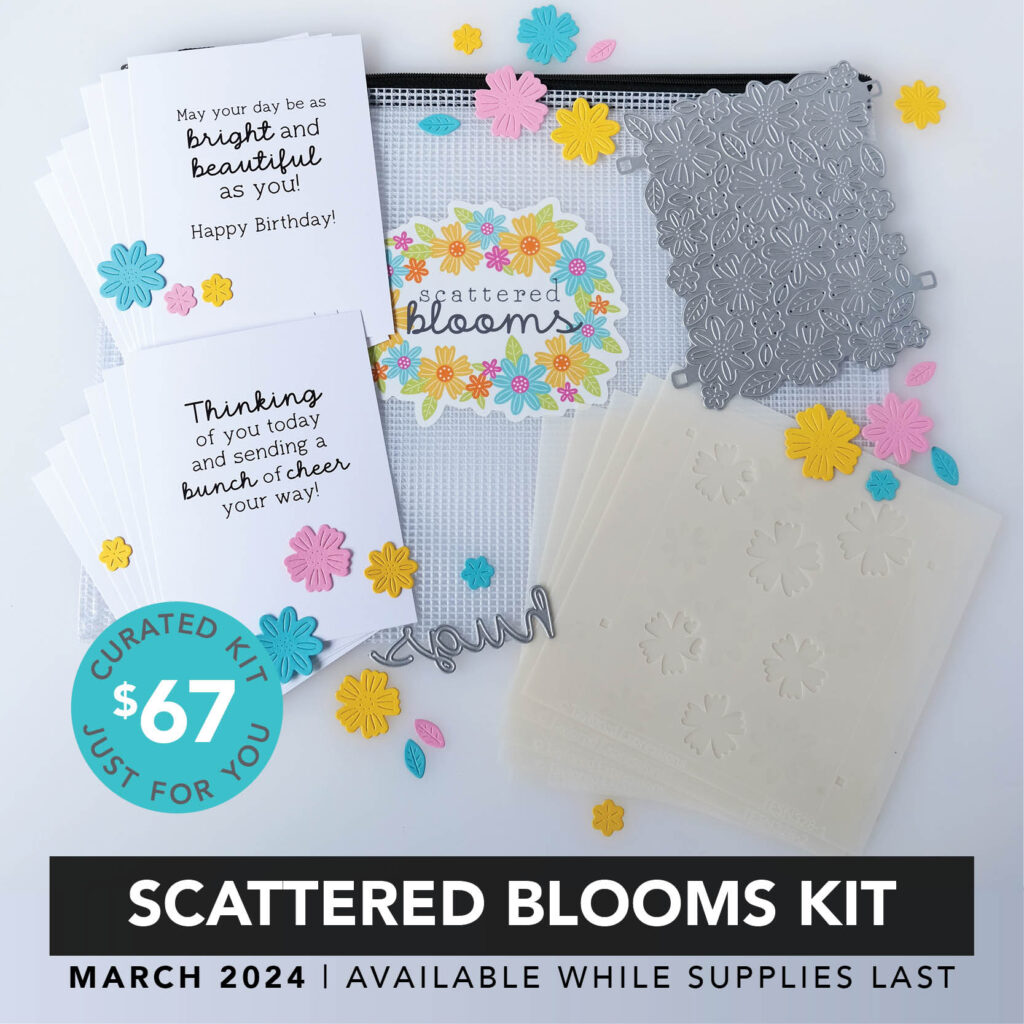
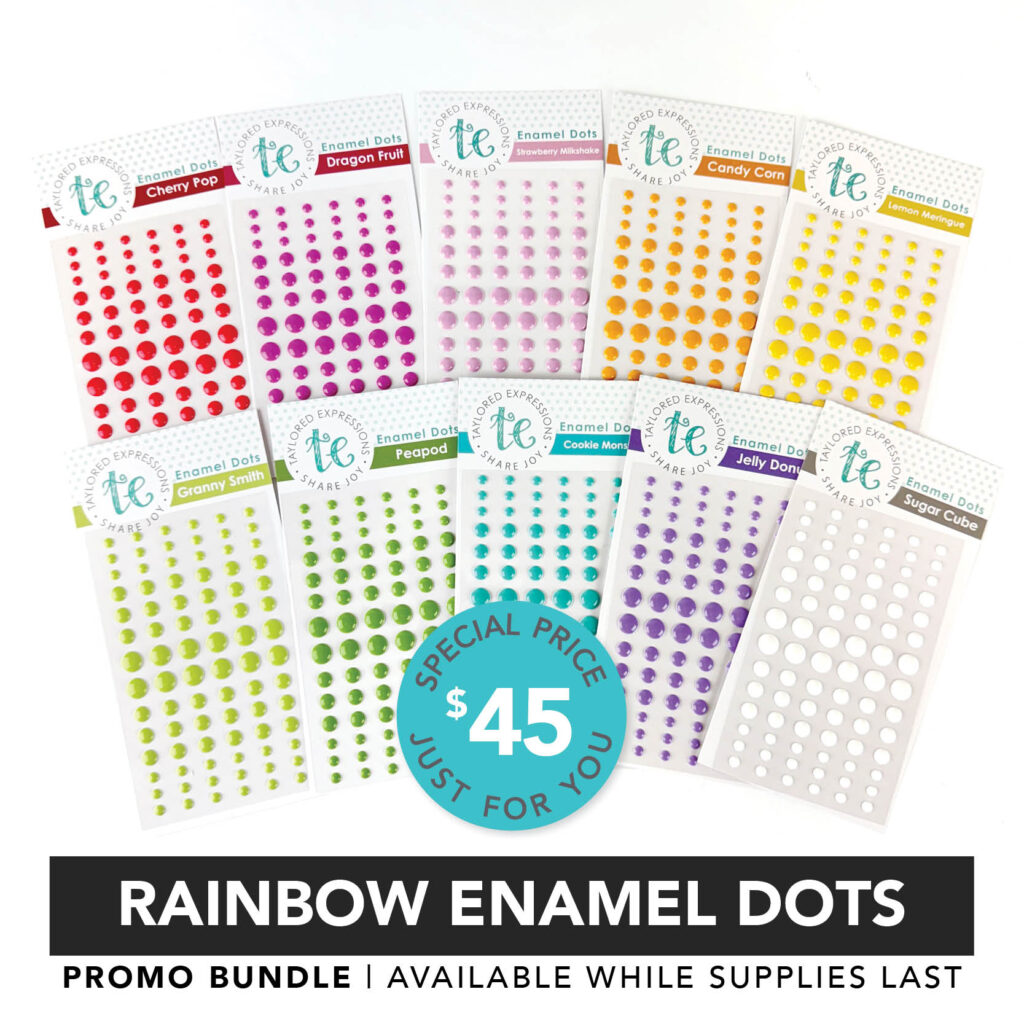
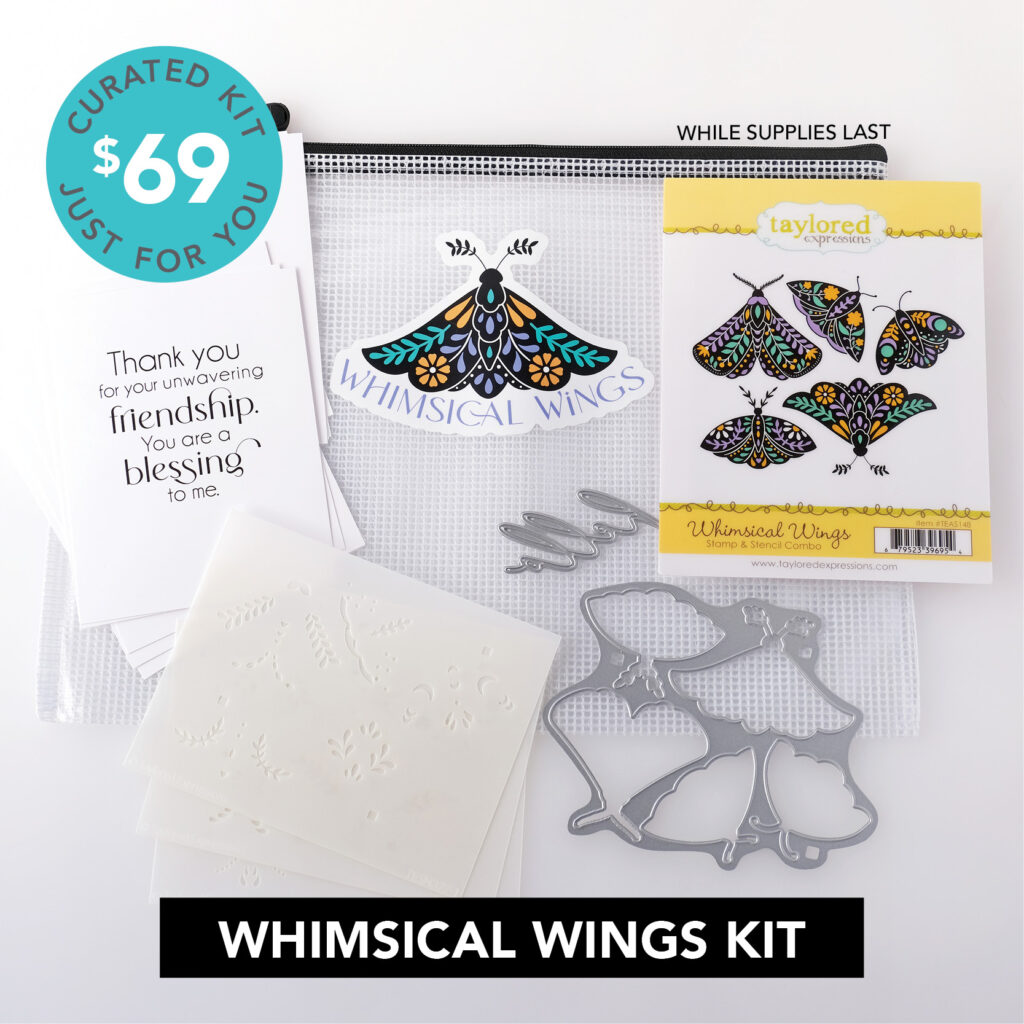
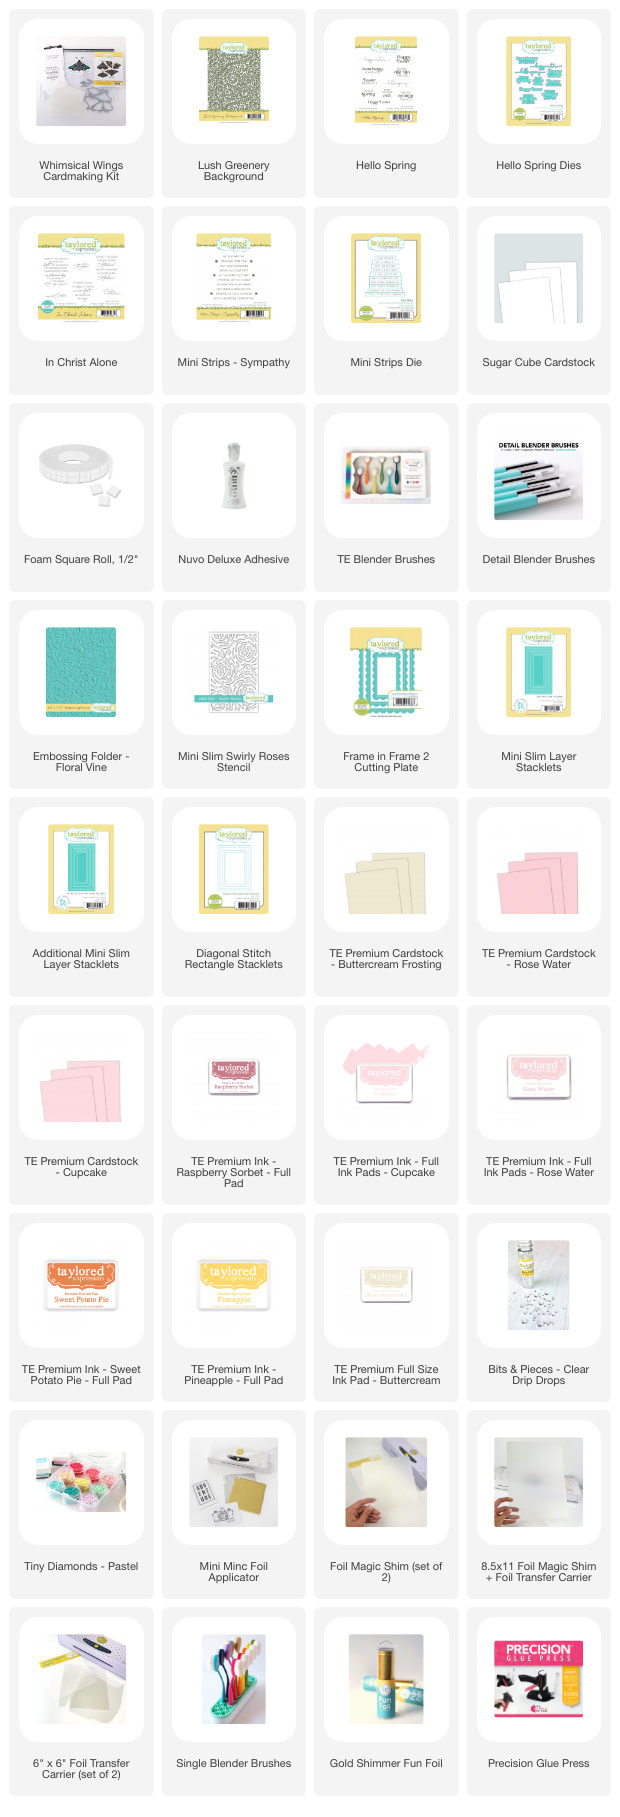
Now for a limited time, we’ve got a Full Set Syndrome Bundle for $106 that includes: 60 sheets of cardstock (15 of each color), 40 A2 envelopes (10 of each color), 4 full size ink pads, 4 mini ink pads, 4 ink refills, True Colors – Shades of Spring stamp set, and True Colors – Shades of Spring labels. It’s a great way to add all 4 colors to your collection and keep them organized! Offer valid while supplies last.


You Bake Me Happy

You bake me happy!

We are celebrating the special women in our lives this week with a release for her. I think the What’s Cooking dies are adorable! I loved pulling them together for a vintage kitchen look with Confetti cardstock and the new Checking In Background. I love the diagonal gingham look, and it’s adorable here.

The die set comes with an array of kitchen items, and you can use them blank or add the layer with the flower motifs that take you back to grandma’s kitchen and the vintage Pyrex. So cute! I layered my kitchen goodies on the scallop layer from the Layer It: Peace Within dies. I did mask off the scallop edge with post-it tape so I could add the Checking In Background.

I can’t believe Mother’s Day is just a few skips down the road, and the MOM die with the Garden Variety 2 dies are fun! With a collection of die cut blooms that kick off spring with the tulips and phlox and then go all the way through summer, you’ll reach for this one time and time again.

I layered the bright blooms over Salt Water Taffy panels that were splattered with ph Martens Bleed Proof White and added a sentiment from You Are Additions. I used My Hero. A few white clay hearts finishes off the design for a cheerful card to honor my Mom.

Love the shift into spring this week with the Taylored Expressions release. All of the products I’ve used are linked below. Keep reading for an amazing summer opportunity!

Something special for this week’s release – win a summer trip to the studio! We’ll be selecting 5 lucky winners to receive a studio visit package! Winners will get a free night hotel stay, local restaurant gift certificates, a goodie bag, studio gift card, and a private tour of the TE headquarters! To be entered to win, follow these 2 steps: Purchase any item from the For Her category Complete Google Form: Click Here That’s it! We’ll be selecting the winners on Tuesday, the 16th on or after 9 am central time! Don’t miss out on your shot at winning trip to our studio – click below to shop For Her!


Foiled Again

Fast and fabulous is the theme for my cards today! Taylored Expressions has a fantastic Foil It release with gorgeous designs to pair with Taylor’s favorite foils and the Mini Minc. The instant glam makes for a gorgeous single layer card or a fabulous base for your stamped or colored images.

For my first card, I used the new Inked Botanical Foil Its which are gorgeous large footprint florals. I am definitely ordering more of these gorgeous panels. Here, I chose to foil the panel in silver and then spotlight Granny Smith, Confetti Cake, and Pineapple circles using circle stencils of varying size and blending brushes. I chose

I finished the panel off with a sentiment from the Modern Sentiment Foil It for a clean and classic birthday card. If you are part of any cardmaking groups that do mass production, Foil It panels are your best friend!

Here’s a second example from the Inked Botanicals Foil It pack. In this example, I colored the larger open areas with OLO Marker and added another sentiment panel from the Modern Sentiment Label pack. I just love this look!

The Garden Gallery Foil It panels allow for gorgeous foiled designs with a little more detail in the line art. I felt like these Garden Gallerly leaves were a perfect pair with a soft blended background.

For both of these designs, I foil first and then apply calculated color over the top of the foil designs.

This blended rectangle is a combination of Salt Water Taffy and Mint Julep ink that’s spattered after blending with pH Martins white and accented with Taylor’s Tiny Diamonds.

Also new this week are backer dies for one of my favorite sentiment sets, Modern Sentiments. First I foiled my sentiment panels, cut with the coordinating die and then finished with a backer layer in the same color as my card base, Salt Water Taffy.

Easy to put together, easy to mail, no extra postage… I’m a big fan of the flat, gorgeous designs that these floral Foil Its allow.

There are so many gorgeous designs and fun bundles being released this week. I’ll be adding more to my stash, for sure.

Get the foiling essentials all together in our Metallic Basics Fun Foil Bundle! This TE Fun Foil bundle retails for $75 and includes Champagne, Gold, Silver, Black, and Rose Gold.

Taylor’s Favorite Rainbow Bundle is sure to bring all of the color and shine to your projects! This special bundle retails for $105 and includes our TE Fun Foil in Cherry Pop, Dragon Fruit, Candy Corn, Lemon Meringue, Lime Zest, Cookie Monster, and Jelly Donut.

Get the foiling essentials all together in our Metallic Basics Fun Foil Bundle! This TE Fun Foil bundle retails for $75 and includes Champagne, Gold, Silver, Black, and Rose Gold.

And, of course, we didn’t forget about our Foil It panels! Right now through 9AM Central on Tuesday, April 9th, the more you buy, the more you save with ANY of our Foil It packs! When you purchase 5 – 9 Foil It packs you will get 10% off and when you purchase 10 or more Foil It packs you will get 20% off! Stock up on all of the new designs and your favorites! Offer valid while supply last.


Scattered Blooms

You’re pretty much the best! Loving the new Scattered Bloom Kit from Taylored Expressions! This stencil and cutting plate die combo create beautiful panels and easy die cut blooms for the sweetest cards. You’ll love the coordinating Foil-It panels to foil the floral details and perfect sentiments for inside or the front of your card.

I used the stencil to create my first panel with Rosewater, Guava, Sweet Potato, Spearmint, and Poblano Premium Inks from Taylored Expressions and created a gate-fold card. I layered the blended panel on Rose Water cardstock cut from the A2 Rectangles and the Postage Stackets , and then I spliced it down the center to create a gate-fold card. The circle sentiment adheres to one side of the center-split to reveal your personal greeting inside.

Gate-fold cards are super easy to put together. Start with a 5.5″ x 8.5″ piece of cardstock that is scored at 2 1/8 from the right and left long sides. Fold the flaps in and voila. I couldn’t help but to blend a second panel that I die cut for floral accents on the sentiment round and inside.

A sweet sentiment from The Insiders – Scattered Blooms is perfect to celebrate a beautiful birthday!

My second card features one of the Foil It: Scattered Blooms panels on the card front.

Hope you’re feeling back in full bloom soon!

I used more blended blooms from the coordinating kit stencils and cut with the Scattered Blooms Cutting Plate to decorate the front.

I made quick work of designing both of my cards using the All Planned Out die-cut set. This incredible set is a gift with $100 purchase this month, and it includes a wide variety of elements to plan layouts and accent your stamped images or sentiments. You can see pieces on the Guava circle layer of the gate-fold card and the diagonal scallop strip as well as the Rose Water triangle layer across the bottom of the “full bloom” card. I used the Pretty Polka stencil to add some tone-on-tone polka dots to the Rose Water before cutting.

So many options with the kit elements and TE’s $100 freebie this week. I think you’ll love everything included in the kit. All products I’ve used are linked below.

The Scattered Blooms kit is $67 packaged in a zippered pouch with a custom sticker. The kit includes:

  • Scattered Blooms Layering Stencil
  • Scattered Blooms Cutting Plate
  • Big Hugs Die
  • The Insiders – Scattered Blooms
  • True Colors Inspiration Cards (Set of 4)

Kit items are not available to purchase individually.

Additional products available to purchase outside of the kit: Scattered Blooms Envelope SealsBig Hugs BackerFoil It – Scattered Blooms, and The Insiders – Scattered Blooms.

Limited quantity available.

Thanks for stopping by!


ROYGBIV Forever

While I’m waiting for the spring flowers, Taylored Expressions has beautiful floral goodness to offer up this morning in their fantastic Sunshine & Rainbows Release. It was 28 degrees during my walk/jog this morning, so I’ll take the paper versions! LOL

The Create-in-Quad: ROYGBIV was first introduced at Stamp Joy last fall, and howdy! It was a favorite! I love the fun rainbow images and blend perfectly for a colorful hello. Here I’ve created a traditional TE rainbow with Lollipop, Candy Corn, Lime Zest, Cookie Monster, and Plum Punch for the vase image in the Quad. The coordinating dies make it easy to clip and pop up. I used the coordinating foil panels for a backdrop that was over-blended with Confetti Cake Premium TE Ink – one of my faves.

I used the Rounded Rectangle Dies and Rounded Rectangle Ridged Stacklets to create a window for my ROYGBIV lovely. The entire design is anchored by die cut clouds. I left the sentiment off so I could add it when it’s time to send off to a friend.

True story… I grabbed a card without a front sentiment for a wedding this weekend. I ended up leaving a CONGRATULATIONS on your graduation sentiment in the wedding card box. Be careful, friends!

How about a ray of sunshine! The Here Comes the Sun Kit last summer was my favorite of the year, and it’s back!

I used the Shine On Stencil over the Shine On Foil It to create a fun burst of color using Mango, Candy Corn, and Lollipop Premium TE inks.

Then I added a window with the Open Scallop Circle to create a shaker card. My shaker is filled with clay cloud confetti and rhinestones. When you shake them around, they reveal a Hello Sunshine message! Finally, I added little butterflies to draw you into the shaker. I blended a panel with the same Mango, Candy Corn, and Lollipop inks, then cut the panel with the Little Bits: Butterflies dies.

Who has been waiting since Black Friday for the  Rainbow Enamel Dots Bundle?? Wait no more! Today it’s live and is $45. The bundle includes:

This special bundle is only available while supplies last!

And, one more something special:

First 750 orders of $75+ receive the Sticker to It – Rainbow Bright for free! So ROYGBIV sweet!

Arch Nouveau & 2025 Calendars

I’m sharing a gorgeous new set from Taylored Expressions today that was designed to go with the beautiful Arched Calendar collection. I’m showcasing the set on a handstamped, heat embossed card.

I stamped the arched floral images on Spearmint cardstock with VersaMark and heat embossed with Gold Embossing Powder. Then I cut the arches with the coordinating dies and layered them with vellum sprigs from the Subtle Sprigs die set and the toffee layer from the Pierced Grid (FAVORITE!) cutting plate. I stacked it all on the a Postage Stacklet layer that was brushed with Toffee ink for a little bit of depth and weight on the bottom. Finally, I added a gold embossed sentiment from the Sundry Sentiment set. I love the font in this one, and I love how this card turned out.

The Arch Nouveau Bundle includes a free class this month. Check it out:

The Arch Nouveau Bundle that I used to create my card is $79 and includes:

Next up, with a twist on my traditional style, I created some calendar panels with the new 2025 Mini Tear Off Calendars and a stack of Office Funnies. These were fun to put together.

I created legal pad backgrounds with the Notebook Paper Background – you do have to mask off the vertical lines to stamp pink, and then reverse mask to stamp the blue, but I think it was it was worth the effort. I colored a few of my images with Prismacolor Colored Pencils and one with OLO Marker.

Finally, I used the Alphabet die to add NOTED and MEMO to the edges. A fun and easy gift for your favorite co-workers.


2025 Mini & Square Tear Off Calendars
2025 Landscape Desk Calendar
2025 5×7 Calendar
2025 Arched Desk Calendar
4 NEW pre-printed calendar cardsOffice Funnies
In the Word 3
Birth Flowers
Gus & Gertie
Cats & Dogs pre-printed calendar cards (originally offered in the Advent Calendar)
NEW I’m A Hugger dies: Lamb Die & Clear Combo & Unicorn Die & Clear Combo
Arch Nouveau Bundle

There are so many styles of calendars to choose from in this week’s Taylored Expressions release. Funny, punny, beautiful or cute – there is something for everyone!


Whimsical Wings

It’s Taylored Expressions Kit Day with a beautiful new kit called Whimsical Wings! The thing I love about this kit is that you create a variety of moths with each stamped impression and a single pass through the die cutting machine. I always love getting more bang for my buck with stamps that create multiples, and this delivers!

Whimsical Wings is a stamp and stencil combo that creates these winged beauties with dies, seals and foil its in a zippered pouch for easy creating.

Here I’ve used a color combination of Rose Water, Peaches n Cream, Buttercream Frosting, and Pineapple for a soft Easter palette. I loved how this mini slim card turned out.

One of the things I love about TE stamps is the crisp look that you only achieve with red rubber stamps. Look at the detail on the moth antennae. This was 2 different impressions and still so crisp.

The roses background was created with the Mini Slim Swirly Roses Stencil. I stamped the moths in Buttercream pigment ink and added stenciled details with the Pineapple, Rosewater, Sweet Potato, and Raspberry Sorbet Premium Inks and Blender Brushes. The Peaches n Cream strip of cardstock was stamped tone-on-tone with the Burlap Background stamp. I splattered some white and added Taylor’s Tiny Diamonds for a touch of dimension. The sentiment is from the set In Christ Alone.

For my second card, I used Gold Shimmer Foil and the Whimsical Wings Foil It panels to create a collection of beautiful moths. These remind me of the thin, gilded accessories that you see in higher-end gift shops. So pretty. I accented the wings with Sweet Potato, Cupcake, and Rose Water Ink. The winged things rest on a layer of Sugar Cube cardstock that’s been embossed with the Floral Vine Embossing Folder.

Here’s a tilted peek at the shimmer texture you get with the Gold Shimmer Foil. LOVE!

The sentiment is from the stamp set, Hello Spring. After layering on a scalloped white rectangle, I added some clear drip drops to finish the design.

My last sample for today features a soft pink bed for the moths that I created with the Lush Greenery Background stamp. I inked and stamped the background piece in Rosewater Premium Ink before adding winged things. The sentiment was added from Mini Strips – Sympathy, and I used the background stamp again in a coordinating color to create one strip to ground the sentiment.

The color palette here is Rosewater, Cupcake, Sweet Potato, and Pineapple. So springy!

I finished off the design with a large scalloped frame cut from the Frame in Frame 2 cutting plate and the Diagonal Rectangle die adds just a hint of depth to the inside frame. Finally, a few silver rhinestones to bring a touch of glitter to this design.

]The Whimsical Wings Kit is $69, is packaged in a zippered pouch with a custom sticker, and incudes:


Whimsical Wings Stamp & Stencil Combo
Whimsical Wings Coordinating Die
Signature Hello die
The Insiders – Whimsical Wings
True Colors Inspiration Cards (set of 4)

Most kit items are not available to purchase individually.


Easter Blessings

Many blessings to share today with the new Taylored Expressions Easter release!

I love the fresh feelings that abound around Easter and Spring. All things made new. There are fun, lighthearted things and deep, meaningful things all around.

Gifts and special moments to share. There is something for all elements of the season in today’s product release.

My first project shares the Folk Eggs bundle from Taylored Expressions along with a special stamp/stencil combo that is a free gift with $100 purchase while supplies last. The free gift with purchase is called Flower Fields, and I used it here as a backdrop for the Folk Eggs without the stamp for bright, spring greenery in the backdrop.

The stamp & stencil Folk Eggs combo is easy to line up, stamp, fill-in with blender brush color using the coordinating stencils, and die cut all four pieces in one pass.

The Egg Cups may be my favorite thing. So simple and sweet in an array of spring colors.

This combo of products is included in a special treat: Folk Egg Bundle for $112 and includes:

  • Folk Eggs Stamp & Stencil Combo set
  • Folk Eggs die
  • Easter Egg Cups die
  • Hello Spring sentiments rubber stamps
  • Hello Spring die
  • Foil It – Hello Spring

Next up, it’s Iconic Easter with adorable bunny and chick for simple, sweet cards and tags. Here, I’ve paired the dies from the Layer It: Piece Within dies released last week. The layering dies are a wonderful size, and include all three elements shown here: rectangle layer, coordinating diagonal impression layer, and the scalloped backdrop.

I’ve used the Take Two Pretty Polka stencil to add some tone-on-tone glow-up to my dies cut from classic spring pastels ( Cupcake, Lavendar Glaze, and Salt Water Taffy). The sentiments are stamped and cut from Hello Spring, also being released today.

How adorable are the mini Egg Cartons – available today. They are the perfect size to package treats and a little hello without breaking the bank and in the best clean creamy white color. I used Sugar Cube ink and the Take Two Pretty Polka stencil to add white polka dots to a kraft paper that I cut into strips before adding the ribbons and tags. So cute alone, and just adorable when stacked together.

Last today, but certainly not least of a favorite, this card features a beautiful new sentiment set, In Christ Alone and a suite of beautiful spring bouquets from the Fittingly Floral Collection. First, I foiled three panels from the Foil It pack. I’ve stamped it in VersaClair Black ink over the foiled arch panel (all foil is Champagne color) and splattered with a tiny paintbrush and pH Martin’s Black Star ink. Next, I used the Fittingly Floral Foil Its coordinating stencils to create swags. I foiled two panels, blended a combination of Banana Cream Pie, Peaches and Cream, Cupcake and Peapod TE Premium Inks over the flowers. Then I used OLO Marker to bring a little bit of depth to the floral centers (RV0.2 and Y2.2). I cut the swags with the coordinating dies and trimmed one of the pieces to make a lower corner accent. The entire panel is layered on Peaches and Cream cardstock.

So many pretties to choose from today! I hope you have a beautiful spring and enjoy crafting for this special season!

Poshta Design Spring Release

It’s LUCKY release day at Poshta Design, and I’m thrilled to corral all of my projects in one spot! I’ve had so much fun creating for their spring release.

Poshta Design is a fabulous small family business dedicated to creating suites of dies to cut and stitch beautiful felt decor for all holidays and occasions. They are based in the Midwest, and they live up to the motto – Midwest is Best. I just adore their products and the owners.

My favorites of the release are the Shamrocks and Celtic Details to create adorable St. Patrick’s Day gifts, decor bowl fillers, or banners.

I’m not normally one to decorate for St. Patrick’s Day, but I’m in love with these. The Celtic Knot Details coordinate with the Lucky Shamrock and are just darling.

The Lucky Shamrock can be dressed up with sequins or left simply stunning. That’s the mark of a beautiful product, in my opinion.

Next up, I loved adding Embroidered Egg Details to the Poshta Design Basic Egg die. I paired mine with a combination of sweet spring pastels and embellishing with sequins and seed beads.

So soft, and just the right addition to my Easter dough bowls.

Little Red was one of the projects I stitched several times because I think it’s just adorable, especially on show with Just Hatched Details. Just Hatched also coordinates with Basic Egg for fun chicklet additions. I think these are so cute and will be popular all year with all of the free-range chicken ladies!

So sweet! I’ve added a few little eggs under the Little Red – I cut them from the Mini Egg Basket Detail dies, and felt like the size was perfect proportions to Little Red.

Here is another look at Little Red in the beautiful Dreamcicle Color Story Collection, also available today!

Poshta Design Color Stories are special because they include felt in a wonderful palette of color with threads, sequins, and seed beads to make pulling beautiful projects together thoughtful and easy.

How about a closer look at the Mini Egg Basket Details? I have stuffed all of my ornaments with fiber-fill, but you could use quilt batting for a flatter look that allows you to stuff the pocket with trinkets or candy. My girls are all grown up, so I went full stuffing, and I love it.

A special thank you to Elizabeth at Poshta for inviting me to create so many lovelies this week. What a treat for me, and I hope I’ve inspired you as you begin your spring crafting projects!

Thank you for stopping by!

Bumper Crop of Felt Cuteness

There is a bumper crop of cute new felted projects in my near future! I am thrilled to be a guest designer this month for Poshta Design, and today is the first day of sneak peeks of all things spring and Easter!

The carrot bowl fillers are actually made with a genius little add-on to the Sewing Kit Essentials: Scissor Keeper that was released last fall from Poshta Design. Carrot Crop dies add root texture to the scissor keeper cone shape, and a leafy topper is perfect to finish them off.

I chose to stuff and stitch mine closed, but they would be adorable little cone treat pouches, as well.

One of the things I love about Poshta Design is their curated Color Stories, and this is a sneak peek of a project I am working on for later in the week that features the new Creamsicle Color Story. Inspired by sunset colors, this one has me dreaming of summer days that won’t be too long now. How delicious is this Marmalade, Calypso (new color), Coral Reef, Amethyst, and Chantilly palette? Complete with felt, beads, thread and sequins, you will be creating instantly when your box arrives.

My final project to share today is the adorable Mini Egg Basket Details die that coordinates perfectly with the previously released Basic Egg die. This sweet addition to the Basic Egg Collection transforms your eggs into tiny Easter baskets. Use the pinked grass, diminutive egg, and flower fillers to create a charming array of designs. It’s the perfect little pouch, tucked into a spring dough bowl.

Please note: This die coordinates with the Basic Egg Die. This die does not cut the egg shape, just the basket and filler details.

Be sure to check the Poshta Design Blog this week for all of the intricate details of this sweet release. I’ll be back tomorrow with a little luck o the Irish to share! Thanks for stopping by!